Dungeon Playbook
Current poolMidnight · Season 2Altar of Fangs
A poison-heavy Midnight dungeon where clean utility assignments, mandatory totem objectives, disciplined pulls, and three execution-focused bosses decide the key.
Reviewed for Midnight Season 2 · Last checked Sep 2026
- Bosses charted
- 3
- Dangerous pulls
- 9
- Priority casts
- 6
Dungeon Overview
The shape of the key before the detailed calls.
A poison-and-control dungeon with mandatory objectives and execution-heavy bosses
Expect recurring group damage, sharp tank pressure, poison and magic utility checks, and several mechanics where one missed assignment immediately creates a second problem.
Altar of Fangs asks the group to solve several different jobs instead of brute-forcing one damage check. The opening route is tied to six Caustic Mist Totems, the middle wing rewards hard stops and poison removal, and the final approach ends with a mandatory elite before Zul’jan.
The practical rule is simple: name the kick, name the stop, and do not make the healer own every utility failure. Clean positioning on Rav’i, coordinated Toxic Atrophy interrupts on the Writhing Coil, and assigned beam lanes on Zul’jan matter more than squeezing one extra pack into a cooldown window.
- Poison management
- Coordinated kicks
- Hard stops
- Mandatory totems
- Boss positioning
- Group-wide damage
Dungeon Profile
- Tank Pressure
- High
- Harrowers, stacking Ravenous Descendants, Chieftain Dismember, Rattling Writhe, the Ascendant Serpent, and boss busters require planned mitigation and careful facing.
- Group Damage
- Very High
- Blood Sacrifice, Rattle, Synchronized Venom, Death Rattle, Living Venom deaths, and boss ritual phases repeatedly pressure all five players.
- Interrupt Demand
- Very High
- Piercing Hiss, Envenom, Mass Envenom, and repeated Toxic Atrophy casts need an actual kick plan, while Evolve specifically needs hard crowd control.
- Movement
- High
- The group must dodge sweeping frontals and charges, break Death Rattle tethers, avoid tornadoes and shockwaves, and manage Zul’jan’s beam and axe lanes.
- Dispel / Utility Demand
- Very High
- Magic removal or freedom effects answer Paralyzing Shots, poison removal covers failed Envenoms, disease removal fixes a Regurgitate hit, and an enrage soothe helps Ravenous Descendants.
- Route Complexity
- Moderate
- The route is mostly linear, but six opening totems, four post-Coil totems, mandatory elites, and dangerous pull combinations punish skipped objectives and overpulling.
Dungeon visual · Abstract flow
Dungeon Tactical Overview
A route-flow chart, not dungeon geometry. Read left-to-right on wide screens or top-to-bottom on mobile.
- StartKICK
Opening objectives
6 Caustic Mist Totems
Pulls 1–4
- Stage 2Bloodlust / Heroism
Rav’i
Clean pile + shield break
Pulls 5
- Stage 3STOP
Control wing
Evolve stops + Rattle cooldown
Pulls 6–8
- Stage 4MOVE
Writhing Coil
3 kicks → break tethers
Pulls 9
- Stage 5DEFENSIVE
Poison gate
Elite checkpoint + Mass Envenom
Pulls 10–12
- Stage 6Bloodlust / Heroism
Zul’jan
4 beams + planned venom clears
Pulls 13
Before You Queue
- Recognize the three must-kick casts — Piercing Hiss, Mass Envenom, and Toxic Atrophy are the casts the group cannot casually trade. Review →
- Assign a hard stop for Evolve — Evolve is a stop check, not a conventional kick. Name a stun, incap, fear, disorient, or displacement before the first Evolutionist. Review →
- Audit the group’s utility — Know who can remove magic, poison, and disease effects, who can soothe an enrage, and who can provide freedom-style movement removal. Review →
- Learn Rav’i’s safe pile — The Tank must keep Rav’i nearest the Carrion Pile without Fresh Meat before Ssscavenging.
- Pre-assign Zul’jan’s four beam lanes — Each beam needs a player. Decide where everyone starts and use Boneslicer to clear Ritual Venom on purpose.
- Know the Blackwake default — Complete every required totem on the first pass, split Evolutionists, and plan Bloodlust/Heroism for Rav’i and Zul’jan. Review →
The Things That Wipe the Key
The few failure points most likely to cost the timer.
- PositioningTankHealerDPS
The wrong Carrion Pile on Rav’i
Fresh Meat lands on two piles. Keep Rav’i beside the remaining clean pile before Ssscavenging, then soak Messy Eater impacts and break the shield immediately.
Consequence: Feeding Frenzy creates a much larger shield and extends escalating group damage long enough to overwhelm the party.
- InterruptTankHealerDPS
No kick left for the real cast
Assign Piercing Hiss and Mass Envenom before the pull, then preserve three kicks for each Toxic Atrophy sequence on the Writhing Coil and its split adds.
Consequence: A missed priority cast can cripple the group, apply party-wide poison pressure, or destabilize the Coil intermission.
- StopTankDPS
Treating Evolve like a kick
High Evolutionists must be hard-stopped during Evolve. Use valid crowd control and keep ordinary interrupts for Envenom or Mass Envenom.
Consequence: The Evolutionist heals and upgrades single-target Envenom into group-wide Mass Envenom pressure.
- MovementTankHealerDPS
Death Rattle tethers stay connected
Every player must run away promptly to break Vine Grip. Regroup the spawned Writhes for cleave, control their fixates, and interrupt their Toxic Atrophy casts.
Consequence: Unbroken tethers keep heavy party damage rolling and delay the damage window until the group collapses.
- PositioningTankHealerDPS
A beam reaches Zul’jan
One player intercepts each of the four Ritual of the Fang beams. Track the resulting Ritual Venom and clear it deliberately with Boneslicer before it expires.
Consequence: An unsoaked beam empowers Zul’jan with stacking party damage; uncleared Ritual Venom expires for lethal damage.
- RouteTankHealerDPS
Opening every pressure source at once
Do not combine a Ritual Chieftain’s pulsing totem and healing absorb with uncontrolled Harrowers, Serpents, or stacked Descendants unless the group planned the cooldowns and utility.
Consequence: Tank damage, group damage, paralysis, and kick requirements overlap faster than a learning group can recover.
Boss Playbook
The fight in 20 seconds, what matters, and the most common wipe.
Boss 1
Rav’i
A positioning and shield-break fight: keep Rav’i beside the clean Carrion Pile, spread Triple Shot, soak Messy Eater impacts, and end Ssscavenging quickly.
The Fight in 20 Seconds
Fresh Meat lands on two Carrion Piles after Ravenous Stomp. The Tank moves Rav’i beside the remaining clean pile before Ssscavenging; the group soaks Messy Eater impacts and burns the absorb shield while the Healer covers rising Carrion Burst damage. Spread Triple Shot and dodge Regurgitate waves between shield phases.
What Actually Matters
- Ravenous Stomp and Fresh Meat
The Stomp hits the party and marks two Carrion Piles with Fresh Meat. Identify the unmarked pile immediately and move Rav’i beside it before her energy empties.
- Ssscavenging
Rav’i eats from the nearest pile, gains an absorb shield, and pulses Carrion Burst until the shield breaks. A Fresh Meat pile triggers Feeding Frenzy and a much harder recovery.
- Messy Eater
Soak every ground impact during Ssscavenging. Missing an impact adds avoidable group damage during the fight’s largest healing check.
- Triple Shot
Multiple players receive damage around themselves. Loosely spread so marked players do not cleave one another, especially during Stomp or shield pressure.
- Regurgitate
Acid waves travel toward a player. Dodge the frontal pattern; a hit leaves a Disease effect that only appropriate Disease removal can clear.
Dungeon visual · Illustrated positioning
Rav’i Carrion Pile Control
Illustrated positioning for the pile handoff, role spread, boss movement, shield break, and chunk soaks.
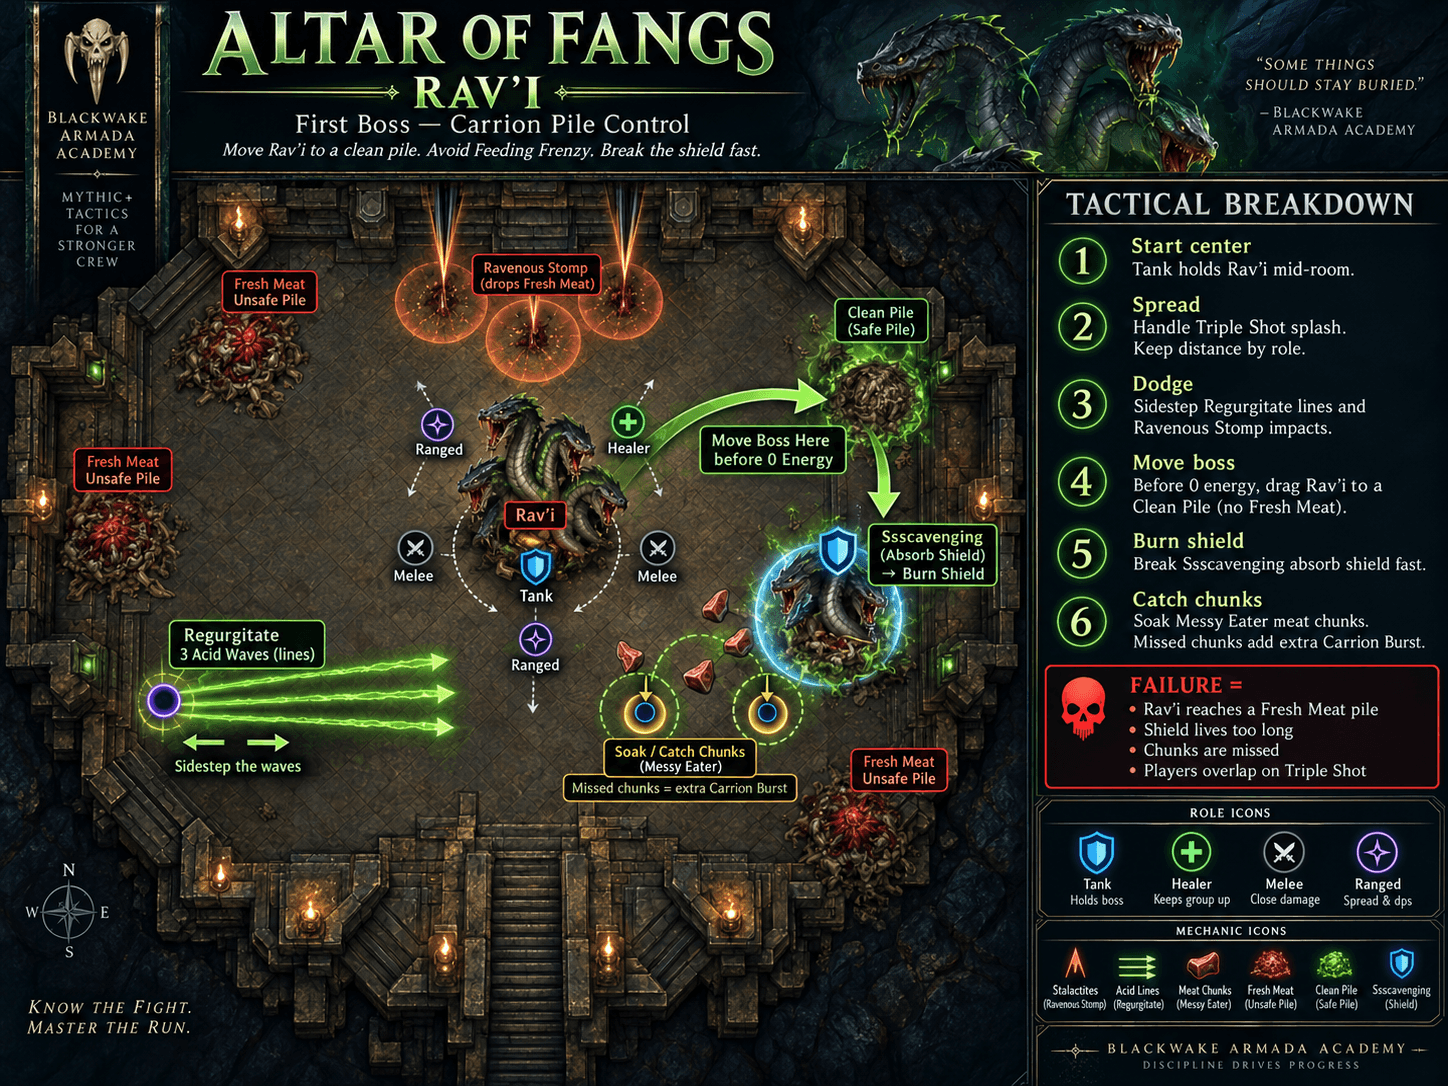
- 1. Identify the two piles marked by Fresh Meat after Ravenous Stomp.
- 2. Move Rav’i beside the unmarked pile before Ssscavenging.
- 3. Keep the party loosely spread and out of the unsafe pile lanes.
- 4. Soak Messy Eater impacts and break the shield quickly.
Tank
- After each Ravenous Stomp, identify the Carrion Pile without Fresh Meat and position Rav’i beside it before Ssscavenging.
- Keep the boss stable enough for the party to see and soak Messy Eater impacts without crossing dangerous lanes.
- Use active mitigation for Hydrastrike and do not let a late reposition select a meat-filled pile.
Healer
- Top the group before Ravenous Stomp and watch Triple Shot targets for overlap.
- Use a healing cooldown during Ssscavenging until the absorb shield breaks; the duration depends on group damage.
- Regurgitate applies a Disease on a hit. Remove it only if your class can; otherwise commit healing to that target.
DPS
- Pool enough damage to break every Ssscavenging shield quickly; shield damage shortens Carrion Burst exposure.
- Soak every Messy Eater impact, spread Triple Shot, and dodge Regurgitate rather than finishing a cast in the wave.
- Use the clean-pile call as a positioning cue and avoid standing between Rav’i and Fresh Meat.
Defensive Timing
- Use a personal for Ravenous Stomp when Triple Shot or another damage event overlaps.
- Use personals early during Ssscavenging if the shield is not breaking quickly; waiting until Carrion Burst has ramped is less effective.
Bloodlust / Heroism: Strong Blackwake default on the pull. It shortens the first boss and gives immediate value before the first shield, while still letting the group pool shorter cooldowns for Ssscavenging.
Common Wipe: Rav’i reaches a Fresh Meat pile, triggers Feeding Frenzy, and the group cannot break the enlarged shield before Carrion Burst overwhelms the healer.
- Ravenous Stomp and Fresh Meat
Boss 2
The Writhing Coil
A sustained-damage and coordination fight built around three-kick Toxic Atrophy sequences, breaking Death Rattle tethers, and controlling five mirrored-health Writhes.
The Fight in 20 Seconds
Maintain a three-player Toxic Atrophy kick order while the Healer covers Synchronized Venom. Dodge Burrowing Charge and the follow-up Venom Jet. When Death Rattle begins, every player runs to break Vine Grip; then group and control the five Uncoiled Writhes, interrupt their casts, and avoid the late Undermining lines before they reform.
What Actually Matters
- Toxic Atrophy
The boss casts it three times in sequence. Assign three interrupts before the pull; during Uncoil, multiple Writhes can cast it and need marked kicks or emergency stops.
- Vindictive Onslaught
Burrowing Charge targets a direction, followed by Venom Jet. Leave the charge line and keep the follow-up frontal pointed away from allies before stepping clear.
- Death Rattle
Vine Grip tethers every player and deals heavy group damage until each tether breaks. Stop casting and run away immediately.
- Uncoil
The boss splits into five fixating Writhes that mirror damage back to the boss. Group them, control the fixates, and deal priority cleave while maintaining Toxic Atrophy interrupts.
- Undermining
At the end of the split, the Writhes create shockwave lines as they return to the center. Keep moving and do not stand in the reform path.
Dungeon visual · Illustrated mechanic sequence
Writhing Coil: Death Rattle to Reform
The sequence emphasizes the order of operations: movement first, then add control and damage.
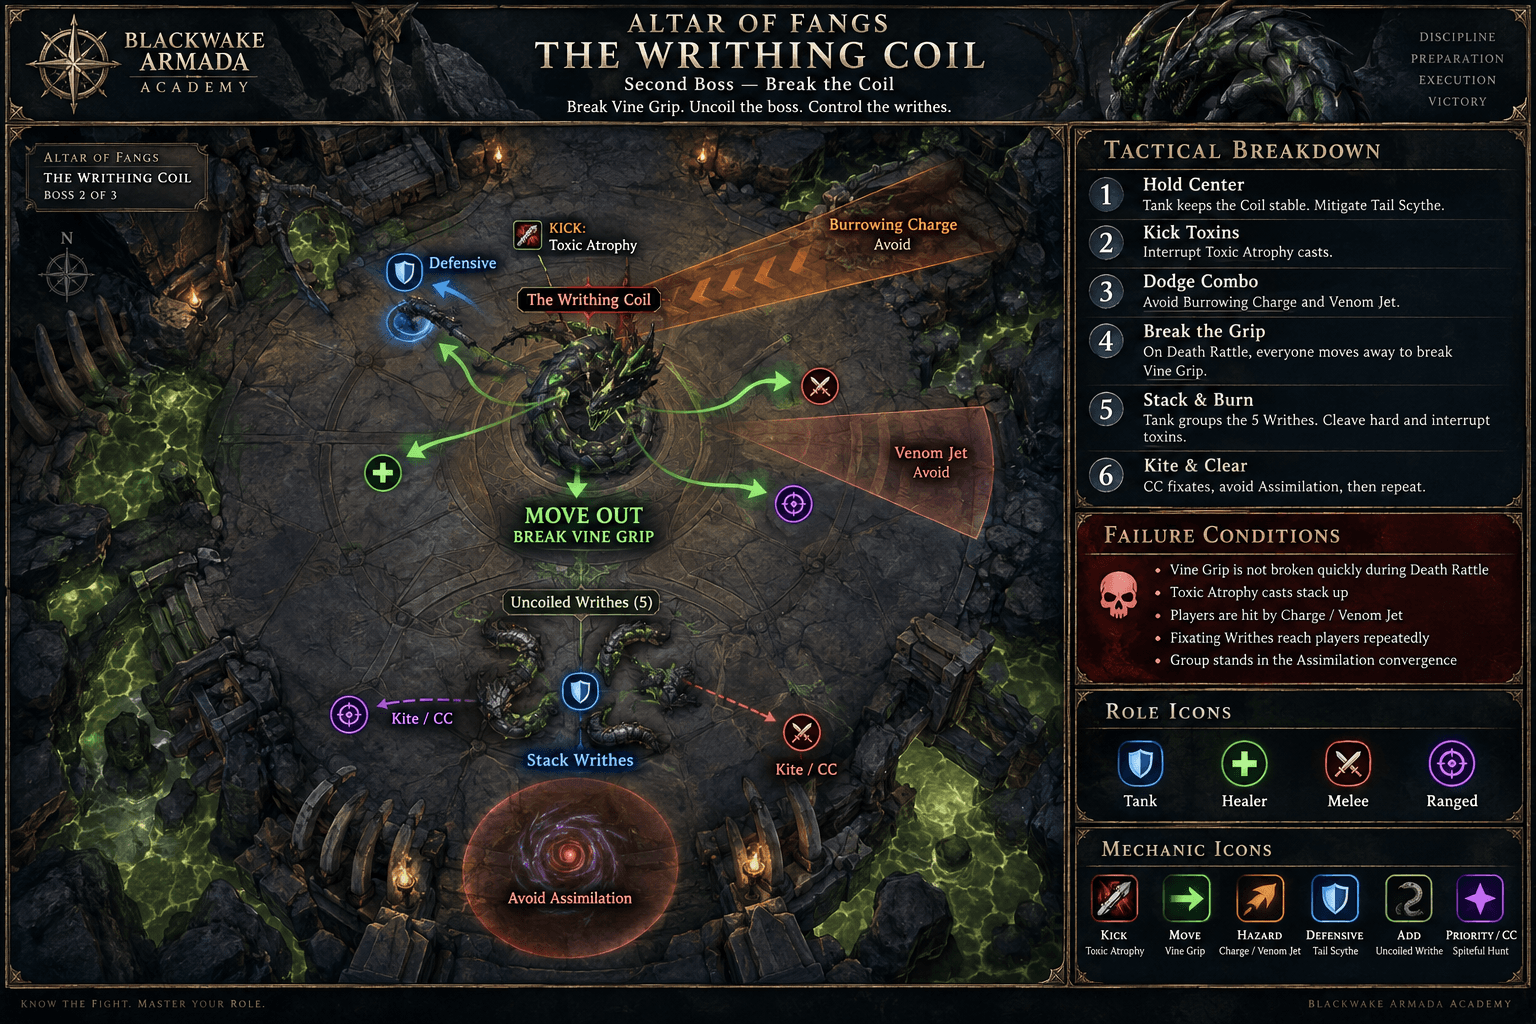
- 1
Death Rattle
Stop casting; Vine Grip tethers everyone.
- 2
Break outward
Every player runs away until their tether breaks.
- 3
Regroup five Writhes
Bring the fixating adds together for control and cleave.
- 4
Kick + control
Interrupt Toxic Atrophy and manage fixates during Uncoil.
- 5
Clear reform lines
Keep moving through Undermining as the adds return.
TankRegroup the Writhes after tethers break.
HealerCooldown Death Rattle and early Uncoil.
DPSControl fixates and preserve kicks for Toxic Atrophy.
Tank
- Use active mitigation for Tail Scythe.
- Aim Burrowing Charge and Venom Jet away from the party, then move out without spinning the frontal through allies.
- After Death Rattle breaks, regroup the Uncoiled Writhes so control and cleave hit all five while respecting fixates.
Healer
- Synchronized Venom creates steady background damage throughout the fight.
- Use group cooldowns for Death Rattle and the first moments of Uncoil, when movement, fixates, and extra Toxic Atrophy casts overlap.
- Track players slow to break Vine Grip and spot-heal fixate targets during the split.
DPS
- Own one cast in the three-kick Toxic Atrophy sequence and save an interrupt for the Uncoiled Writhes.
- Break Death Rattle immediately; lost casts are cheaper than extended tether damage.
- Stack and control the Writhes, use cooldowns for mirrored cleave, and dodge Undermining as they reform.
Defensive Timing
- Use a personal during Death Rattle, especially if movement or a prior Toxic Atrophy miss has left you low.
- Use another defensive during Uncoil when fixates and add casts overlap; do not save everything for normal boss uptime.
Bloodlust / Heroism: A strong alternative use when Death Rattle and Uncoil are the group’s limiting phase. Blackwake’s baseline holds it for Zul’jan, but using it here is preferable to repeating a failed split.
Common Wipe: One or more players break Death Rattle late, then the group enters Uncoil low and misses Toxic Atrophy casts from the Writhes while fixates scatter the adds.
- Toxic Atrophy
Boss 3
Zul’jan
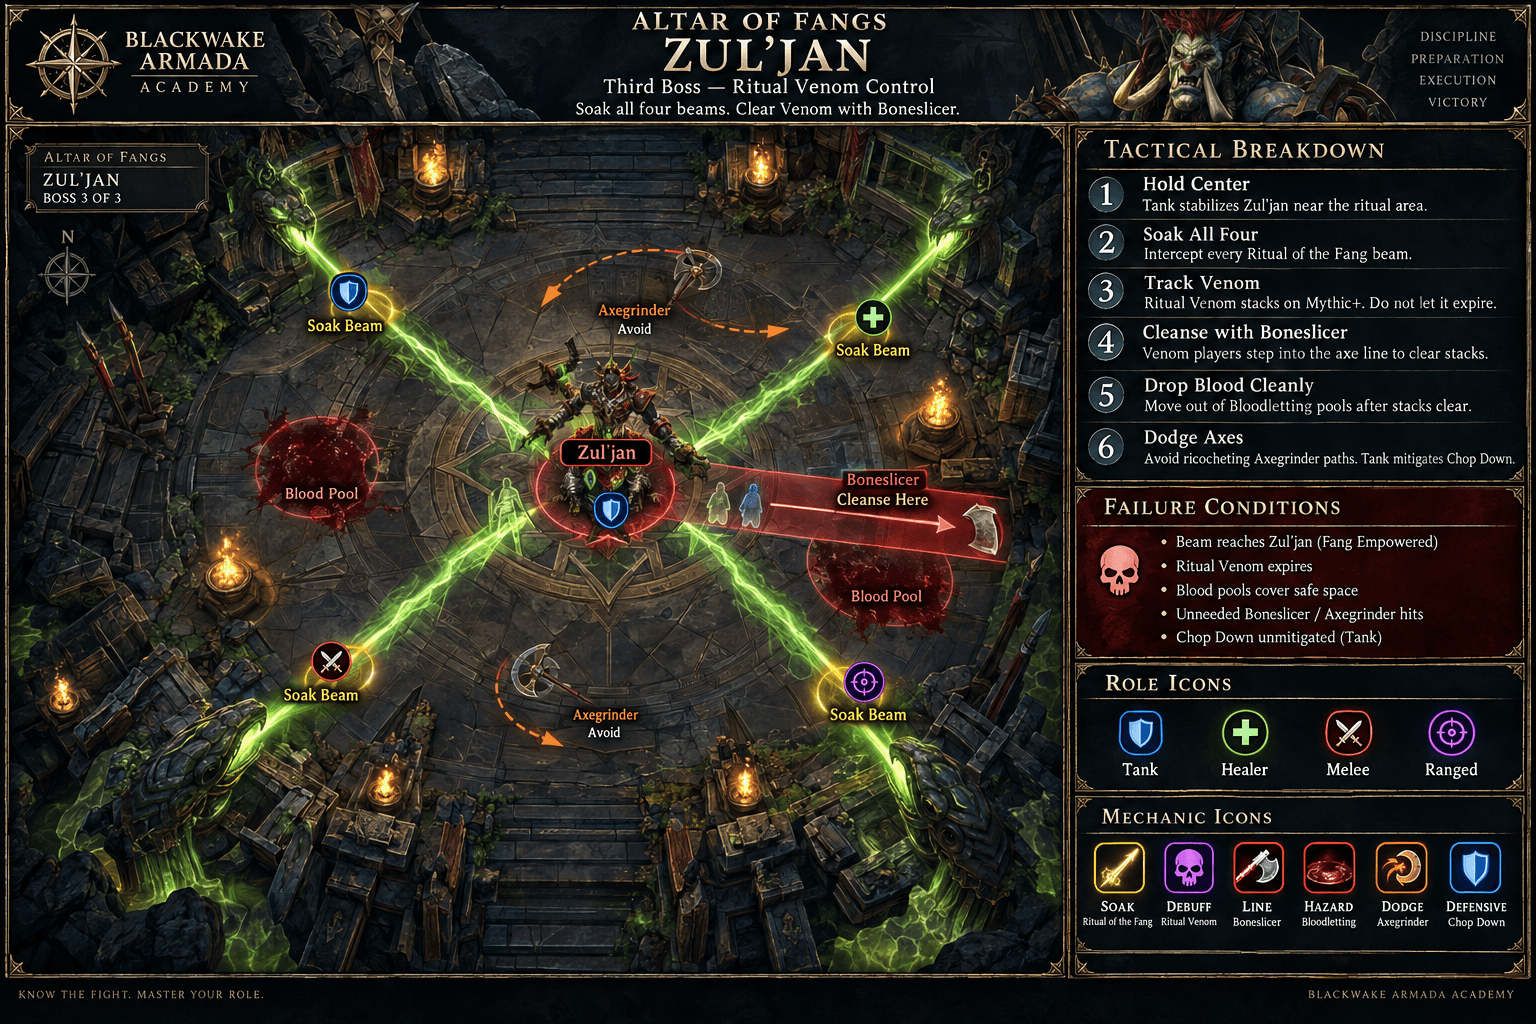
An assignment fight where four beam soakers prevent Fang Empowered, then deliberately clear Ritual Venom through Boneslicer while dodging ricocheting axes.
The Fight in 20 Seconds
Assign one player to each Ritual of the Fang beam. Soaking prevents the boss from gaining stacking Fang Empowered damage but applies Ritual Venom; clear those stacks before expiration by standing in a planned Boneslicer line, then leave the Bloodletting pool. Dodge Axegrinder blades, keep beam lanes readable, and mitigate Chop Down.
What Actually Matters
- Ritual of the Fang
Four beams travel toward Zul’jan. One player intercepts each beam; any beam that reaches the boss grants stacking Fang Empowered party damage.
- Ritual Venom
Beam soakers gain stacking venom that becomes lethal on expiration. Track stacks and timers rather than waiting for the debuff to become an emergency.
- Boneslicer and Bloodletting
Use a called Boneslicer line to take Physical damage and clear Ritual Venom. The clear creates a blood pool, so step out immediately and keep future lanes open.
- Axegrinder
Spinning axes ricochet around the room. Dodge them; chasing an unpredictable blade to clear venom is riskier than the planned Boneslicer response.
- Chop Down
A heavy two-hit Physical combo on the Tank. Use active mitigation and keep the boss stable for beam and Boneslicer assignments.
Dungeon visual · Illustrated positioning
Zul’jan Beam and Venom Assignments
Illustrated beam assignments, Ritual Venom tracking, planned Boneslicer clears, Bloodletting placement, and Axegrinder avoidance.
Tank
- Keep Zul’jan centered and stable enough that four beam lanes remain obvious.
- Use active mitigation and a defensive for Chop Down’s paired Physical hits.
- Place Bloodletting pools toward the edge without rotating the boss through assigned soakers or Boneslicer lanes.
Healer
- Use a major healing cooldown for each Ritual of the Fang channel and beam soak.
- Track every soaker’s Ritual Venom stacks and expiration, then spot-heal immediately after the Boneslicer clear.
- Expect extra damage from Boneslicer, Axegrinder mistakes, and new Bloodletting pools; keep moving without losing beam coverage.
DPS
- Start in your assigned beam lane and fill an empty lane if another player dies or is displaced.
- Use the agreed Boneslicer line to clear Ritual Venom, then leave the blood pool instead of standing for another tick.
- Dodge Axegrinder blades and keep major cooldowns on the boss; there are no priority adds to justify leaving the target.
Defensive Timing
- Use a personal during Ritual of the Fang, especially with multiple venom stacks or while clearing through Boneslicer.
- Use defensives before a planned venom clear if your health is not full; the Physical hit and resulting pool are predictable.
Bloodlust / Heroism: Strong Blackwake default on the pull. It reduces the number of beam-and-venom cycles on the dungeon’s most assignment-heavy encounter; if unavailable, use it when it returns rather than holding through extra rituals.
Common Wipe: A beam reaches Zul’jan or a player lets Ritual Venom expire because the group never agreed on beam lanes and a safe Boneslicer clear.
- Ritual of the Fang
Dangerous Trash
Only the enemies that meaningfully change the pull.
Dungeon visual · Priority pack
Priority Pack: Chieftain Objective
The opening objective pull is a hierarchy problem: focus the pressure source, preserve the critical kick, and control the ramping melee threat.
- 1Critical
Ritual Chieftain
Blood Sacrifice / Unstable Totem
DEFENSIVEPRIORITY TARGETFocus the Chieftain, commit healing through Blood Sacrifice, and finish the required nearby totem interaction without chaining another pressure pack.
- 2Critical
Primal Serpent
Piercing Hiss
KICKPRIORITY TARGETAssign every Piercing Hiss. Use spare defensives for Fetid Spit only when it overlaps other opening-area pressure.
- 3High
Ravenous Descendant
Ravenous
DEFENSIVEPRIORITY TARGETRemove the enrage with a soothe where available; otherwise hard-control it before stacks climb, then kite briefly to reset pressure.
- Critical
Twinfang Harrower
Opening totem circuit
Paralyzing Shots
DISPELMOVEPRIORITY TARGETTargets two players with a long movement-impairing magic effect while Duostrike raises tank pressure and Toxic Breath sweeps in a frontal.
- Kick:
- Not kick-interruptible
- Handle:
- Remove Paralyzing Shots with appropriate magic removal or a valid movement-impairing removal. Dodge Toxic Breath and keep the mob faced away.
- Stops:
- The Harrower is a tough mob and immune to common crowd control; solve the debuff instead of planning a stun.
- Dispel:
- Magic removal or an appropriate freedom/immunity effect; one healer dispel may not cover both targets.
- Position:
- Tank it facing away from the party and leave space to sidestep the sweeping frontal.
Tank
- Duostrike makes its melee sequence dangerous; use active mitigation and do not expose the group to Toxic Breath.
Healer
- Track both Paralyzing Shots targets and call for a second removal when your dispel covers only one.
DPS
- Prioritize the Harrower when utility coverage is thin and do not stand with the Tank.
- High
Ravenous Descendant
Opening totem circuit
Ravenous
DEFENSIVEPRIORITY TARGETIts enrage stacks attack speed as it melees, turning a routine enemy into rapidly escalating tank damage.
- Kick:
- Not kick-interruptible
- Handle:
- Remove the enrage with a soothe where available; otherwise hard-control it before stacks climb, then kite briefly to reset pressure.
- Stops:
- Stuns and other valid hard crowd control work; the August hotfix reduced the movement speed penalty and attack-speed gain but did not remove the mechanic.
- Purge:
- Enrage removal (Soothe), not a magic purge.
- Position:
- Keep it controlled near the pack; do not drag it through players while kiting.
Tank
- Watch stacks and move before the melee sequence becomes lethal.
Healer
- Tank damage ramps rather than arriving as one cast; warn the Tank before you lose coverage.
DPS
- Use soothe or a timely stop instead of waiting for the Tank to run.
- Critical
Primal Serpent
Opening totem circuit
Piercing Hiss
KICKPRIORITY TARGETA completed cast deals armor-ignoring Physical damage and reduces the group’s Haste by 30% for six seconds; Fetid Spit adds random-target damage.
- Kick:
- Interruptible
- Handle:
- Assign every Piercing Hiss. Use spare defensives for Fetid Spit only when it overlaps other opening-area pressure.
- Stops:
- A conventional interrupt is the reliable response; do not depend on dispelling the Physical debuff.
- Dispel:
- Not dispellable.
- Position:
- Keep the serpent grouped for interrupts and priority damage.
Tank
- Mark it before multi-mob pulls so the kick target stays obvious.
Healer
- Expect random Fetid Spit damage even when every Hiss is stopped.
DPS
- Do not spend the assigned kick on filler when Piercing Hiss is available.
- Critical
Ritual Chieftain
Opening totem circuit
Blood Sacrifice / Unstable Totem
DEFENSIVEPRIORITY TARGETThe nearby Caustic Mist Totem pulses group damage, while Blood Sacrifice hits the party and applies a healing absorb. Dismember adds a tank hit.
- Kick:
- Not kick-interruptible
- Handle:
- Focus the Chieftain, commit healing through Blood Sacrifice, and finish the required nearby totem interaction without chaining another pressure pack.
- Stops:
- The Chieftain is a tough mob and immune to common crowd control; plan throughput rather than a stop chain.
- Position:
- Keep the pack compact without facing other frontals through the group.
Tank
- Use mitigation for Dismember and avoid pairing this enemy with uncontrolled Descendant stacks.
Healer
- Blood Sacrifice is damage plus an absorb; start recovery immediately rather than waiting for health bars to move normally.
DPS
- This is the priority target. Use defensives and healthstones before the absorb overlap becomes a healer emergency.
- Critical
High Evolutionist
Writhing Coil wing
Evolve
STOPKICKDISPELPRIORITY TARGETEvolve is a channel that heals the Evolutionist and upgrades Envenom into Mass Envenom. Envenom itself is kickable and leaves a Poison DoT if it lands.
- Kick:
- Not kick-interruptible
- Handle:
- Hard-stop Evolve immediately. Kick Envenom with available interrupts and poison-cleanse any landed DoT.
- Stops:
- Stun, incapacitate, fear, disorient, knockback, or another valid hard stop; Evolve is not the cast to solve with a normal kick.
- Dispel:
- Poison removal for landed Envenom or Mass Envenom effects.
- Position:
- Pull Evolutionists into a clean stop location and avoid combining more than the group can control.
Tank
- Keep it in the group’s control area and do not chain into eggs while Evolve is available.
Healer
- Track poison coverage before the pull; an evolved caster can exceed one cleanser’s capacity.
DPS
- Save a hard stop for Evolve and priority damage for any Evolutionist that transforms or shields.
- Critical
Rattling Writhe
Writhing Coil wing
Rattle
DEFENSIVEPRIORITY TARGETRattle channels unavoidable party damage, while Corrosive Fangs pressures the Tank. The Writhe is a tough mob and cannot be controlled out of the channel.
- Kick:
- Not kick-interruptible
- Handle:
- Use planned group defensives and healing cooldowns for Rattle, then kill the Writhe before repeating the event.
- Stops:
- Immune to common crowd control; Rattle is a throughput check, not a stop assignment.
- Position:
- Keep the surrounding pack stable so movement does not interrupt healing during Rattle.
Tank
- Use mitigation for Corrosive Fangs and avoid stacking this with multiple Evolutionists.
Healer
- Pre-plan a cooldown for Rattle; the damage is predictable and should not be healed reactively.
DPS
- Use priority damage and a personal defensive during Rattle.
- Critical
Ascendant Serpent
Mandatory post-Coil gate
Infest
MOVEDEFENSIVEPRIORITY TARGETThis required elite targets players with Infest and spawns Hatchlings; Virulent Whirl creates tornadoes and Noxious Spray is a frontal tank hit with pushback.
- Kick:
- Not kick-interruptible
- Handle:
- Spread Infest targets enough to avoid overlap, then regroup the Hatchlings for cleave. Dodge tornadoes and keep Noxious Spray away from the party.
- Stops:
- The Ascendant Serpent is immune to common crowd control; its Hatchlings can be slowed and controlled.
- Position:
- Tank near usable space, face Noxious Spray away, and regroup after Infest for efficient add control.
Tank
- Defensive Noxious Spray and resist the pushback without turning the frontal.
Healer
- Infest plus spawned adds creates the main recovery window; stabilize before moving into the final wing.
DPS
- Cleave Hatchlings onto the elite, but move for Virulent Whirl and do not stand in the frontal.
- Critical
Ula’tek’s Chosen
Final approach
Mass Envenom
KICKDISPELMOVEPRIORITY TARGETMass Envenom applies group-wide poison pressure if completed. Toxic Surge adds pulsing damage and line attacks that must be dodged.
- Kick:
- Interruptible
- Handle:
- Assign every Mass Envenom and use spare kicks on Envenom. If Mass Envenom lands, call poison removals rather than silently letting five DoTs run.
- Stops:
- Use the conventional interrupt first; reserve movement for Toxic Surge lines.
- Dispel:
- Poison removal after a missed Envenom or Mass Envenom.
- Position:
- Leave lanes for Toxic Surge and keep the Chosen visible for kick assignments.
Tank
- Hold the pack still enough for clean line dodges and do not chain a second Chosen without available kicks.
Healer
- Prepare throughput for Toxic Surge even when Mass Envenom is stopped.
DPS
- This is the final wing’s priority target; call kick order before the cast starts.
- High
Living Venom
Final approach
Venom Burst
DEFENSIVEPRIORITY TARGETEach Living Venom explodes on death for group damage. Simultaneous deaths can stack into a lethal burst during other final-wing pressure.
- Kick:
- Not kick-interruptible
- Handle:
- Stagger deaths, top the party between explosions, and use personals when multiple health bars will reach zero together.
- Stops:
- Control is less important than disciplined damage timing.
- Position:
- Keep them grouped for controlled cleave without detonating the full pack at once.
Tank
- Do not chain forward while the party is recovering from the death bursts.
Healer
- Watch enemy health and pre-heal the death events; ask DPS to stop cleave if several will die together.
DPS
- Throttle AoE and finish one or two at a time instead of detonating the entire pack.
Interrupt Priority
Kick when a kick works. Use the named stop when it does not.
Stuns, silences, knockbacks, displacement, and incapacitates are stops, not interchangeable labels for an interrupt. Review Interrupts, Stops, and Crowd Control →
Dungeon visual · Interrupt strip
Second-Screen Interrupt Strip
Priority, action type, spell, and source remain visible without opening details or relying on color alone.
Critical
- KICKPiercing Hiss
Primal Serpent
- KICKMass Envenom
Ula’tek’s Chosen
- KICKToxic Atrophy
The Writhing Coil / Uncoiled Writhes
High priority
- STOPEvolve
High Evolutionist
- KICKEnvenom
High Evolutionist
Useful
- KICKEnvenom
Ula’tek’s Chosen
Critical
- KICKCritical
Piercing Hiss
Primal Serpent
Armor-ignoring party damage plus a 30% Haste reduction for six seconds destabilizes the pull and slows every recovery tool.
Response: Assign a primary kick and a named backup before engaging multiple Serpents.
Alternative stop: Use a valid conventional interrupt; the Physical debuff is not a healer dispel.
Role note: Any role with a kick can own it; do not assume the Tank has every Serpent.
- KICKCritical
Mass Envenom
Ula’tek’s Chosen
The whole group receives poison pressure while Toxic Surge or another pack mechanic may already be active.
Response: Call the kick order before the pull and preserve the backup for a second cast.
Alternative stop: If it lands, immediately coordinate available Poison removals; cleansing is recovery, not the plan.
Role note: DPS should not overlap two kicks on the first cast and leave the next one uncovered.
- KICKCritical
Toxic Atrophy
The Writhing Coil / Uncoiled Writhes
The boss casts three in sequence, and multiple split adds can cast it during the intermission; misses add dangerous debuffs during constant group damage.
Response: Pre-assign three kicks for the boss sequence, then mark or call the casting Writhes during Uncoil.
Alternative stop: During the add phase, valid crowd control can delay a cast when a kick is unavailable.
Role note: Keep one interrupt ready after Death Rattle rather than spending everything on movement.
High Priority
- STOPHigh
Evolve
High Evolutionist
The Evolutionist heals and upgrades Envenom into the group-wide Mass Envenom.
Response: Use hard crowd control on the channel; this is explicitly a stop assignment, not a kick.
Alternative stop: Stun, incap, fear, disorient, knockback, displacement, or another valid hard stop.
Role note: Name the stop before pulling two Evolutionists; do not discover the group has no answer mid-channel.
- KICKHigh
Envenom
High Evolutionist
A landed cast deals direct damage and applies an eight-second Poison DoT, consuming cleanse capacity needed for later casts.
Response: Kick when Evolve control is covered and poison-cleanse any miss.
Alternative stop: A valid hard stop can buy time, but preserve dedicated control for Evolve.
Role note: Healers should call when Poison removal is unavailable so the next Envenom receives a kick.
Useful
- KICKUseful
Envenom
Ula’tek’s Chosen
A random player takes direct damage and an eight-second Poison DoT, adding avoidable pressure before Zul’jan.
Response: Use spare kicks after Mass Envenom is safely assigned.
Alternative stop: Poison removal clears a landed DoT.
Role note: Never spend the only available kick here when Mass Envenom is about to cast.
Tank Cheat Sheet
The Tank calls worth reviewing at the ready check.
- Opening Harrowers and Ravenous Descendants are real melee threats: face Toxic Breath away, keep mitigation active for Duostrike, and soothe or control Ravenous stacks before kiting.
- Do not chain a Ritual Chieftain into another pressure pack until Blood Sacrifice and the nearby Unstable Totem damage are under control.
- Mark Primal Serpents and Ula’tek’s Chosen so the party can see the assigned kick target in dense pulls.
- On Rav’i, identify the Carrion Pile without Fresh Meat after each Stomp and move the boss beside it before Ssscavenging; use mitigation for Hydrastrike.
- Keep Evolutionist pulls inside the group’s hard-stop range and avoid stepping into extra eggs while Evolve is available.
- Use a defensive for Rattling Writhe’s Corrosive Fangs and avoid combining the Writhe with more poison casters than the party can control.
- On the Writhing Coil, point Burrowing Charge and Venom Jet away from allies, mitigate Tail Scythe, and regroup the split Writhes for controlled cleave.
- Face the Ascendant Serpent’s Noxious Spray away from the party and plant yourself where its pushback will not send you through tornadoes or into the next pack.
- On Zul’jan, keep the boss stable for assigned beam lanes and planned Boneslicer clears; use active mitigation for Chop Down and move new blood pools to the edge.
- After a death or accidental pull, stop chain pulling. This dungeon becomes recoverable again as soon as kicks, dispels, and hard stops are reassigned.
Healer Cheat Sheet
The Healer calls worth reviewing at the ready check.
- Paralyzing Shots targets two players: remove what your class can and call for a freedom-style or second magic removal instead of assuming one healer global solves both.
- Blood Sacrifice is party damage plus a healing absorb. Begin the recovery immediately and ask for personals when it overlaps Unstable Totem pulses.
- Poison removal is busiest in the Evolutionist and Chosen wings; not every healer can remove Poison, so confirm the group’s actual coverage before the key.
- A Regurgitate hit on Rav’i leaves a Disease effect; remove it only if your class can, and otherwise heal the target while the player avoids the next wave.
- Top the party before Ravenous Stomp and plan a healing cooldown for Ssscavenging until DPS breaks the shield.
- Rattling Writhe’s Rattle is predictable unavoidable group damage. Assign a throughput cooldown rather than reacting after the party is low.
- The Writhing Coil applies steady Synchronized Venom pressure; Death Rattle and the Uncoil adds are the windows for group cooldowns and player personals.
- Infest and the Ascendant Serpent add spawn form a recovery checkpoint. Stabilize before the final approach instead of carrying low health into Mass Envenom packs.
- Living Venom explosions must be staggered. Watch enemy health and tell DPS to pause cleave when several deaths would overlap.
- On Zul’jan, cooldown each Ritual of the Fang, track Ritual Venom stacks and timers, and spot-heal players immediately after their planned Boneslicer clear.
DPS Cheat Sheet
Mechanics, utility, and priority damage are useful DPS—not only meter output.
- Priority damage beats blind AoE on Ritual Chieftains, High Evolutionists, Rattling Writhes, Ula’tek’s Chosen, and the mandatory Ascendant Serpent.
- Assign Piercing Hiss and Mass Envenom kicks by name. Hold a backup instead of overlapping every interrupt on the first cast.
- Bring a real hard stop for Evolve; a kick does not replace the stun, incap, fear, disorient, knockback, or displacement assignment.
- Use soothe, Poison removal, magic removal, Disease removal, and freedom effects only when your class actually provides them; call what you can cover before the pull.
- On Rav’i, loosely spread Triple Shot, dodge Regurgitate, soak every Messy Eater impact, and burst the Ssscavenging shield instead of padding elsewhere.
- Save movement and a personal defensive for Death Rattle, then group the Uncoiled Writhes and interrupt Toxic Atrophy while cleaving damage into the boss.
- Cleave Ascendant Serpent Hatchlings onto the elite, but continue dodging Virulent Whirl and Noxious Spray.
- Throttle damage on Living Venoms so their death explosions do not occur together.
- On Zul’jan, stand in your assigned beam lane, use the planned Boneslicer line to clear Ritual Venom, and leave the resulting blood pool immediately.
- Use major cooldowns on priority targets and boss shields/add phases; useful damage is the damage that shortens the dangerous mechanic, not merely the largest pack total.
Blackwake Route
The recommended sequence, why it works, and where the plan can flex.
Blackwake Learning Route — Clean Objectives
A conservative, no-skip route that completes every mandatory totem on the first pass, limits Evolutionist overlap, isolates the largest unavoidable damage checks, and enters each boss with the group’s utility assignments intact. Exact enemy-force percentages are intentionally omitted; follow the linked current route map for verified count and adapt after accidental pulls.
Dungeon visual · Route timeline
Blackwake Route Timeline
A scan-first companion to the detailed pull cards. Pull order, boss transitions, control checks, and planned Bloodlust uses come from the existing route.
- Start · Pull 1
Safe opener
KICK - Pull 2
Chieftain objective pack
DEFENSIVE - Pull 3
Finish the first-side totems
Controlled pull
- Pull 4
Complete all six opening totems
Controlled pull
- Pull 5Boss
Rav’i
Bloodlust / Heroism - Pull 6
First Evolutionist control pack
STOP - Pull 7
Isolated Rattling Writhe
DEFENSIVE - Pull 8
Remaining Coil-wing packs
STOP - Pull 9Boss
The Writhing Coil
Controlled pull
- Pull 10
Four Infusion Totems and Ascendant Serpent
MOVE - Pull 11
Chosen control pack
KICK - Pull 12
Stagger the final venoms
KICK - Pull 13Boss
Zul’jan
Bloodlust / Heroism
- Pull 1
Safe opener
Venom Leeches, Ravenous Descendants, one Twinfang Harrower, and Primal Serpents on the first totem path.
Purpose: Start the six-totem circuit while every offensive and defensive cooldown is available.
Danger: Paralyzing Shots, Piercing Hiss, Harrower melee pressure, and rising Ravenous stacks arrive together.
Cooldowns: Use short cooldowns freely; Blackwake saves Bloodlust/Heroism for Rav’i rather than copying the high-risk live-data giant opener.
Tank
- Face Toxic Breath away and be ready to control or kite Descendant stacks.
Healer
- Plan the two Paralyzing Shots removals before the pull.
DPS
- Assign Piercing Hiss and prioritize the Harrower or Serpents over low-health Leeches.
- Pull 2
Chieftain objective pack
Ritual Chieftain with its nearby Ravenous Descendant and Primal Serpent pack; activate the adjacent Caustic Mist Totem.
Purpose: Advance the mandatory objective without adding a second Chieftain damage cycle.
Danger: Unstable Totem pulses, Blood Sacrifice absorb, Dismember, Ravenous stacks, and Piercing Hiss.
Cooldowns: Use a healer cooldown or group defensives for Blood Sacrifice; save long offensive cooldowns if Rav’i is near.
Tank
- Mitigate Dismember and do not chain the next pack through the healing absorb.
Healer
- Recover the absorb before movement to the next objective.
DPS
- Chieftain first, Piercing Hiss assigned, then clean up the Descendant.
- Pull 3
Finish the first-side totems
Remaining opening-area pack boundaries leading through the next Caustic Mist Totems.
Purpose: Clear and click each nearby objective as the group passes so no one backtracks after the area is empty.
Danger: Do not combine a second Harrower or Chieftain merely to save walking; utility coverage, not mob count, sets the pull size.
Cooldowns: Cycle short stops and defensives; hold Bloodlust/Heroism.
Tank
- Pause after each pack long enough to confirm the totem interaction completed.
Healer
- Call when dispel or major healing coverage is not ready.
DPS
- A ranged player can help confirm or complete the objective after the dangerous target dies.
- Pull 4
Complete all six opening totems
Final opening packs guarding any remaining Caustic Mist Totems.
Purpose: Open the route to Rav’i with no missed mandatory objective.
Danger: A missed totem costs more time than a controlled extra pause; visually confirm six before dropping to the boss.
Cooldowns: Finish with resources ready for Rav’i.
Tank
- Do not jump until the objective gate is confirmed open.
Healer
- Top the group before the transition.
DPS
- Stop padding low-priority targets if a Chieftain, Serpent, or Harrower remains active.
- Pull 5Bloodlust / Heroism
Rav’i
Rav’i
Purpose: First boss and first Blackwake default Bloodlust/Heroism use.
Danger: Wrong-pile Feeding Frenzy, missed Messy Eater soaks, and a slow shield break are the wipe conditions.
Cooldowns: Bloodlust/Heroism on the pull. Pool burst for each Ssscavenging shield rather than emptying every cooldown into normal uptime.
Tank
- Move to the pile without Fresh Meat before Ssscavenging.
Healer
- Top before Stomp and cooldown the shield phase.
DPS
- Soak, dodge Regurgitate, and break the shield immediately.
- Pull 6
First Evolutionist control pack
High Evolutionist with nearby Bloodletters or Hatchlings along the Writhing Coil wing.
Purpose: Teach the Evolve stop in a pull where the group can see and call it clearly.
Danger: Evolve must be hard-stopped; Envenom needs a kick or Poison removal. Avoid triggering extra eggs.
Cooldowns: Use short AoE control, not every long stop at once.
Tank
- Keep the Evolutionist in stop range and gather fixating adds for control.
Healer
- Confirm Poison removal before the pull.
DPS
- Stop Evolve, kick Envenom, and prioritize the Evolutionist.
- Pull 7
Isolated Rattling Writhe
Rattling Writhe with only the nearby pack the group can control cleanly.
Purpose: Keep the unavoidable Rattle healing check separate from excessive Evolutionist poison pressure.
Danger: Rattle cannot be solved with a kick or stun; Corrosive Fangs adds tank damage.
Cooldowns: Assign a healing cooldown and personal defensives for Rattle.
Tank
- Mitigate Corrosive Fangs and hold the pack stable.
Healer
- Pre-cast for Rattle instead of recovering late.
DPS
- Priority-target the Writhe and use a personal during Rattle.
- Pull 8
Remaining Coil-wing packs
Remaining High Evolutionists, Bloodletters, and Hatchlings before the boss, split at natural pack boundaries.
Purpose: Reach the boss without ever asking the group to cover more Evolve channels than its named hard stops.
Danger: Two uncontrolled Evolutionists can turn single-target poison into repeated Mass Envenom.
Cooldowns: Use DPS cooldowns on the final dangerous trash pack if they will return during the boss.
Tank
- Avoid eggs and stop moving forward when hard control is exhausted.
Healer
- Stabilize poisons before the boss pull.
DPS
- Call every Evolve stop and throttle movement that would hatch extra fixates.
- Pull 9
The Writhing Coil
The Writhing Coil
Purpose: Second boss; preserve a clear arena and an explicit three-kick Toxic Atrophy rotation.
Danger: Death Rattle tethers, Toxic Atrophy sequences, add fixates, and late Undermining lines.
Cooldowns: Blackwake default holds Bloodlust/Heroism, but using it here is a valid alternative if the split phase is the group’s wall.
Tank
- Aim charge and frontal away; regroup split adds.
Healer
- Cooldown Death Rattle and Uncoil.
DPS
- Break tethers, control fixates, and interrupt marked Writhes.
- Pull 10
Four Infusion Totems and Ascendant Serpent
Required Infusion Totem objective followed by the mandatory Ascendant Serpent elite and its Hatchlings.
Purpose: Open the poison gate and create a deliberate recovery checkpoint before the final wing.
Danger: Infest overlap, Virulent Whirl tornadoes, and Noxious Spray frontal/pushback.
Cooldowns: Use offensive cooldowns on the elite if available; they are more valuable here than on low-risk final trash.
Tank
- Face Noxious Spray away and brace against the pushback.
Healer
- Stabilize after Infest before moving on.
DPS
- Regroup Hatchlings for cleave without standing in tornadoes.
- Pull 11
Chosen control pack
Ula’tek’s Chosen with its immediate final-approach allies.
Purpose: Handle the first Mass Envenom assignment without overlapping a second Chosen or multiple death bursts.
Danger: Mass Envenom, Toxic Surge lines, and any nearby Living Venom deaths.
Cooldowns: Use kicks and priority damage before broad AoE cooldowns.
Tank
- Leave clear Toxic Surge lanes.
Healer
- Prepare for Toxic Surge and call Poison coverage after any miss.
DPS
- Assign Mass Envenom, use spare kicks on Envenom, and focus the Chosen.
- Pull 12
Stagger the final venoms
Remaining Blade of the Altar, Ula’tek’s Chosen, and Living Venom packs at natural boundaries before Zul’jan.
Purpose: Finish required forces without simultaneous Living Venom deaths or overlapping Chosen casts.
Danger: Mass Envenom plus multiple Venom Burst deaths can overwhelm the group immediately before the boss.
Cooldowns: Hold major boss cooldowns when possible; use personals to smooth unavoidable death bursts.
Tank
- Stop chain pulling until each Venom Burst recovery completes.
Healer
- Watch enemy health and demand staggered deaths.
DPS
- Throttle cleave and preserve the Mass Envenom kick.
- Pull 13Bloodlust / Heroism
Zul’jan
Zul’jan
Purpose: Final boss and second Blackwake default Bloodlust/Heroism use.
Danger: Unsoaked beams empower the boss; Ritual Venom must be cleared intentionally before expiration.
Cooldowns: Bloodlust/Heroism on the pull. If it is unavailable, use it at the first Ritual of the Fang after it returns rather than delaying a safe clear indefinitely.
Tank
- Hold the boss stable and mitigate Chop Down.
Healer
- Cooldown each ritual and track venom clears.
DPS
- Own a beam lane and use Boneslicer to clear, then leave the blood pool.
Why This Route Works
- Objectives are completed on the first pass
Six Caustic Mist Totems and four Infusion Totems are route gates, not optional count. The route pairs each interaction with nearby combat so a missed click never becomes a full-room backtrack.
- Ritual Chieftains are not stacked for style points
Unstable Totem damage and Blood Sacrifice absorbs already create a complete healing event. Separating major pressure sources keeps the opener teachable without relying on perfect group utility.
- Evolutionists are limited by available hard stops
Evolve cannot be treated as a normal kick. Pull size follows the number of reliable stops the group named before combat, preventing accidental Mass Envenom chains.
- The Rattling Writhe gets its own cooldown plan
Rattle is unavoidable and the mob is immune to common crowd control. Isolating that throughput check gives the healer and party defensives a predictable job.
- The mandatory Ascendant Serpent becomes a checkpoint
The group spends cooldowns on the required elite, then deliberately stabilizes before entering Mass Envenom trash. That pause is safer than carrying Infest damage into the final wing.
- No skip is required
The Blackwake default values consistency over a fragile death skip or invisibility dependency. Accidental pulls can be absorbed by trimming only clearly optional later packs using the linked live route map.
- Bloodlust favors repeatable boss execution
Live high-key data often front-loads Bloodlust into a giant opener or the Writhing Coil. The Academy default instead uses Rav’i and Zul’jan so a learning group gets predictable value without inflating pull complexity.
Bloodlust / Heroism Plan
- Rav’i — Blackwake default
Shortens the first boss and gives the group maximum resources for the first Ssscavenging shield while learning safe-pile positioning.
Alternative: A coordinated group may Bloodlust the opening pull instead, but only after assigning Paralyzing Shots removal, Piercing Hiss kicks, Descendant control, and Chieftain cooldowns.
If timing is lost: If Bloodlust was used on trash or lost to a wipe, continue the boss cleanly and move the next planned use to the Writhing Coil or Zul’jan based on cooldown timing.
- Zul’jan — Blackwake default
Reduces the number of Ritual of the Fang cycles and venom-clear windows on the most assignment-heavy boss.
Alternative: Use Bloodlust on the Writhing Coil if Death Rattle and Uncoil are the group’s limiting phase, then fight Zul’jan without assuming a second use.
If timing is lost: If timing is still unavailable on the pull, use it when it returns rather than holding through multiple extra ritual cycles.
If It Goes Sideways
Recover the pull, adapt the route, and keep the run moving.
An opening patrol or extra pack joins
Stop forward movement, mark the Primal Serpent or Ritual Chieftain, reassign the next Piercing Hiss and Paralyzing Shots responses, and spend defensives early. Do not continue the route chain until the accidental pack is dead.
A required totem was missed
Finish the current safe pull, confirm which objective remains, and backtrack immediately while the route is still nearby. Do not discover the missing interaction after committing to the boss transition.
The Tank dies
Use battle resurrection if the pack remains controllable. DPS should hard-stop or kite a Ravenous Descendant, Evolutionist, or fixating add rather than trying to facetank; the healer stabilizes before the route resumes.
The Healer dies
Stop chain pulling and use immunities, personals, off-healing, and crowd control to finish the highest-priority enemy. On unavoidable Rattle, Blood Sacrifice, or Toxic Surge pressure, a reset is safer than feeding more deaths.
Mass Envenom or Envenom lands
Call available Poison removals by name, use personals on uncleansed targets, and stop adding packs. The goal is to survive the poison window, not preserve every cooldown for a theoretical later pull.
Death Rattle or Zul’jan assignments break down
On the Coil, every player runs first and recovers damage second. On Zul’jan, fill an empty beam lane, then communicate venom stacks and use the next planned Boneslicer clear; do not improvise by standing in ricocheting axes.
Bloodlust timing is lost
Move the use to the next high-confidence boss or dangerous mandatory elite. The route does not require one exact timer; a clean later use is better than forcing an oversized pull to match the original plan.
Enemy forces differ after an accidental pull
Use the linked current route map to identify a clearly optional later pack. Never skip a Caustic Mist Totem, Infusion Totem, Ascendant Serpent, or required boss to repair count.
Common Mistakes
Patterns that repeatedly turn manageable moments into lost time.
Overlapping kicks on filler
Two players interrupt Envenom together, then Mass Envenom or Piercing Hiss completes. Assign the dangerous cast first and treat filler as spare-kick territory.
Calling Evolve an interrupt
Evolve needs hard crowd control. A party can have five kicks and still fail if nobody saved a valid stop.
Expecting one healer dispel to cover the dungeon
Paralyzing Shots can hit two players, poisons are not removable by every healer, and Regurgitate is a Disease. Audit actual class utility instead of assigning every failure to the healer.
Moving Rav’i after the decision point
The Tank notices the clean pile too late, or the group stands between the boss and Fresh Meat. Identify and move early so Ssscavenging selects the safe pile.
Running late on Death Rattle
Players finish a cast or global before moving, keeping Vine Grip connected while group damage climbs. Break the tether first; resume output after the mechanic is solved.
Detonating every Living Venom together
Uncontrolled AoE turns several manageable death bursts into one lethal event. Watch enemy health and stagger finishes.
Clearing Ritual Venom by chasing an axe
The reliable plan is to use a called Boneslicer line. Intentionally stepping into ricocheting Axegrinder blades adds unpredictable damage and positioning risk.
Rigidly following the route after an extra pull
Accidental count changes the later plan. Mark the deviation and trim an optional pack from the live map instead of pulling to the original script and overcapping blindly.
Skipping an objective interaction
The opening six totems, post-Coil four totems, and Ascendant Serpent are progression gates. They are not optional route optimization.
Before You Run This Key
Reveal each answer when you are ready. No grades, scores, or completion tracking.
Which opening-trash cast receives the highest kick priority?
Why can’t a normal interrupt assignment solve Evolve?
Where should the Tank position Rav’i before Ssscavenging?
What should every player do first during Death Rattle?
What utility types are especially valuable in this dungeon?
How does the group safely clear Ritual Venom on Zul’jan?
Where does Blackwake default Bloodlust/Heroism?
Blackwake Notes
Crew-specific calls and hard lessons that supplement the tactical Playbook.
Mythic+ Sessions
Dungeon workshops, role sessions, route workshops, and key nights with the crew.
No Mythic+ sessions are scheduled right now. The Learning Board can still rally a key crew.
Related Academy Content
Fundamentals stay in their own lessons so this page can remain tactical.
- DPSGetting Started
Interrupts: The Button Everyone Should Know
DPS
What interrupting a cast actually does, why it matters more than damage meters, and the mistakes that waste it.
Read the lesson →
Sep 15, 2026
- HealerGetting Started
Dispels Explained
Healer
What can be dispelled, what cannot, and why timing beats reflexes.
Read the lesson →
Sep 18, 2026
- Mythic+Getting Started
Mythic+ Explained
Keystones, timers, scaling, and rating — what Mythic+ actually is before your first key goes in.
Read the lesson →
Sep 18, 2026
- Mythic+Getting Started
Understanding Dungeon Routes
Why routes exist, what enemy percentage means, and how to follow a plan without needing to make one.
Read the lesson →
Sep 18, 2026
- TankIntermediate
Tanking Your First Mythic+
Tank
Routes, enemy count, boss positioning, and talking to your group — the tank's guide to a first timed key.
Read the lesson →
Sep 18, 2026
- HealerIntermediate
Healing Your First Mythic+
Healer
Tank damage, group bursts, mana on a timer, and how to recover when a pull goes sideways.
Read the lesson →
Sep 18, 2026
- DPSIntermediate
DPS in Mythic+
DPS
Priority targets, kicks, cooldown planning, and staying alive — what a damage dealer actually owes a key.
Read the lesson →
Sep 18, 2026
- Mythic+Intermediate
Mythic+ Deaths and Recovery
What deaths actually cost, how to recover a collapsing pull, and how to stop the chain.
Read the lesson →
Sep 18, 2026
- Mythic+Getting Started
Mythic+ Etiquette
Communication, commitment, and keeping keys a place people want to learn — the Blackwake way.
Read the lesson →
Sep 18, 2026
Trusted Resources
Curated references beyond the Blackwake Playbook.
Need a hand?
Ask the Crew
Working through Altar of Fangs? Ask for a route review, role help, or a learning run.