Dungeon Playbook
Current poolMidnight · Season 2Den of Nalorakk
A three-boss wilderness route combining six offering objectives, poison soaks, a frozen gauntlet, heavy forced movement, and precise echo control.
Reviewed for Midnight Season 2 · Last checked Sep 2026
- Bosses charted
- 3
- Dangerous pulls
- 8
- Priority casts
- 6
Dungeon Overview
The shape of the key before the detailed calls.
An objective and environmental dungeon with poison, ice movement, and echo positioning
Expect recurring Tank debuffs, unavoidable party channels, Poison and Magic dispels, forced movement, and boss mechanics that require every player to soak or block correctly.
Den of Nalorakk changes character in each wing: gather six offerings before Hoardmonger, use cover through Harsh Winds, solve ice-and-add timing at the Sentinel, then control echoes and soaks on Nalorakk. The route rewards objective discipline more than oversized pulls.
- Offerings
- Poison soaks
- Harsh Winds
- Forced movement
- Echo control
Dungeon Profile
- Tank Pressure
- High
- Armor shreds, Frostfangs, avatars, beast enrage, Saberfang stacks, and Nalorakk positioning punish weak mitigation.
- Group Damage
- Very High
- Feast of Misery, Harsh Winter, Primal Echo, Volatile Totem, Frozen Tempest, and boss channels are sustained checks.
- Interrupt Demand
- High
- Healing Breeze, Frigid Roar, Arc Lightning, boss add casts, and Lightning Bolt require rotations.
- Movement
- Very High
- Wind cover, sliding ice, tornado baiting, knockbacks, echo placement, and body-blocking dominate execution.
- Dispel / Utility Demand
- High
- Curse, Magic, Poison, soothe, purge, bleed removal, and freedom effects all have uses.
- Route Complexity
- High
- Six offerings, optional buffs, wind cover, and flexible trash count create route responsibility.
Dungeon visual · Abstract flow
Dungeon Tactical Overview
A route-flow chart, not dungeon geometry. Read left-to-right on wide screens or top-to-bottom on mobile.
- StartKICK
Offering circuit
6 offerings + assigned casts
Pulls 1–3
- Stage 2Bloodlust / Heroism
The Hoardmonger
Pile choice + mushroom soaks
Pulls 4
- Stage 3DEFENSIVE
Harsh Winds
Cover + split pressure
Pulls 5–6
- Stage 4MOVE
Sentinel of Winter
Shivercores → Snowdrifts
Pulls 7
- Stage 5KICK
Nalorakk approach
Mystic + Warbringer + Nanea
Pulls 8
- Stage 6Bloodlust / Heroism
Nalorakk
Echo wall + Onslaught cover
Pulls 9
Before You Queue
- Plan all six offerings — Gather them on the first pass before Hoardmonger.
- Assign Healing Breeze and Frigid Roar — These casts receive priority kicks. Review →
- Check Curse, Magic, and Poison coverage — Hunger, Cryo Surge, mushrooms, and boss debuffs are different types. Review →
- Review Sentinel add timing — One Shivercore dies, one Rimeshatter is soaked, and Snowdrift covers Tempest.
- Review Nalorakk echo wall — Place echoes together and body-block them during Fury.
The Things That Wipe the Key
The few failure points most likely to cost the timer.
- RouteTankHealerDPS
Missing offerings
Collect six viable offerings while clearing.
Consequence: The first boss cannot start and the group backtracks.
- InterruptTankHealerDPS
Healing Breeze completes
Kick every Tender heal and purge a missed buff.
Consequence: Dangerous packs reset health and repeat mechanics.
- PositioningTankHealerDPS
Mushroom expires
Assign all Spoiled Supplies soaks.
Consequence: Putrid Burst can wipe the party.
- MovementTankHealerDPS
No Snowdrift for Tempest
Kill and soak Shivercores in sequence.
Consequence: Frozen Tempest pushes and damages the exposed group.
- TankTankHealerDPS
Nalorakk cover fails
Tank keeps Zul’jarra behind the group for Onslaught.
Consequence: Three unblocked hits overwhelm healing.
- PositioningTankHealerDPS
Echo reaches Zul’jarra
Players intercept Fury charges.
Consequence: Demoralizing Scream punishes the whole group.
Boss Playbook
The fight in 20 seconds, what matters, and the most common wipe.
Boss 1
The Hoardmonger
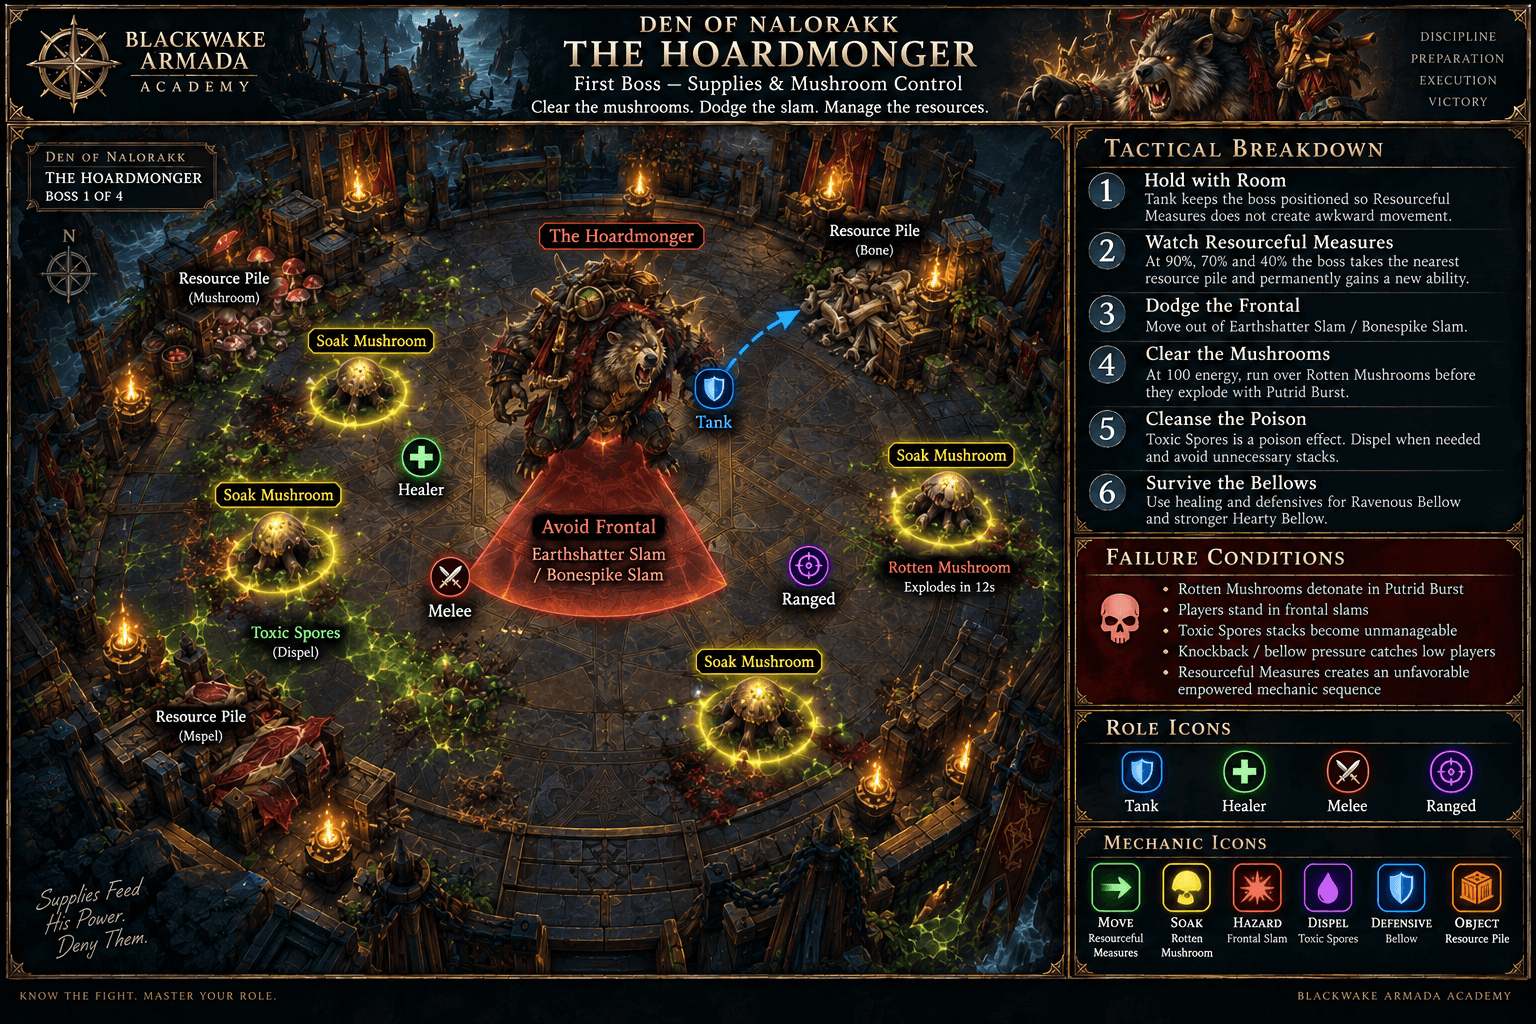
Choose resource piles deliberately, dodge empowered slams, soak every Rotten Mushroom before it bursts, and distribute Toxic Spores rather than stacking them on one player..
The Fight in 20 Seconds
Choose resource piles deliberately, dodge empowered slams, soak every Rotten Mushroom before it bursts, and distribute Toxic Spores rather than stacking them on one player.
What Actually Matters
- Resourceful Measures
At 90%, 70%, and 40% the boss consumes the nearest unused pile and empowers an ability.
- Ravenous Bellow
Unavoidable group hit and DoT; the meat pile adds knockback.
- Earthshatter Slam
Move from the frontal; the bone pile adds persistent spikes.
- Spoiled Supplies
Soak every mushroom before Putrid Burst.
- Toxic Spores
Each soak applies Poison, so spread assignments and cleanse where available.
Dungeon visual · Illustrated positioning
Hoardmonger Pile and Mushroom Plan
Illustrated resource-pile order, Rotten Mushroom soaks, Toxic Spore distribution, frontal movement, and Ravenous Bellow coverage.
Tank
- Position near the intended next pile and soak extra mushrooms with mitigation.
- Keep frontals away.
Healer
- Cooldown Bellow and track Poison stacks on soakers.
- Top before late mushroom soaks.
DPS
- Soak assigned mushrooms and leave Slam.
- Do not force one player to take every Poison stack.
Defensive Timing
- Personal for Bellow or repeated soaks.
- Tank defensive while taking extra mushrooms.
Bloodlust / Heroism: Good first use to shorten three empowered cycles.
Common Wipe: An unsoaked mushroom triggers Putrid Burst while Poison stacks already strain the healer.
- Resourceful Measures
Boss 2
Sentinel of Winter
Bait Raging Squall tornadoes together, kill Fractured Shivercores, interrupt Winter’s Shroud, soak each Rimeshatter, and use their Snowdrifts to resist Frozen Tempest pushback..
The Fight in 20 Seconds
Bait Raging Squall tornadoes together, kill Fractured Shivercores, interrupt Winter’s Shroud, soak each Rimeshatter, and use their Snowdrifts to resist Frozen Tempest pushback.
What Actually Matters
- Icy arena
Movement slides; make small corrections.
- Glacial Torment
Dispel the DoT promptly and heal uncleansed targets.
- Raging Squall
Stack to bait tornadoes, then rotate.
- Shattering Frostspike
Dodge circles and kill the two Shivercores.
- Rimeshatter and Frozen Tempest
Soak the death projectile and use Snowdrift shelter for the channel.
Dungeon visual · Illustrated mechanic sequence
Sentinel: Shivercore to Snowdrift
The encounter repeats a fixed resource loop: bait movement, kill one add, assign the soak, then use its Snowdrift for the channel.
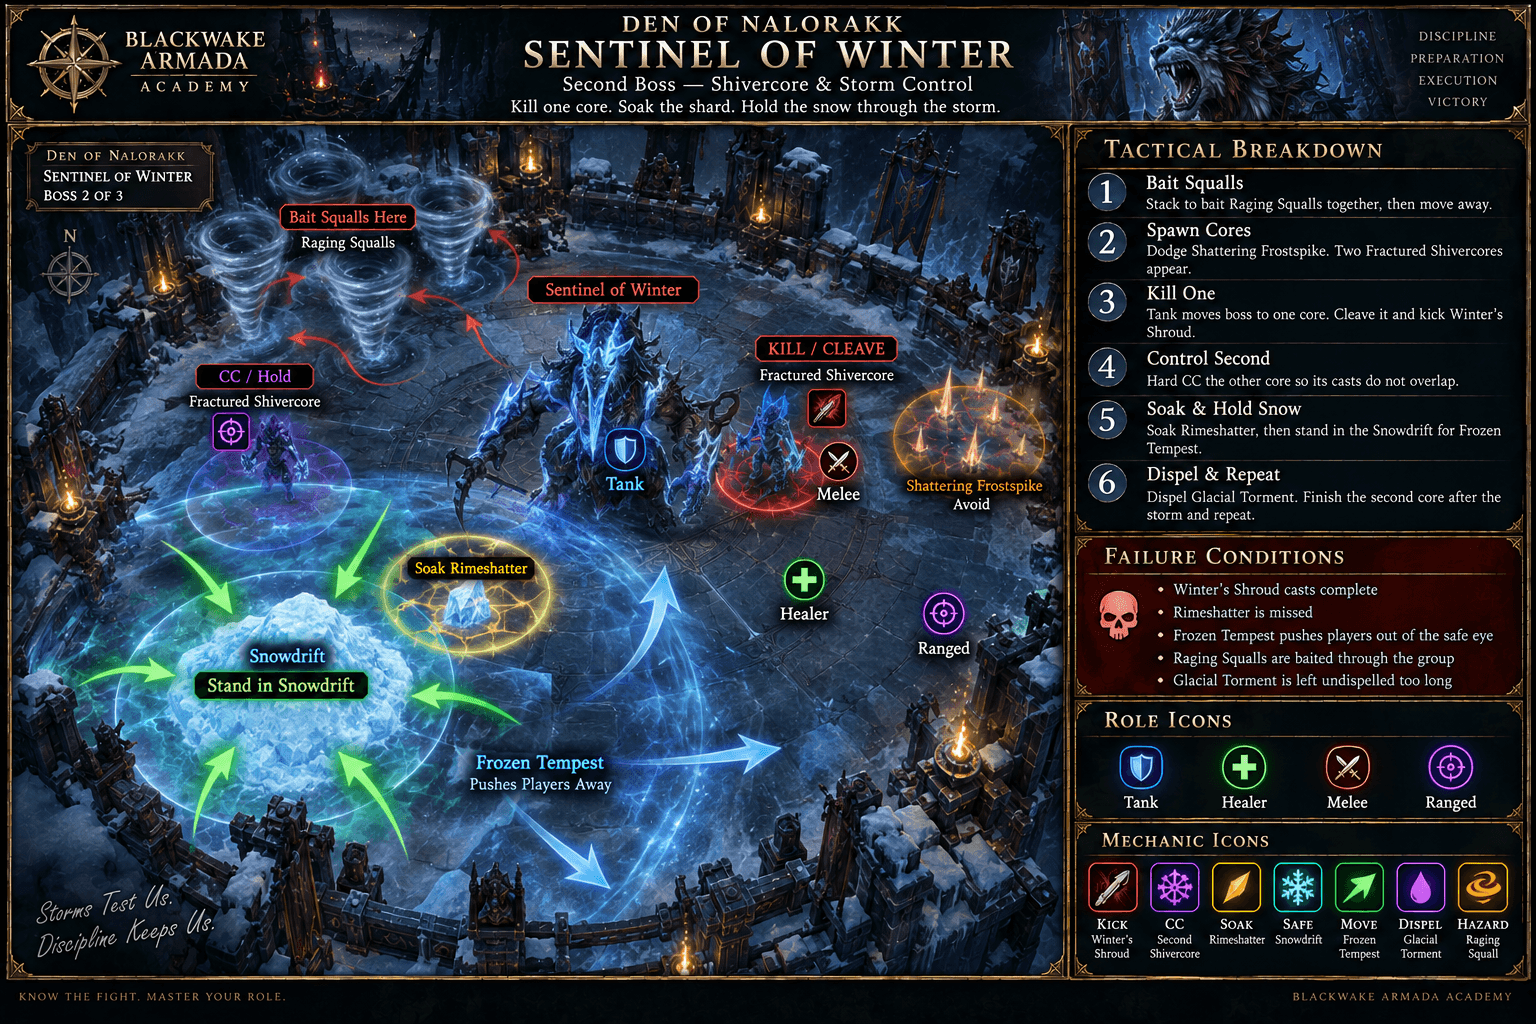
- 1
Bait Squall
Stack Raging Squall tornadoes, then rotate together.
- 2
Focus one core
Kill a Fractured Shivercore while interrupting Winter’s Shroud.
- 3
Assign Rimeshatter
The designated player soaks the death projectile.
- 4
Take Snowdrift
Use the resulting shelter to resist Frozen Tempest.
- 5
Reset cleanly
Repeat without killing both cores before coverage exists.
TankKeep the boss near the active add and usable Snowdrift.
HealerDispel Torment and cooldown Frozen Tempest.
DPSFocus one Shivercore and do not trigger both without soak coverage.
Tank
- Position boss near the add being killed and near usable Snowdrift.
- Keep movement deliberate on ice.
Healer
- Dispel Torment and cooldown Frozen Tempest.
- Track the designated Rimeshatter soaker.
DPS
- Interrupt Winter’s Shroud and focus one Shivercore at a time.
- Do not kill both without soak coverage.
Defensive Timing
- Personal during Frozen Tempest.
- Use defensives if Torment cannot be dispelled.
Bloodlust / Heroism: Strong alternative if Tempest/add timing causes wipes.
Common Wipe: Shivercores die without Rimeshatter soaks or the group misses Snowdrift shelter during Frozen Tempest.
- Icy arena
Boss 3
Nalorakk
Place Echoing Maul echoes together without cleaving, keep echoes away from the Tank’s back, hide behind Zul’jarra for Overwhelming Onslaught, soak Forceful Slam, and body-block echoes during Fury of the War God..
The Fight in 20 Seconds
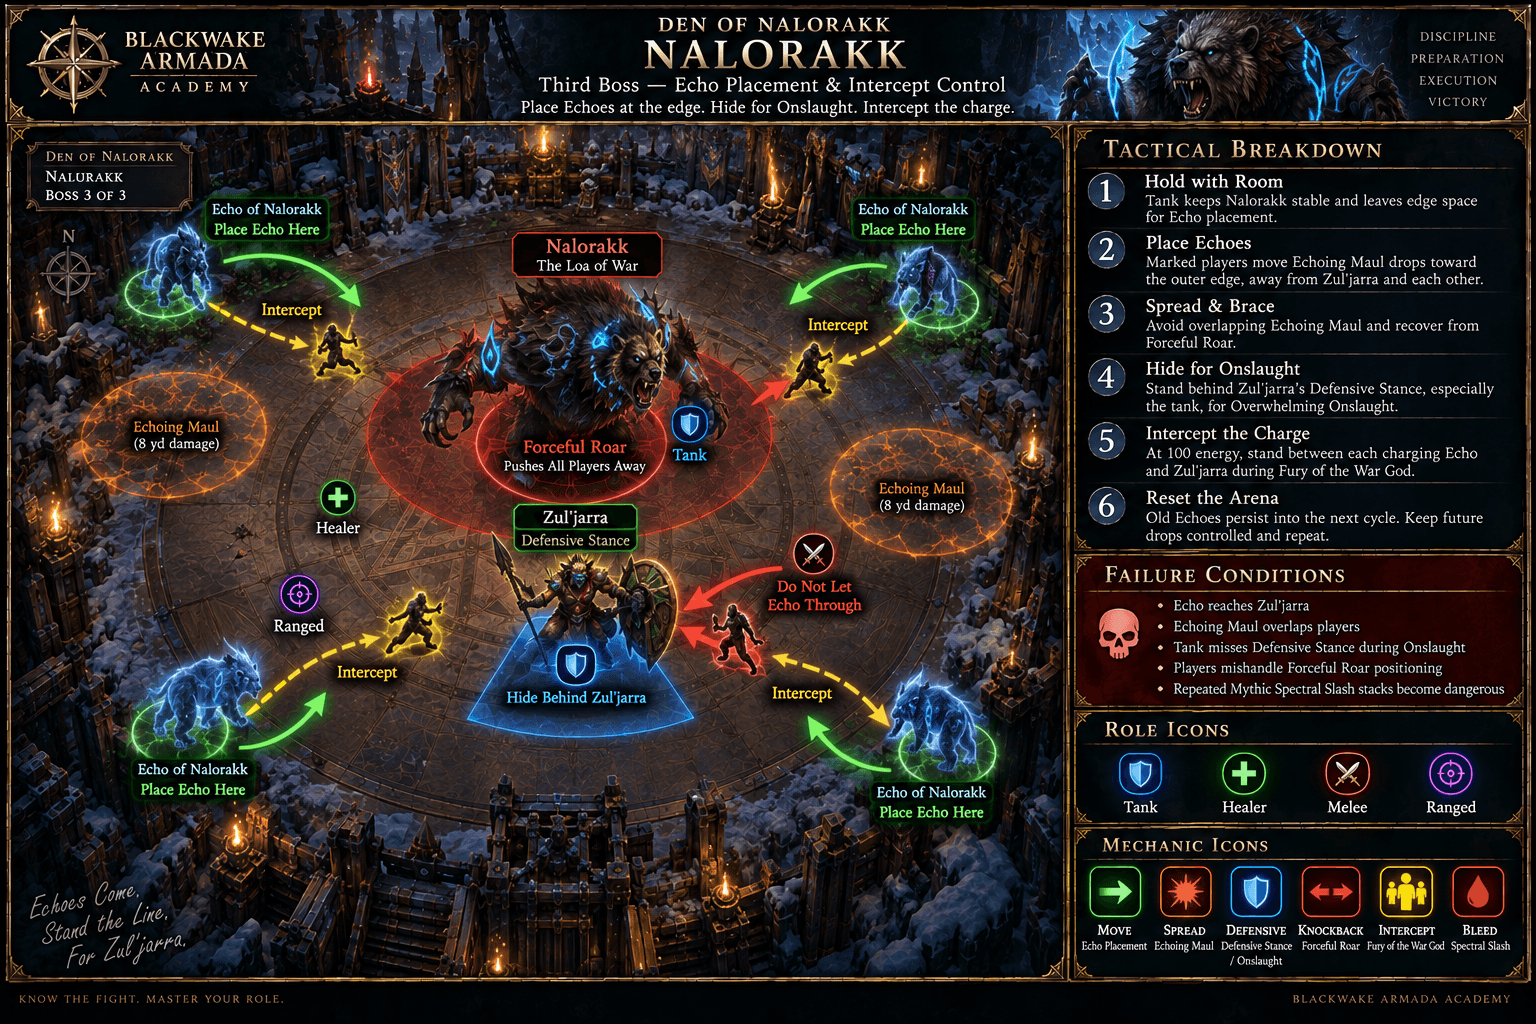
Place Echoing Maul echoes together without cleaving, keep echoes away from the Tank’s back, hide behind Zul’jarra for Overwhelming Onslaught, soak Forceful Slam, and body-block echoes during Fury of the War God.
What Actually Matters
- Echoing Maul
Three players drop dangerous echoes; cluster placements without overlapping hits.
- Spectral Slash
Echoes punish players who move too close.
- Overwhelming Onslaught
Zul’jarra shields the group from three hits; Tank must not face away from safe cover.
- Forceful Slam
Regroup quickly for the soak after knockback.
- Fury of the War God
Players form a wall and intercept charging echoes before they reach Zul’jarra.
Dungeon visual · Illustrated positioning
Nalorakk Echo Placement
Illustrated echo placement, Fury of the War God interception, Zul’jarra cover, Forceful Roar spread, and arena reset.
Tank
- Keep echoes out of your back arc and return quickly for Forceful Slam.
- Hold the boss central for the echo wall.
Healer
- Cooldown the three Onslaught hits and recover before the soak.
- Spot-heal echo blockers.
DPS
- Place echoes cleanly, stand behind the shield, then body-block Fury charges.
- Use movement tools after knockback.
Defensive Timing
- Personal for Onslaught or an echo intercept.
- Tank defensive if repositioning delays cover.
Bloodlust / Heroism: Strong final default to reduce repeated Onslaught/Fury cycles.
Common Wipe: The Tank points away from Zul’jarra, the group misses cover, or an echo reaches her and triggers Demoralizing Scream.
- Echoing Maul
Dangerous Trash
Only the enemies that meaningfully change the pull.
Dungeon visual · Priority pack
Priority Pull: Nalorakk Approach
The final approach combines a must-kick, unavoidable group damage, and a priority totem in one controlled pack.
- 1High
Loa Speaker Nanea
Volatile Totem
KICKMOVEPRIORITY TARGETKick Lightning Bolt and kill Volatile Totem immediately.
- 2High
Stormbound Mystic
Arc Lightning
KICKPRIORITY TARGETKick every cast.
- 3High
Grizzled Warbringer
Primal Echo
DEFENSIVEMOVEPRIORITY TARGETCooldown the hit and dodge Poison Spear Volley.
- Critical
Earthwhisper Tender
Healing Breeze
KICKPURGEPRIORITY TARGETHeals nearby enemies and extends dangerous pulls.
- Kick:
- Interruptible
- Handle:
- Kick every cast; purge a miss.
- Critical
Spirit of Hunger
Starvation Effigy / Feast of Misery
PRIORITY TARGETDEFENSIVEDISPELEffigy weakens players while Feast channels party damage.
- Kick:
- Not kick-interruptible
- Handle:
- Kill the Effigy and Curse-dispel Hunger effects; the spirit is CC-immune.
- Critical
Frigid Mauler
Frigid Roar
KICKPRIORITY TARGETDangerous interruptible party cast.
- Kick:
- Interruptible
- Handle:
- Assign every Roar.
- High
Avatar of Determination
Glacial Tomb
STOPMOVEPRIORITY TARGETRoots all players before Pulverize.
- Kick:
- Not kick-interruptible
- Handle:
- Break roots or use freedom effects, then leave Pulverize.
- Stops:
- The Avatar is CC-immune; remove player roots rather than trying to stop the mob.
- High
Winter Squall
Harsh Winter
DEFENSIVEPRIORITY TARGETConstant party damage until the optional tough enemy dies; killing it stops Harsh Winds.
- Kick:
- Not kick-interruptible
- Handle:
- Plan throughput or route around it.
- High
Stormbound Mystic
Arc Lightning
KICKPRIORITY TARGETInterruptible party damage.
- Kick:
- Interruptible
- Handle:
- Kick every cast.
- High
Grizzled Warbringer
Primal Echo
DEFENSIVEMOVEPRIORITY TARGETUnavoidable group damage from a CC-immune enemy.
- Kick:
- Not kick-interruptible
- Handle:
- Cooldown the hit and dodge Poison Spear Volley.
- High
Loa Speaker Nanea
Volatile Totem
KICKMOVEPRIORITY TARGETTotem pulses group damage while Lightning Bolt and Earthquake add pressure.
- Kick:
- Interruptible
- Handle:
- Kick Lightning Bolt and kill Volatile Totem immediately.
Interrupt Priority
Kick when a kick works. Use the named stop when it does not.
Stuns, silences, knockbacks, displacement, and incapacitates are stops, not interchangeable labels for an interrupt. Review Interrupts, Stops, and Crowd Control →
Dungeon visual · Interrupt strip
Second-Screen Interrupt Strip
Priority, action type, spell, and source remain visible without opening details or relying on color alone.
Critical
- KICKHealing Breeze
Earthwhisper Tender
- KICKFrigid Roar
Frigid Mauler
- KICKArc Lightning
Stormbound Mystic
High priority
- KICKWinter’s Shroud
Fractured Shivercore
- KICKLightning Bolt
Loa Speaker Nanea
Useful
- KICKEarth Bolt
Earthwhisper Tender
Critical
- KICKCritical
Healing Breeze
Earthwhisper Tender
Heals the pack.
Response: Kick every cast; purge a miss.
- KICKCritical
Frigid Roar
Frigid Mauler
Heavy party damage.
Response: Assign every cast.
- KICKCritical
Arc Lightning
Stormbound Mystic
Party-wide damage.
Response: Kick every cast.
High Priority
- KICKHigh
Winter’s Shroud
Fractured Shivercore
Protects adds and delays shelter timing.
Response: Rotate kicks.
- KICKHigh
Lightning Bolt
Loa Speaker Nanea
Repeated random-target damage.
Response: Maintain a rotation.
Useful
- KICKUseful
Earth Bolt
Earthwhisper Tender
Random-target damage.
Response: Use spare kicks after Healing Breeze.
Tank Cheat Sheet
The Tank calls worth reviewing at the ready check.
- Track Shredding Claws and kite Gatherers before armor loss stacks.
- Soothe Matriarch after cub deaths.
- Position Hoardmonger near the intended resource pile.
- Use cover during Harsh Winds and do not drag packs through exposed lanes.
- Frostfang Bloodrush makes the first ten seconds the dangerous window.
- Stack Sentinel adds for cleave without sliding through tornadoes.
- Mitigate Saberfang Shred Armor and Warbringer pressure.
- Keep Nalorakk echoes out of your back arc and return for Forceful Slam.
Healer Cheat Sheet
The Healer calls worth reviewing at the ready check.
- Curse-dispel Hunger debuffs and cooldown Feast of Misery.
- Track Toxic Spores across mushroom soakers.
- Magic-dispel Cryo Surge and Glacial Torment by priority.
- Harsh Winter and Rattle-like channels need planned cooldowns.
- Frozen Tempest healing happens while players manage shelter.
- Primal Echo and Volatile Totem are dangerous final-wing spikes.
- Onslaught is three large hits followed by movement into a soak.
- Not every healer removes Poison or Curse; assign utility honestly.
DPS Cheat Sheet
Mechanics, utility, and priority damage are useful DPS—not only meter output.
- Tender, Effigy, Mauler, Writhe-like channels, Volatile Totem, and boss adds are priority.
- Kick Healing Breeze, Frigid Roar, Arc Lightning, and Winter’s Shroud.
- Use soothe on Mother’s Wrath and Bestial Wrath where available.
- Collect offerings during safe movement instead of after trash dies.
- Soak mushrooms and Rimeshatter assignments.
- Use freedom effects on Glacial Tomb where available.
- Body-block Nalorakk echoes during Fury.
- Priority mechanics beat AoE padding.
Blackwake Route
The recommended sequence, why it works, and where the plan can flex.
Blackwake Learning Route — Offerings and Cover
Collect all six offerings on the first pass, use conservative pulls through Hunger and wind sections, isolate Winter’s unavoidable damage, and preserve a clean arena for Nalorakk. Count percentages are left to the current linked route.
Dungeon visual · Route timeline
Blackwake Route Timeline
A scan-first companion to the detailed pull cards. Pull order, boss transitions, control checks, and planned Bloodlust uses come from the existing route.
- Start · Pull 1
Offering opener
KICK - Pull 2
Spirit of Hunger
DISPEL - Pull 3
Finish six offerings
PRIORITY TARGET - Pull 4Boss
The Hoardmonger
Bloodlust / Heroism - Pull 5
Harsh Winds entry
KICK - Pull 6
Avatar/Squall split
MOVE - Pull 7Boss
Sentinel of Winter
MOVE - Pull 8
Nalorakk approach
KICK - Pull 9Boss
Nalorakk
Bloodlust / Heroism
- Pull 1
Offering opener
Strikers, Gatherers, Tender
Purpose: Advance the route with one clearly assigned priority mechanic before chaining forward.
Danger: Healing Breeze and offerings.
Cooldowns: Short cooldowns.
Tank
- Set the pack in safe space and stop moving forward if control is exhausted.
Healer
- Confirm recovery and dispel coverage before the next chain.
DPS
- Priority damage and assigned utility come before broad AoE.
- Pull 2
Spirit of Hunger
Spirit, Effigy, nearby pack
Purpose: Advance the route with one clearly assigned priority mechanic before chaining forward.
Danger: Feast and curse pressure.
Cooldowns: Group defensive.
Tank
- Set the pack in safe space and stop moving forward if control is exhausted.
Healer
- Confirm recovery and dispel coverage before the next chain.
DPS
- Priority damage and assigned utility come before broad AoE.
- Pull 3
Finish six offerings
Remaining first-wing packs
Purpose: Advance the route with one clearly assigned priority mechanic before chaining forward.
Danger: Do not lose objectives to speed.
Cooldowns: Prepare boss cooldowns.
Tank
- Set the pack in safe space and stop moving forward if control is exhausted.
Healer
- Confirm recovery and dispel coverage before the next chain.
DPS
- Priority damage and assigned utility come before broad AoE.
- Pull 4Bloodlust / Heroism
The Hoardmonger
Boss
Purpose: Advance the route with one clearly assigned priority mechanic before chaining forward.
Danger: Mushroom soaks and Bellow.
Cooldowns: First Bloodlust.
Tank
- Set the pack in safe space and stop moving forward if control is exhausted.
Healer
- Confirm recovery and dispel coverage before the next chain.
DPS
- Priority damage and assigned utility come before broad AoE.
- Pull 5
Harsh Winds entry
Frostfangs, Rumbler, Mauler
Purpose: Advance the route with one clearly assigned priority mechanic before chaining forward.
Danger: Use cover and kick Roar.
Cooldowns: Defensive first ten seconds.
Tank
- Set the pack in safe space and stop moving forward if control is exhausted.
Healer
- Confirm recovery and dispel coverage before the next chain.
DPS
- Priority damage and assigned utility come before broad AoE.
- Pull 6
Avatar/Squall split
Avatar or Winter Squall packs
Purpose: Advance the route with one clearly assigned priority mechanic before chaining forward.
Danger: Roots, Pulverize, sustained aura.
Cooldowns: Do not combine both for learning.
Tank
- Set the pack in safe space and stop moving forward if control is exhausted.
Healer
- Confirm recovery and dispel coverage before the next chain.
DPS
- Priority damage and assigned utility come before broad AoE.
- Pull 7
Sentinel of Winter
Boss
Purpose: Advance the route with one clearly assigned priority mechanic before chaining forward.
Danger: Shivercore sequence and Tempest.
Cooldowns: Healing cooldowns.
Tank
- Set the pack in safe space and stop moving forward if control is exhausted.
Healer
- Confirm recovery and dispel coverage before the next chain.
DPS
- Priority damage and assigned utility come before broad AoE.
- Pull 8
Nalorakk approach
Mystics, Warbringer, Nanea
Purpose: Advance the route with one clearly assigned priority mechanic before chaining forward.
Danger: Arc Lightning, Echo, Totem.
Cooldowns: Priority damage.
Tank
- Set the pack in safe space and stop moving forward if control is exhausted.
Healer
- Confirm recovery and dispel coverage before the next chain.
DPS
- Priority damage and assigned utility come before broad AoE.
- Pull 9Bloodlust / Heroism
Nalorakk
Boss
Purpose: Advance the route with one clearly assigned priority mechanic before chaining forward.
Danger: Echo placement and Onslaught cover.
Cooldowns: Second Bloodlust.
Tank
- Set the pack in safe space and stop moving forward if control is exhausted.
Healer
- Confirm recovery and dispel coverage before the next chain.
DPS
- Priority damage and assigned utility come before broad AoE.
Why This Route Works
- Offerings stay on route
Objective collection is paired with nearby pulls.
- Hunger is isolated
Effigy and Feast receive full attention.
- Wind dictates pace
Cover and cooldowns set pull size.
- Winter checks are separated
Avatar roots and Squall aura do not overlap by default.
- Nalorakk begins clean
Final trash recovery protects echo assignments.
Bloodlust / Heroism Plan
- The Hoardmonger
Shortens repeated resource empowerments and mushroom sets.
Alternative: Use on a dangerous first-wing pull if offerings and control are planned.
If timing is lost: If timing is lost, move the use to the next planned boss or dangerous mandatory pull rather than forcing the original script.
- Nalorakk
Reduces repeated Onslaught and Fury cycles.
Alternative: Use on Sentinel if Tempest is the group wall.
If timing is lost: If timing is lost, move the use to the next planned boss or dangerous mandatory pull rather than forcing the original script.
If It Goes Sideways
Recover the pull, adapt the route, and keep the run moving.
Offering missed
Backtrack before engaging Hoardmonger.
Mushroom soak missed
Use personals and Poison removals; stop stacking more soaks on low players.
Wind catches the group
Move to visible cover and stop pulling until everyone arrives.
Shivercore timing breaks
Leave the second add alive until Rimeshatter and Tempest shelter are ready.
Tank is knocked from Onslaught
Group follows Zul’jarra’s shield, then repositions for Forceful Slam.
Extra count pulled
Trim only optional later packs from the linked route; never skip objectives.
Common Mistakes
Patterns that repeatedly turn manageable moments into lost time.
Leaving an offering behind
Six are mandatory.
Kicking Earth Bolt before Healing Breeze
The heal is the assignment.
One player soaks every mushroom
Spread Toxic Spores.
Fighting in Harsh Winds
Use terrain cover.
Killing both Shivercores together
Sequence shelter and soaks.
Standing near old echoes
Spectral Slash punishes proximity.
Tank faces away from cover
Onslaught requires Zul’jarra behind the group.
Ignoring Volatile Totem
Kill it immediately.
Before You Run This Key
Reveal each answer when you are ready. No grades, scores, or completion tracking.
Which Tender cast is critical?
How many offerings are required?
What happens if a mushroom expires?
What protects players from Frozen Tempest pushback?
Where must the Tank keep Nalorakk echoes?
Where does Blackwake Bloodlust?
Blackwake Notes
Crew-specific calls and hard lessons that supplement the tactical Playbook.
Mythic+ Sessions
Dungeon workshops, role sessions, route workshops, and key nights with the crew.
No Mythic+ sessions are scheduled right now. The Learning Board can still rally a key crew.
Related Academy Content
Fundamentals stay in their own lessons so this page can remain tactical.
- DPSGetting Started
Interrupts: The Button Everyone Should Know
DPS
What interrupting a cast actually does, why it matters more than damage meters, and the mistakes that waste it.
Read the lesson →
Sep 15, 2026
- HealerGetting Started
Dispels Explained
Healer
What can be dispelled, what cannot, and why timing beats reflexes.
Read the lesson →
Sep 18, 2026
- Mythic+Getting Started
Mythic+ Explained
Keystones, timers, scaling, and rating — what Mythic+ actually is before your first key goes in.
Read the lesson →
Sep 18, 2026
- Mythic+Getting Started
Understanding Dungeon Routes
Why routes exist, what enemy percentage means, and how to follow a plan without needing to make one.
Read the lesson →
Sep 18, 2026
- TankIntermediate
Tanking Your First Mythic+
Tank
Routes, enemy count, boss positioning, and talking to your group — the tank's guide to a first timed key.
Read the lesson →
Sep 18, 2026
- HealerIntermediate
Healing Your First Mythic+
Healer
Tank damage, group bursts, mana on a timer, and how to recover when a pull goes sideways.
Read the lesson →
Sep 18, 2026
- DPSIntermediate
DPS in Mythic+
DPS
Priority targets, kicks, cooldown planning, and staying alive — what a damage dealer actually owes a key.
Read the lesson →
Sep 18, 2026
- Mythic+Intermediate
Mythic+ Deaths and Recovery
What deaths actually cost, how to recover a collapsing pull, and how to stop the chain.
Read the lesson →
Sep 18, 2026
- Mythic+Getting Started
Mythic+ Etiquette
Communication, commitment, and keeping keys a place people want to learn — the Blackwake way.
Read the lesson →
Sep 18, 2026
Trusted Resources
Curated references beyond the Blackwake Playbook.
Need a hand?
Ask the Crew
Working through Den of Nalorakk? Ask for a route review, role help, or a learning run.