Dungeon Playbook
Current poolBattle for Azeroth · Season 2Kings' Rest
A substantially rebuilt Battle for Azeroth dungeon with dense fixed events, dangerous purge and kick checks, sarcophagus rescues, a redesigned Council sequence, and a new Dazar finale.
Reviewed for Battle for Azeroth Season 2 · Last checked Sep 2026
- Bosses charted
- 4
- Dangerous pulls
- 8
- Priority casts
- 7
Dungeon Overview
The shape of the key before the detailed calls.
A linear royal gauntlet with dense utility checks and redesigned bosses
Heavy Slams, bleeds, fears, heals, totems, Tank amplifiers, and fixed event waves create sustained coordination from entrance to throne.
This is the Patch 12.1 version. Trash packages, enemy forces, Council order, Shadow of Zul, and Dazar were changed. The route is linear but mechanically dense: every wing has one cast, add, totem, or soak that takes priority over broad damage.
- Season 2 rebuild
- Purge checks
- Fixed gauntlets
- Totem priority
- Heavy Tank damage
Dungeon Profile
- Tank Pressure
- Very High
- Guardian enrage, Mortal Bleed, constructs, Backhand, Shadow of Zul, Maul, and Blade Combo are major checks.
- Group Damage
- Very High
- Heavy Slams, Gust, Slam, Arc Lightning, Pool of Darkness, and final leaps pressure the party.
- Interrupt Demand
- Very High
- Hex Volley, Unholy Mending, Bind Soul, Wretched Discharge, Hex, Poison Nova, and Deathly Roar need rotations.
- Movement
- High
- Frontals, Bladestorm, coffins, axes, soaks, leaps, and spears require movement.
- Dispel / Utility Demand
- Very High
- Purge, soothe, Magic, Poison, Curse, bleed removal, and freedom effects have distinct uses.
- Route Complexity
- Moderate
- Mostly linear, but fixed event waves and revised enemy forces invalidate BfA count plans.
Dungeon visual · Abstract flow
Dungeon Tactical Overview
A route-flow chart, not dungeon geometry. Read left-to-right on wide screens or top-to-bottom on mobile.
- StartKICK
Guardian opener
Hexer + Champion control
Pulls 1
- Stage 2Bloodlust / Heroism
Golden Serpent
Paired pools + Animated Gold
Pulls 2
- Stage 3KICK
Royal gauntlet
Fixed control waves
Pulls 3
- Stage 4DEFENSIVE
Construct halls
Entomb + mummy kicks
Pulls 4
- Stage 5MOVE
Mchimba
Find the shaking coffin
Pulls 5
- Stage 6Bloodlust / Heroism
Council to Dazar
Council, Zul check, Dazar
Pulls 6–9
Before You Queue
- Use a Season 2 route — Council and Dazar are redesigned; old guides are unsafe.
- Assign Hex Volley, Mending, Nova, and Roar — These are the high-cost misses.
- Bring purge and soothe where available — Bound by Shadow, Mending, Bulwark, and enrages reward offensive utility.
- Know the coffin tell — Entombed player shakes the correct sarcophagus.
- Memorize totem order — Explosive, Thundering, Torrent.
The Things That Wipe the Key
The few failure points most likely to cost the timer.
- DPSTankHealerDPS
Gold reaches the boss
Control every Lucre’s Call add.
Consequence: Luster creates a shield and group damage.
- InterruptTankHealerDPS
Gauntlet cast missed
Assign Mending and Bind Soul.
Consequence: Event waves extend or control players.
- PositioningTankHealerDPS
Entomb rescue late
Find shaking coffin immediately.
Consequence: Player takes damage and extra mummies spawn.
- InterruptTankHealerDPS
Poison Nova or Explosive Totem
Kick Nova and kill Explosive first.
Consequence: Council party damage becomes lethal.
- PositioningTankHealerDPS
Shadow of Zul soaks empty
Put players in both Darkness pools.
Consequence: Unsoaked pools blast the group.
- TankTankHealerDPS
Final busters overlap
Layer mitigation for Maul into Combo.
Consequence: Tank dies during mounted phase.
Boss Playbook
The fight in 20 seconds, what matters, and the most common wipe.
Boss 1
The Golden Serpent
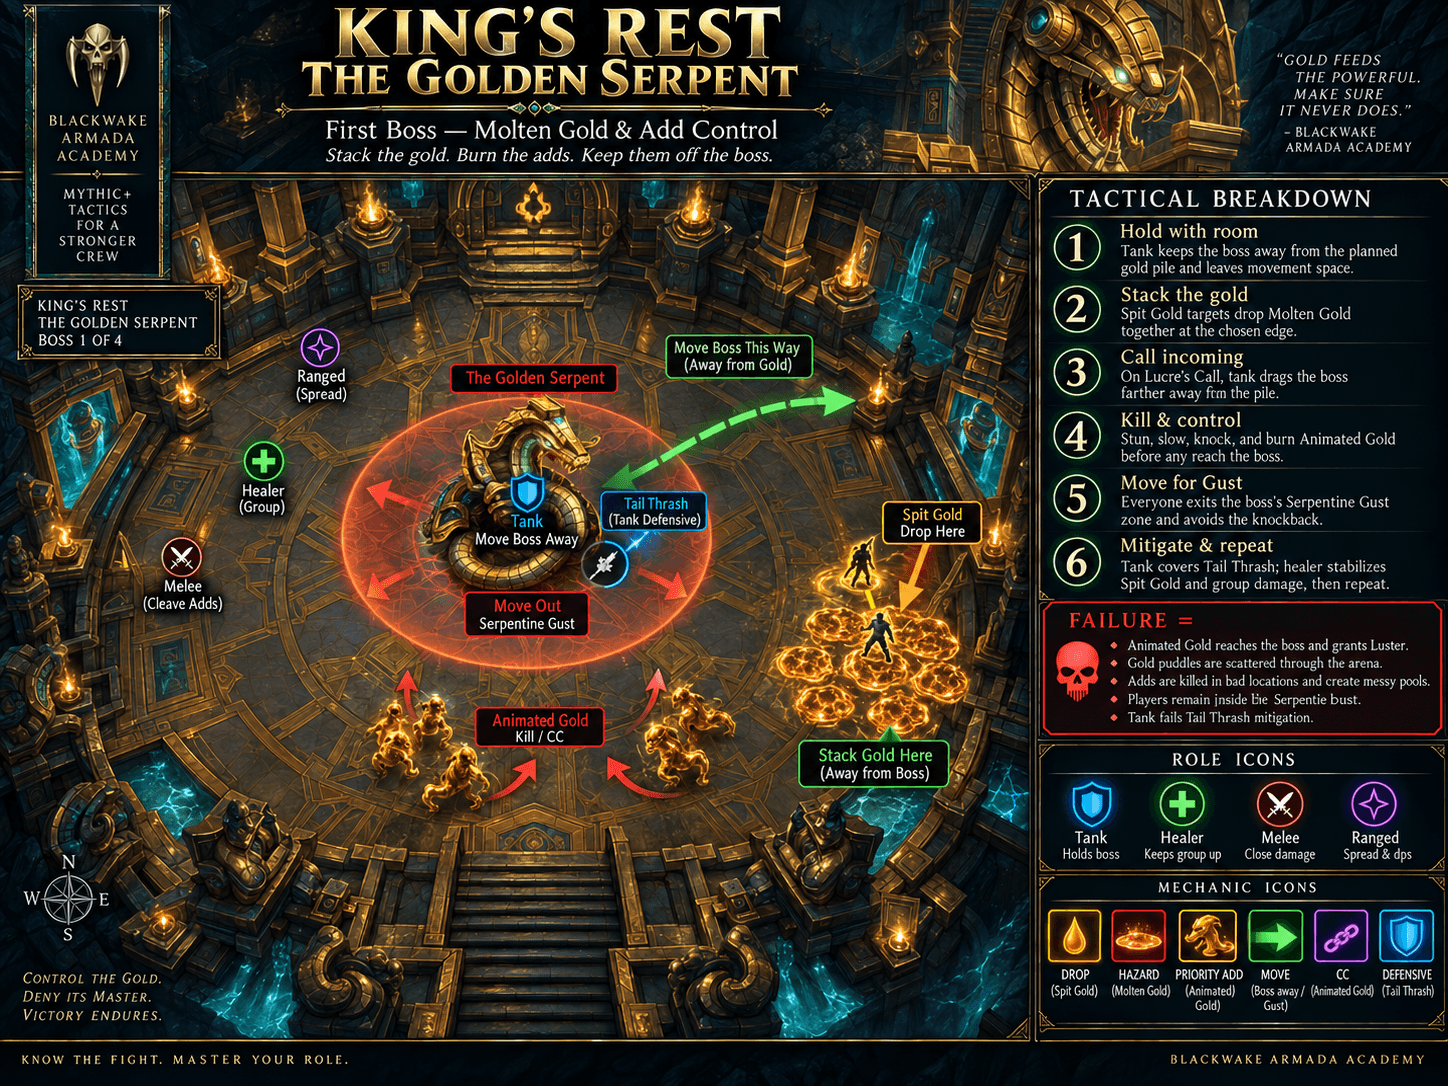
Place two Spit Gold pools together, control Animated Gold during Lucre’s Call, and prevent every add from reaching the boss while healing Serpentine Gust..
The Fight in 20 Seconds
Place two Spit Gold pools together, control Animated Gold during Lucre’s Call, and prevent every add from reaching the boss while healing Serpentine Gust.
What Actually Matters
- Spit Gold
Two players place pools for controlled add spawns.
- Lucre’s Call
Pools become Animated Gold; slow, control, and kill them.
- Luster
An add reaching boss grants a dangerous shield and party damage.
- Serpentine Gust
Sustained group channel.
- Tail Thrash
Tank hit.
Dungeon visual · Illustrated positioning
Golden Serpent Gold Control
Illustrated Spit Gold placement, Animated Gold control, Lucre’s Call timing, Serpentine Gust coverage, and boss-contact prevention.
Tank
- Drag boss away from adds and mitigate Thrash.
Healer
- Cooldown Gust and Spit targets.
DPS
- Control/kill every Gold before boss contact.
Defensive Timing
- Personal during Gust.
- Defensive if an add reaches boss.
Bloodlust / Heroism: Good first use to reduce add cycles.
Common Wipe: Animated Gold reaches the boss and Luster overlaps Serpentine Gust.
- Spit Gold
Boss 2
Mchimba the Embalmer
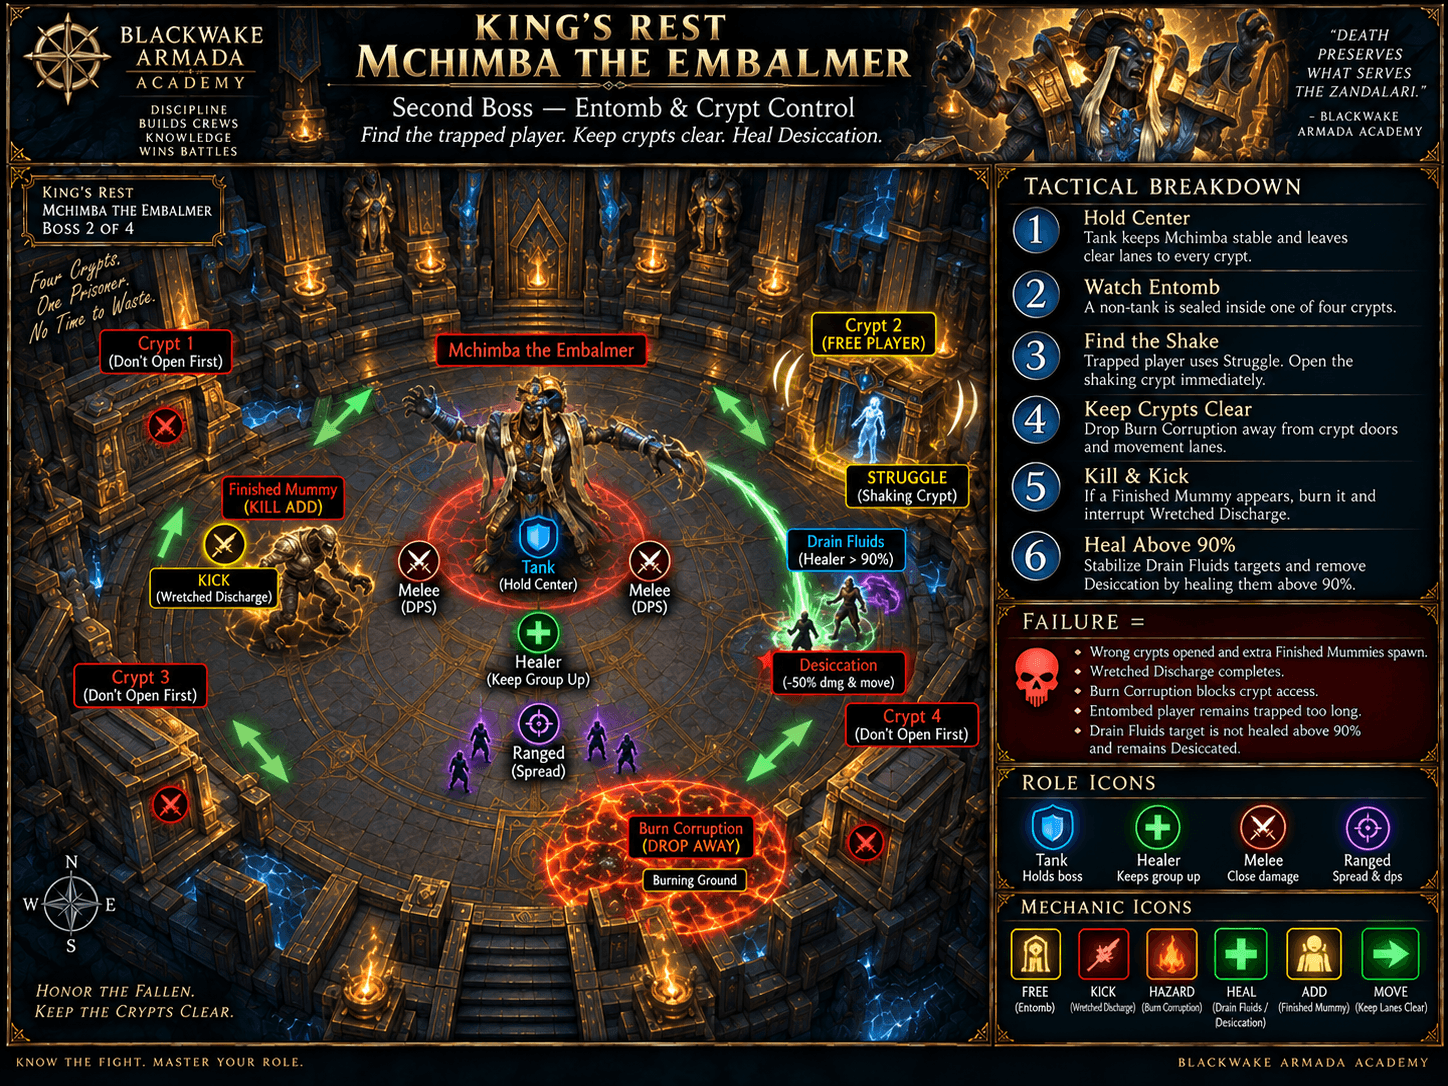
Defensive Drain Fluids targets, place Burn Corruption away, top before Awakening Slam, kick spawned mummies, and free Entombed players by finding the shaking sarcophagus..
The Fight in 20 Seconds
Defensive Drain Fluids targets, place Burn Corruption away, top before Awakening Slam, kick spawned mummies, and free Entombed players by finding the shaking sarcophagus.
What Actually Matters
- Drain Fluids
Target uses defensive; if full channel lands, heal above 90%.
- Burn Corruption
Drop fire away from sarcophagi.
- Awakening Slam
Large hit plus two mummies.
- Wretched Discharge
Kick every mummy cast.
- Entomb
Find the shaking coffin and free player quickly.
Dungeon visual · Illustrated mechanic sequence
Mchimba: Coffin Rescue
The rescue is an ordered search-and-control problem, not a pure damage check.
- 1
Entomb
A player is sealed inside one of the sarcophagi.
- 2
Watch coffins
Identify the shaking sarcophagus immediately.
- 3
Open the correct one
Free the player before the rescue becomes lethal.
- 4
Control mummies
Gather spawned mummies and interrupt Wretched Discharge.
- 5
Reset space
Keep Burn Corruption away from the coffins.
TankKeep the boss and coffin paths clear while gathering mummies.
HealerTop the party before Awakening Slam and recover the Drain target.
DPSSearch coffins immediately and preserve mummy kicks.
Tank
- Keep boss/sarcophagi paths clear and gather mummies.
Healer
- Top before Slam and recover Drain target above 90%.
DPS
- Kick mummies and search coffins immediately.
Defensive Timing
- Personal for Drain/Slam.
- Group defensive if mummies cast.
Bloodlust / Heroism: Useful if repeated Slam/add sets are the group wall.
Common Wipe: The Entombed player remains trapped while mummies free-cast Wretched Discharge.
- Drain Fluids
Boss 3
The Council of Tribes
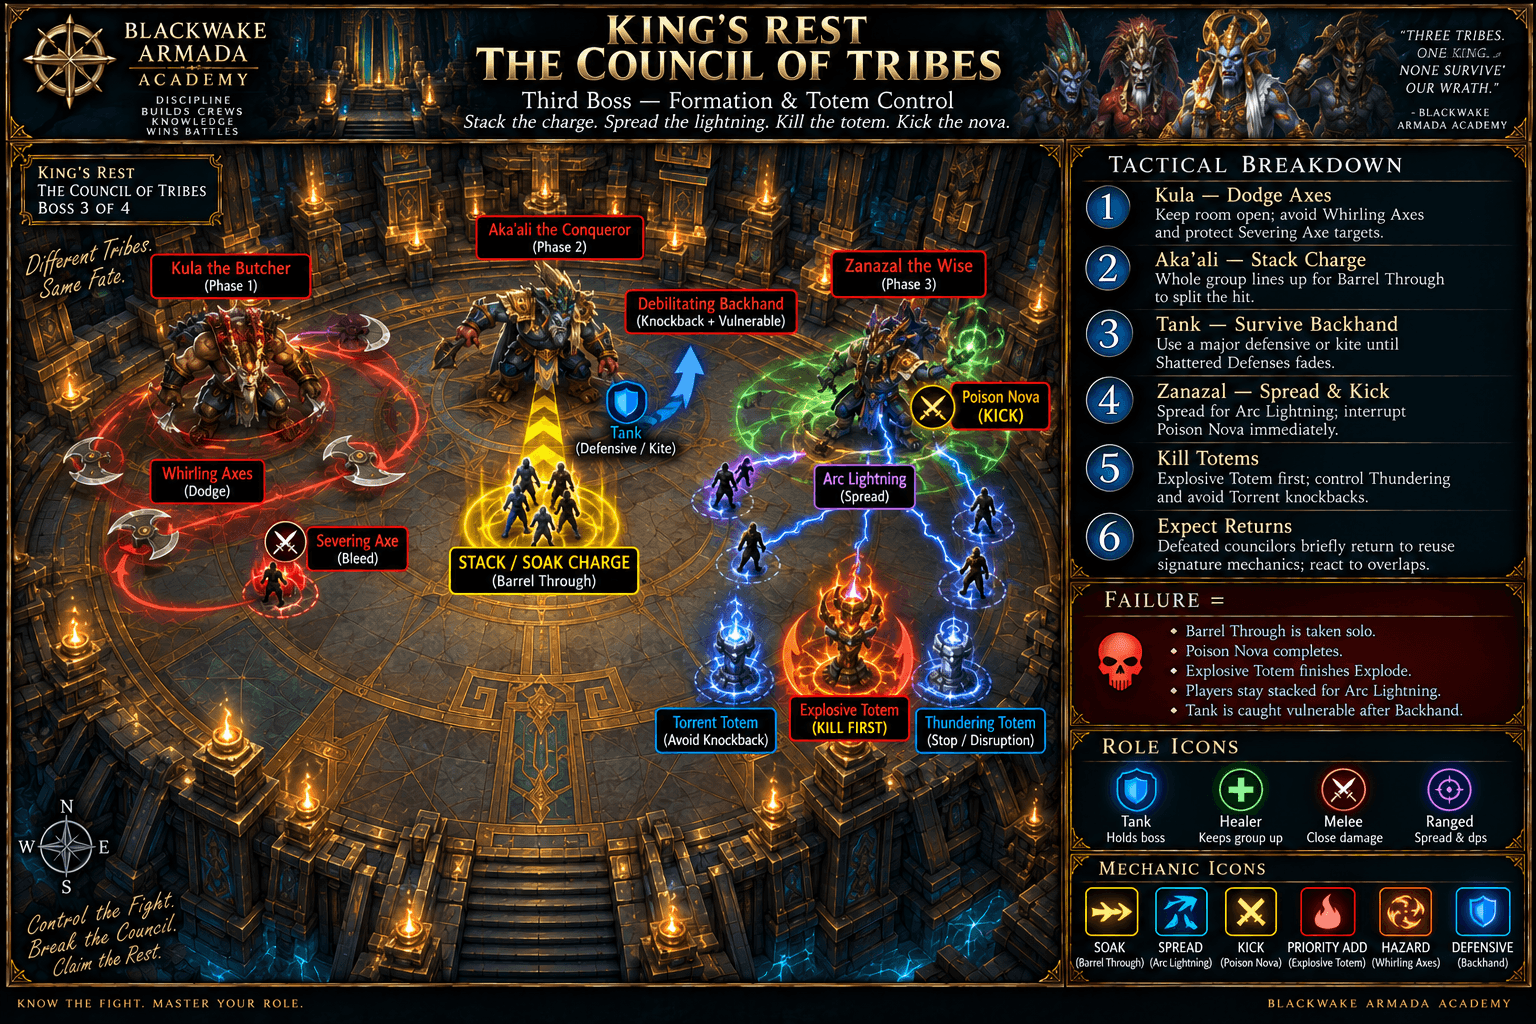
Handle fixed Kula–Aka’ali–Zanazal sequence: heal Severing Axe, dodge Whirling Axes, group-soak Barrel Through, kite Backhand, interrupt Poison Nova, and kill Explosive then Thundering then Torrent Totem..
The Fight in 20 Seconds
Handle fixed Kula–Aka’ali–Zanazal sequence: heal Severing Axe, dodge Whirling Axes, group-soak Barrel Through, kite Backhand, interrupt Poison Nova, and kill Explosive then Thundering then Torrent Totem.
What Actually Matters
- Whirling Axes
Dodge persistent projectiles from Kula’s body.
- Barrel Through
Group soak even after Aka’ali dies.
- Debilitating Backhand
Tank kites or uses major defensive.
- Poison Nova
Must-kick party cast.
- Call the Elements
Explosive Totem first, then Thundering, then Torrent.
Dungeon visual · Illustrated positioning
Council of Tribes Order
Illustrated boss rotation, Severing Axe recovery, Barrel Through grouping, Poison Nova control, and totem priority.
Tank
- Tank Kula centrally and manage Backhand.
Healer
- Heal Severing Axe and Arc Lightning; track soak.
DPS
- Kick Poison Nova and swap totems in order.
Defensive Timing
- Personal for Axe/Arc Lightning.
- Tank major for Backhand.
Bloodlust / Heroism: Strong default to shorten a mechanically dense fixed sequence.
Common Wipe: Poison Nova or Explosive Totem completes while players are split for axes.
- Whirling Axes
Boss 4
Dazar, the First King
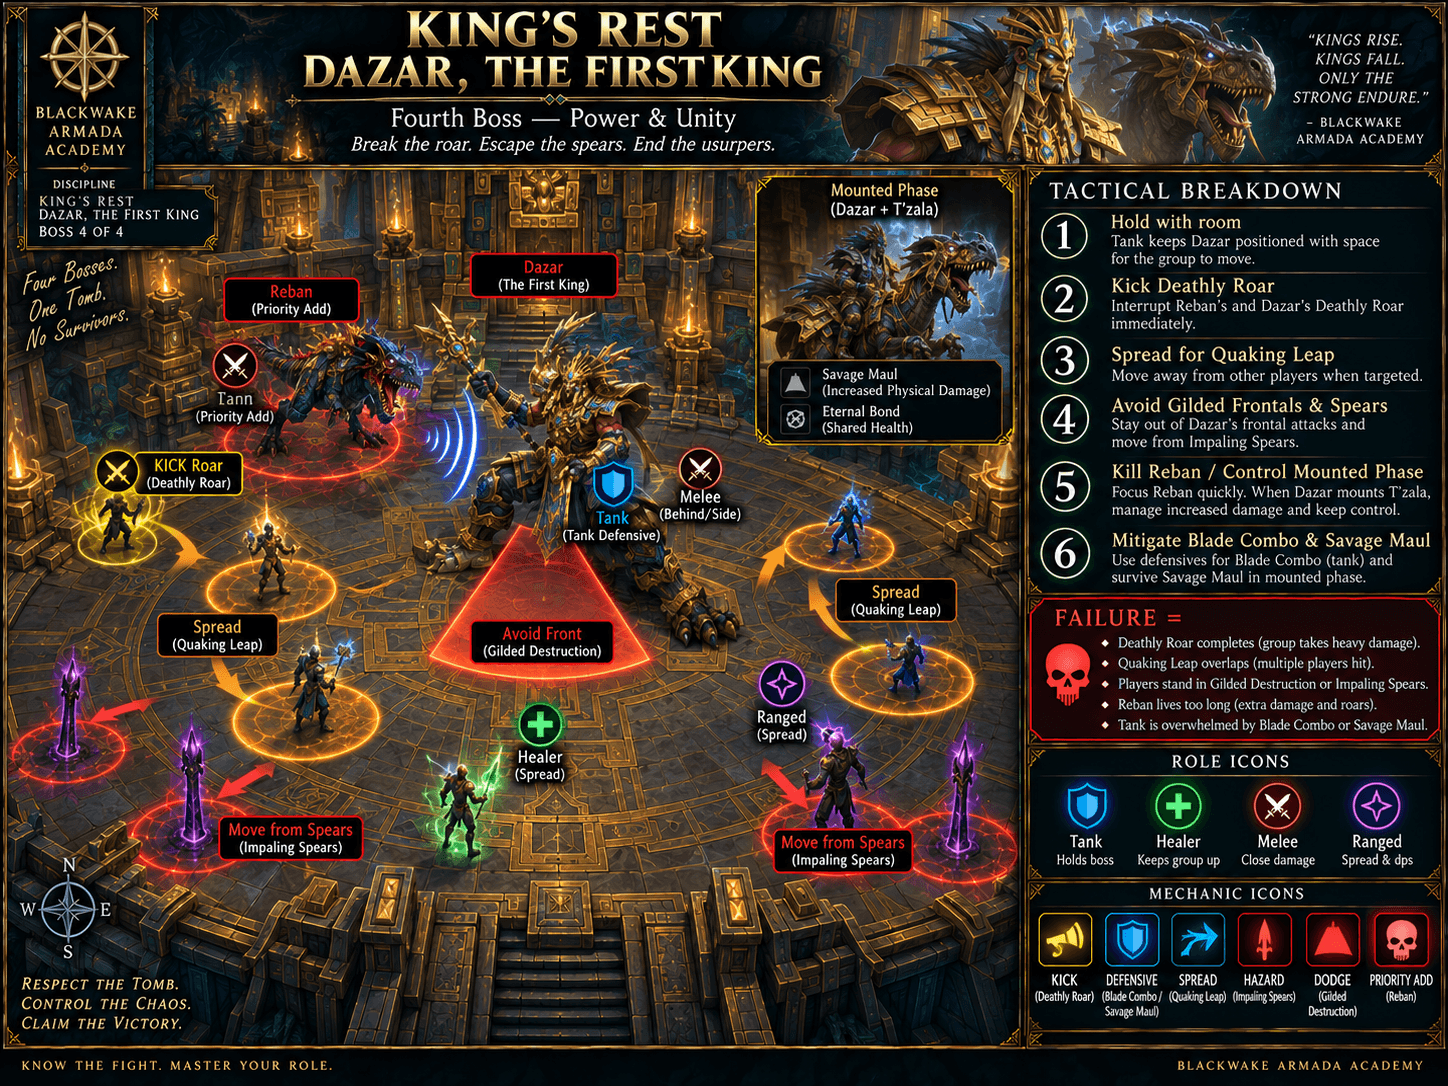
Focus Reban, kick Deathly Roar, spread leaps, mitigate Blade Combo and Savage Maul, point Gilded Destruction away, and dodge Impaling Spears..
The Fight in 20 Seconds
Focus Reban, kick Deathly Roar, spread leaps, mitigate Blade Combo and Savage Maul, point Gilded Destruction away, and dodge Impaling Spears.
What Actually Matters
- Reban
Kill early to remove leap and roar pressure.
- Deathly Roar
Interrupt the fear.
- Aerial Smash / Quaking Leap
Spread marked players.
- Savage Maul and Blade Combo
Layered Tank busters after mount transition.
- Gilded Destruction
Party hit while boss melees become a frontal.
Dungeon visual · Illustrated positioning
Dazar Reban and Leap Control
Illustrated Reban priority, Deathly Roar kicks, leap spread, Blade Combo and Savage Maul mitigation, Gilded Destruction facing, and Impaling Spears.
Tank
- Face boss away, mitigate combo, and control Reban frontal.
Healer
- Prepare Quaking Leap and Gilded Destruction.
DPS
- Focus Reban, kick Roar, and spread leaps.
Defensive Timing
- Personal for Quaking Leap/Gilded.
- Tank major for Maul into Combo.
Bloodlust / Heroism: Strong final use to reduce mounted buster and leap cycles.
Common Wipe: Deathly Roar lands or the Tank faces Gilded frontal through the group during Quaking Leap.
- Reban
Dangerous Trash
Only the enemies that meaningfully change the pull.
Dungeon visual · Priority pack
Priority Pull: Royal Gauntlet
The fixed waves contain two separate control casts that must not be allowed to resolve.
- 1Critical
Queen Wasi
Bind Soul
KICKPRIORITY TARGETReserve kick; fillers are secondary.
- 2Critical
Seneschal M’bara
Unholy Mending
KICKPURGEPRIORITY TARGETKick every cast.
Dungeon visual · Priority pack
Priority Pull: Construct Halls
The hall packs pair an Entomb rescue with kickable mummy casts and ongoing group pressure.
- 1High
Interment Construct
Entomb
DEFENSIVEPRIORITY TARGETFree coffin target quickly.
- 2High
Half-Finished Mummy
Wretched Discharge
KICKDISPELPRIORITY TARGETKick every cast; Disease-remove a miss.
Dungeon visual · Priority pack
Priority Pull: Council Approach
The approach requires a totem swap without losing the assigned Hex control.
- 1High
Spectral Shaman
Healing Tide Totem
PRIORITY TARGETSwap and kill totem.
- 2High
Phantom Hex Priest
Hex
KICKDISPELAssign cast; Curse removal recovers miss.
- Critical
Risen Hexer
Hex Volley
KICKDISPELPRIORITY TARGETMust-kick group control; bolts leave Magic slows.
- Kick:
- Interruptible
- Handle:
- Kick Volley; spare kicks on bolts.
- Critical
Seneschal M’bara
Unholy Mending
KICKPURGEPRIORITY TARGETLarge heal that can be purged after a miss.
- Kick:
- Interruptible
- Handle:
- Kick every cast.
- Critical
Queen Wasi
Bind Soul
KICKPRIORITY TARGETMust-kick control cast from CC-immune enemy.
- Kick:
- Interruptible
- Handle:
- Reserve kick; fillers are secondary.
- High
Interment Construct
Entomb
DEFENSIVEPRIORITY TARGETCC-immune enemy traps player while Heavy Slams pulse.
- Kick:
- Not kick-interruptible
- Handle:
- Free coffin target quickly.
- High
Half-Finished Mummy
Wretched Discharge
KICKDISPELPRIORITY TARGETKickable group damage and Disease.
- Kick:
- Interruptible
- Handle:
- Kick every cast; Disease-remove a miss.
- High
Spectral Shaman
Healing Tide Totem
PRIORITY TARGETTotem heals enemies.
- Kick:
- Not kick-interruptible
- Handle:
- Swap and kill totem.
- High
Phantom Hex Priest
Hex
KICKDISPELKick or Curse-dispel the control.
- Kick:
- Interruptible
- Handle:
- Assign cast; Curse removal recovers miss.
- High
Shadow of Zul
Pool of Darkness
DEFENSIVEPURGEPRIORITY TARGETTwo mandatory soaks plus Revelation adds; CC-immune.
- Kick:
- Not kick-interruptible
- Handle:
- Fill both pools and purge/focus Minions.
Interrupt Priority
Kick when a kick works. Use the named stop when it does not.
Stuns, silences, knockbacks, displacement, and incapacitates are stops, not interchangeable labels for an interrupt. Review Interrupts, Stops, and Crowd Control →
Dungeon visual · Interrupt strip
Second-Screen Interrupt Strip
Priority, action type, spell, and source remain visible without opening details or relying on color alone.
Critical
- KICKHex Volley
Risen Hexer
- KICKUnholy Mending
Seneschal M’bara
- KICKBind Soul
Queen Wasi
- KICKWretched Discharge
Half-Finished Mummy
- KICKPoison Nova
Zanazal
High priority
- KICKDeathly Roar
Dazar/Reban
- KICKHex
Phantom Hex Priest
Critical
- KICKCritical
Hex Volley
Risen Hexer
Group control.
Response: Kick every cast.
- KICKCritical
Unholy Mending
Seneschal M’bara
Large heal.
Response: Kick; purge miss.
- KICKCritical
Bind Soul
Queen Wasi
Controls a player.
Response: Reserve kick.
- KICKCritical
Wretched Discharge
Half-Finished Mummy
Group damage/Disease.
Response: Kick every cast.
- KICKCritical
Poison Nova
Zanazal
Council-wide damage.
Response: Kick every cast.
High Priority
- KICKHigh
Deathly Roar
Dazar/Reban
AoE fear.
Response: Kick every cast.
- KICKHigh
Hex
Phantom Hex Priest
Player control.
Response: Kick or Curse-dispel.
Tank Cheat Sheet
The Tank calls worth reviewing at the ready check.
- Face Guardian slams away and soothe Champion enrage.
- Manage random royal gauntlet busters and fixates.
- Keep coffin access clear at Mchimba.
- Use major for Backhand and kite its amp.
- Hold Council center while avoiding persistent axes.
- Mitigate Shadow of Zul and fill Darkness soaks.
- Focus Reban positioning before mount phase.
- Layer Maul and Blade Combo and face Gilded away.
Healer Cheat Sheet
The Healer calls worth reviewing at the ready check.
- Heavy Slams and Gust need planned throughput.
- Track gauntlet bleeds/Poison by actual class capability.
- Push Drain Fluids target above 90%.
- Top before Awakening Slam.
- Heal Severing Axe and Arc Lightning.
- Curse/Magic dispels recover Hex/Frost Shock.
- Shadow of Zul is a major preboss check.
- Prepare Quaking Leap and Gilded Destruction.
DPS Cheat Sheet
Mechanics, utility, and priority damage are useful DPS—not only meter output.
- Purge Minion shields to kill them instantly where available.
- Kick Volley, Mending, Bind Soul, Discharge, Nova, and Roar.
- Control Animated Gold and swap Healing Tide Totem.
- Find the shaking coffin.
- Kill Explosive Totem first.
- Fill Shadow of Zul soaks and purge Minions.
- Focus Reban.
- Do not pad through priority casts or totems.
Blackwake Route
The recommended sequence, why it works, and where the plan can flex.
Blackwake Learning Route — Current Royal Sequence
Follow the current linear route, complete fixed royal waves, preserve coffin access, use the redesigned Council order, and treat Shadow of Zul as a planned miniboss. No BfA percentages are reused.
Dungeon visual · Route timeline
Blackwake Route Timeline
A scan-first companion to the detailed pull cards. Pull order, boss transitions, control checks, and planned Bloodlust uses come from the existing route.
- Start · Pull 1
Guardian opener
KICK - Pull 2Boss
Golden Serpent
Bloodlust / Heroism - Pull 3
Royal gauntlet
KICK - Pull 4
Construct halls
DEFENSIVE - Pull 5Boss
Mchimba
MOVE - Pull 6
Council approach
KICK - Pull 7Boss
Council
DEFENSIVE - Pull 8
Shadow of Zul
DEFENSIVE - Pull 9Boss
Dazar
Bloodlust / Heroism
- Pull 1
Guardian opener
Guardians, Hexer, Champion
Purpose: Advance the route with one clearly assigned priority mechanic before chaining forward.
Danger: Volley and Slams.
Cooldowns: Defensive plan.
Tank
- Set the pack in safe space and stop moving forward if control is exhausted.
Healer
- Confirm recovery and dispel coverage before the next chain.
DPS
- Priority damage and assigned utility come before broad AoE.
- Pull 2Bloodlust / Heroism
Golden Serpent
Boss
Purpose: Advance the route with one clearly assigned priority mechanic before chaining forward.
Danger: Gold adds.
Cooldowns: First Bloodlust.
Tank
- Set the pack in safe space and stop moving forward if control is exhausted.
Healer
- Confirm recovery and dispel coverage before the next chain.
DPS
- Priority damage and assigned utility come before broad AoE.
- Pull 3
Royal gauntlet
Fixed event waves
Purpose: Advance the route with one clearly assigned priority mechanic before chaining forward.
Danger: Mending, Bind Soul, bleeds.
Cooldowns: One wave at a time.
Tank
- Set the pack in safe space and stop moving forward if control is exhausted.
Healer
- Confirm recovery and dispel coverage before the next chain.
DPS
- Priority damage and assigned utility come before broad AoE.
- Pull 4
Construct halls
Purification/Interment constructs and mummies
Purpose: Advance the route with one clearly assigned priority mechanic before chaining forward.
Danger: Heavy Slams, Entomb, Discharge.
Cooldowns: Keep coffins clear.
Tank
- Set the pack in safe space and stop moving forward if control is exhausted.
Healer
- Confirm recovery and dispel coverage before the next chain.
DPS
- Priority damage and assigned utility come before broad AoE.
- Pull 5
Mchimba
Boss
Purpose: Advance the route with one clearly assigned priority mechanic before chaining forward.
Danger: Entomb and mummies.
Cooldowns: Boss cooldowns.
Tank
- Set the pack in safe space and stop moving forward if control is exhausted.
Healer
- Confirm recovery and dispel coverage before the next chain.
DPS
- Priority damage and assigned utility come before broad AoE.
- Pull 6
Council approach
Shaman, Hex Priest, Berserker
Purpose: Advance the route with one clearly assigned priority mechanic before chaining forward.
Danger: Totem and Hex.
Cooldowns: Priority damage.
Tank
- Set the pack in safe space and stop moving forward if control is exhausted.
Healer
- Confirm recovery and dispel coverage before the next chain.
DPS
- Priority damage and assigned utility come before broad AoE.
- Pull 7
Council
Three-boss fixed sequence
Purpose: Advance the route with one clearly assigned priority mechanic before chaining forward.
Danger: Soak, Nova, totems.
Cooldowns: Group defensives.
Tank
- Set the pack in safe space and stop moving forward if control is exhausted.
Healer
- Confirm recovery and dispel coverage before the next chain.
DPS
- Priority damage and assigned utility come before broad AoE.
- Pull 8
Shadow of Zul
Required miniboss
Purpose: Advance the route with one clearly assigned priority mechanic before chaining forward.
Danger: Two soaks and Revelation.
Cooldowns: Major cooldowns.
Tank
- Set the pack in safe space and stop moving forward if control is exhausted.
Healer
- Confirm recovery and dispel coverage before the next chain.
DPS
- Priority damage and assigned utility come before broad AoE.
- Pull 9Bloodlust / Heroism
Dazar
Final boss
Purpose: Advance the route with one clearly assigned priority mechanic before chaining forward.
Danger: Reban, busters, leaps.
Cooldowns: Second Bloodlust.
Tank
- Set the pack in safe space and stop moving forward if control is exhausted.
Healer
- Confirm recovery and dispel coverage before the next chain.
DPS
- Priority damage and assigned utility come before broad AoE.
Why This Route Works
- Current sequence only
Legacy weekly Council and count assumptions are obsolete.
- Waves stay isolated
Each royal cast has a named answer.
- Coffins remain accessible
Ground effects are placed away.
- Shadow of Zul is planned
Soaks and cooldowns are assigned before pull.
- Boss Bloodlust reduces add/buster cycles
Golden Serpent and Dazar are repeatable defaults.
Bloodlust / Heroism Plan
- The Golden Serpent
Reduces Gold add and Gust cycles.
Alternative: Use on a difficult royal wave if boss control is stable.
If timing is lost: If timing is lost, move the use to the next planned boss or dangerous mandatory pull rather than forcing the original script.
- Dazar
Shortens mounted buster and leap phase.
Alternative: Use on Council if totem/Nova execution is the wall.
If timing is lost: If timing is lost, move the use to the next planned boss or dangerous mandatory pull rather than forcing the original script.
If It Goes Sideways
Recover the pull, adapt the route, and keep the run moving.
Gold reaches boss
Purge/break shield and commit group defensives.
Gauntlet kick missed
Purge heal or dispel control, then assign next cast.
Entomb player not found
Spread immediately and watch shaking coffin.
Explosive Totem late
All DPS swap; use personals before detonation.
Shadow soak empty
Nearest healthy player fills it; use defensive.
Final Tank death
Control Reban, battle-resurrect, and stop damage until boss facing is restored.
Common Mistakes
Patterns that repeatedly turn manageable moments into lost time.
Using a BfA route
Season 2 changed forces and bosses.
Ignoring Gold adds
They empower boss.
Kicking filler before Mending/Bind Soul
Reserve priority kick.
Dropping fire by coffins
Keep rescue paths clear.
Wrong totem order
Explosive first.
Empty Darkness soak
Both pools need players.
Ignoring Reban
Kill him early.
Facing Gilded through group
Tank points away.
Before You Run This Key
Reveal each answer when you are ready. No grades, scores, or completion tracking.
What happens when Gold reaches boss?
Which gauntlet heal is critical?
How do you find Entomb?
What is Council totem order?
What must happen at Shadow pools?
Where does Blackwake Bloodlust?
Blackwake Notes
Crew-specific calls and hard lessons that supplement the tactical Playbook.
Mythic+ Sessions
Dungeon workshops, role sessions, route workshops, and key nights with the crew.
No Mythic+ sessions are scheduled right now. The Learning Board can still rally a key crew.
Related Academy Content
Fundamentals stay in their own lessons so this page can remain tactical.
- DPSGetting Started
Interrupts: The Button Everyone Should Know
DPS
What interrupting a cast actually does, why it matters more than damage meters, and the mistakes that waste it.
Read the lesson →
Sep 15, 2026
- HealerGetting Started
Dispels Explained
Healer
What can be dispelled, what cannot, and why timing beats reflexes.
Read the lesson →
Sep 18, 2026
- Mythic+Getting Started
Mythic+ Explained
Keystones, timers, scaling, and rating — what Mythic+ actually is before your first key goes in.
Read the lesson →
Sep 18, 2026
- Mythic+Getting Started
Understanding Dungeon Routes
Why routes exist, what enemy percentage means, and how to follow a plan without needing to make one.
Read the lesson →
Sep 18, 2026
- TankIntermediate
Tanking Your First Mythic+
Tank
Routes, enemy count, boss positioning, and talking to your group — the tank's guide to a first timed key.
Read the lesson →
Sep 18, 2026
- HealerIntermediate
Healing Your First Mythic+
Healer
Tank damage, group bursts, mana on a timer, and how to recover when a pull goes sideways.
Read the lesson →
Sep 18, 2026
- DPSIntermediate
DPS in Mythic+
DPS
Priority targets, kicks, cooldown planning, and staying alive — what a damage dealer actually owes a key.
Read the lesson →
Sep 18, 2026
- Mythic+Intermediate
Mythic+ Deaths and Recovery
What deaths actually cost, how to recover a collapsing pull, and how to stop the chain.
Read the lesson →
Sep 18, 2026
- Mythic+Getting Started
Mythic+ Etiquette
Communication, commitment, and keeping keys a place people want to learn — the Blackwake way.
Read the lesson →
Sep 18, 2026
Trusted Resources
Curated references beyond the Blackwake Playbook.
Need a hand?
Ask the Crew
Working through Kings' Rest? Ask for a route review, role help, or a learning run.