Dungeon Playbook
Current poolMidnight · Season 2Murder Row
A fel-soaked city crawl with mandatory informants, a cooperative bar event, sharp dispel checks, priority adds, and four bosses that reward planned movement.
Reviewed for Midnight Season 2 · Last checked Sep 2026
- Bosses charted
- 4
- Dangerous pulls
- 8
- Priority casts
- 6
Dungeon Overview
The shape of the key before the detailed calls.
An objective-heavy fel dungeon built around dispels, add swaps, and arena management
Tank debuffs, curses, bleeds, poison, pulsing demon damage, and repeated priority adds make this a utility and target-selection dungeon.
Murder Row alternates between crowded street pulls, scripted objectives, and boss rooms where target priority matters more than raw cleave. Complete all four Snitches, finish the five-player bar shift cleanly, and preserve control for demons that punish missed swaps.
- Fel damage
- Mandatory objectives
- Priority adds
- Curse and Poison utility
- Arena space
Dungeon Profile
- Tank Pressure
- High
- Captains, guards, Shivan Punishers, golems, boss Envenom, and an unkillable Infernal create repeated mitigation checks.
- Group Damage
- Very High
- Massive Felwyrms, Demonic Frenzy, Blade Dance, Defiled Slam, Killing Spree, and Searing Fel pressure the party.
- Interrupt Demand
- High
- Seduction, image casts, Fel Rage, Felfire Burst, Chaos Bolt, and support channels need assignments.
- Movement
- High
- Fel Nova, barrels, puddle kiting, gateway timing, and frontals constantly reposition the party.
- Dispel / Utility Demand
- Very High
- Magic, Poison, Curse, Bleed, soothe, purge, and hard stops all have verified uses.
- Route Complexity
- High
- Four Snitches, a five-player bar event, optional vendor tools, and multiple spatial boss rooms punish missed objectives.
Dungeon visual · Abstract flow
Dungeon Tactical Overview
A route-flow chart, not dungeon geometry. Read left-to-right on wide screens or top-to-bottom on mobile.
- StartKICK
Snitch circuit
4 Snitches + street utility
Pulls 1–3
- Stage 2PRIORITY TARGET
Kystia Manaheart
Nibbles + Mirror Images
Pulls 4
- Stage 3MOVE
Clock-in event
Five jobs + warehouse
Pulls 5
- Stage 4DEFENSIVE
Zaen Bladesorrow
Barrels + freight swap
Pulls 6
- Stage 5Bloodlust / Heroism
Demon wing
Controlled packs → Xathuux
Pulls 7–8
- Stage 6Bloodlust / Heroism
Lithiel Cinderfury
Clear adds before Gateway
Pulls 9–10
Before You Queue
- Assign Seduction and Chaos Bolt kicks — Keep backup stops for Mirror Images and Imps. Review →
- Check Magic, Poison, Curse, and Bleed utility — Spittle, Heartstop Poison, Curse of Doom, and several bleeds require different answers. Review →
- Know the four Snitches and bar jobs — Objective mistakes cost more time than a conservative trash split.
- Review Zaen barrel cover — Every player needs separate cover for Murder in a Row.
- Plan Xathuux and Lithiel Bloodlust — Blackwake defaults to Xathuux and Lithiel; Zaen is a valid alternative.
The Things That Wipe the Key
The few failure points most likely to cost the timer.
- RouteTankHealerDPS
Missed Snitch or failed bar coordination
Complete all four opening interrogations and have all five players start their assigned bar task.
Consequence: Backtracking or stalled role-play burns large chunks of timer.
- DPSTankHealerDPS
Deep Corruption Captain lives
Focus the Bribed Captain while controlling Seduction and Tank stacks.
Consequence: Its aura amplifies the whole pack and turns Tank damage into a collapse.
- DPSTankHealerDPS
Freight survives Killing Spree
Swap immediately to Fel-Infused Freight and retain barrel cover.
Consequence: Freight pulses plus Killing Spree overwhelms healing.
- DispelTankHealerDPS
Curse of Doom mishandled
Dispel it or deliberately stack to split the expiration.
Consequence: An isolated expiration can kill the target and summon a Doomguard.
- PositioningTankHealerDPS
Xathuux arena is filled badly
Kite Demonic Rage along the edge and kill Legion Axes.
Consequence: No space remains for later Crush and Rage cycles.
- MovementTankHealerDPS
Adds touch Malefic Wave
Finish Vilefiends and Imps before using the safe gateway.
Consequence: Empowered adds overwhelm the final encounter.
Boss Playbook
The fight in 20 seconds, what matters, and the most common wipe.
Boss 1
Kystia Manaheart
Damage Nibbles to 20% to break Kystia’s protection, then use the Destabilized window while controlling Mirror Images.
The Fight in 20 Seconds
Damage Nibbles to 20% to break Kystia’s protection, then use the Destabilized window while controlling Mirror Images. Spread Corroding Spittle, leave Fel Nova, and keep Nibbles’ Fel Spray away from the party.
What Actually Matters
- Nibbles and Felshield
Kystia takes heavily reduced damage until Nibbles reaches 20% and triggers Destabilized; cleave efficiently but make Nibbles the priority.
- Mirror Images
Interrupt or hard-stop the five images quickly before their casts stack party damage.
- Corroding Spittle
Dispel the Magic debuff promptly, especially before Mirror Images.
- Fel Nova and Fel Spray
Leave Fel Nova and keep Nibbles’ rotating frontal away from allies.
- Chaos Barrage
Tank-targeted damage jumps to allies and is most dangerous during image pressure.
Dungeon visual · Illustrated positioning
Kystia Felshield and Image Control
Illustrated Nibbles focus, Destabilized burst timing, Mirror Image stops, Spittle spread, and Fel Spray positioning.
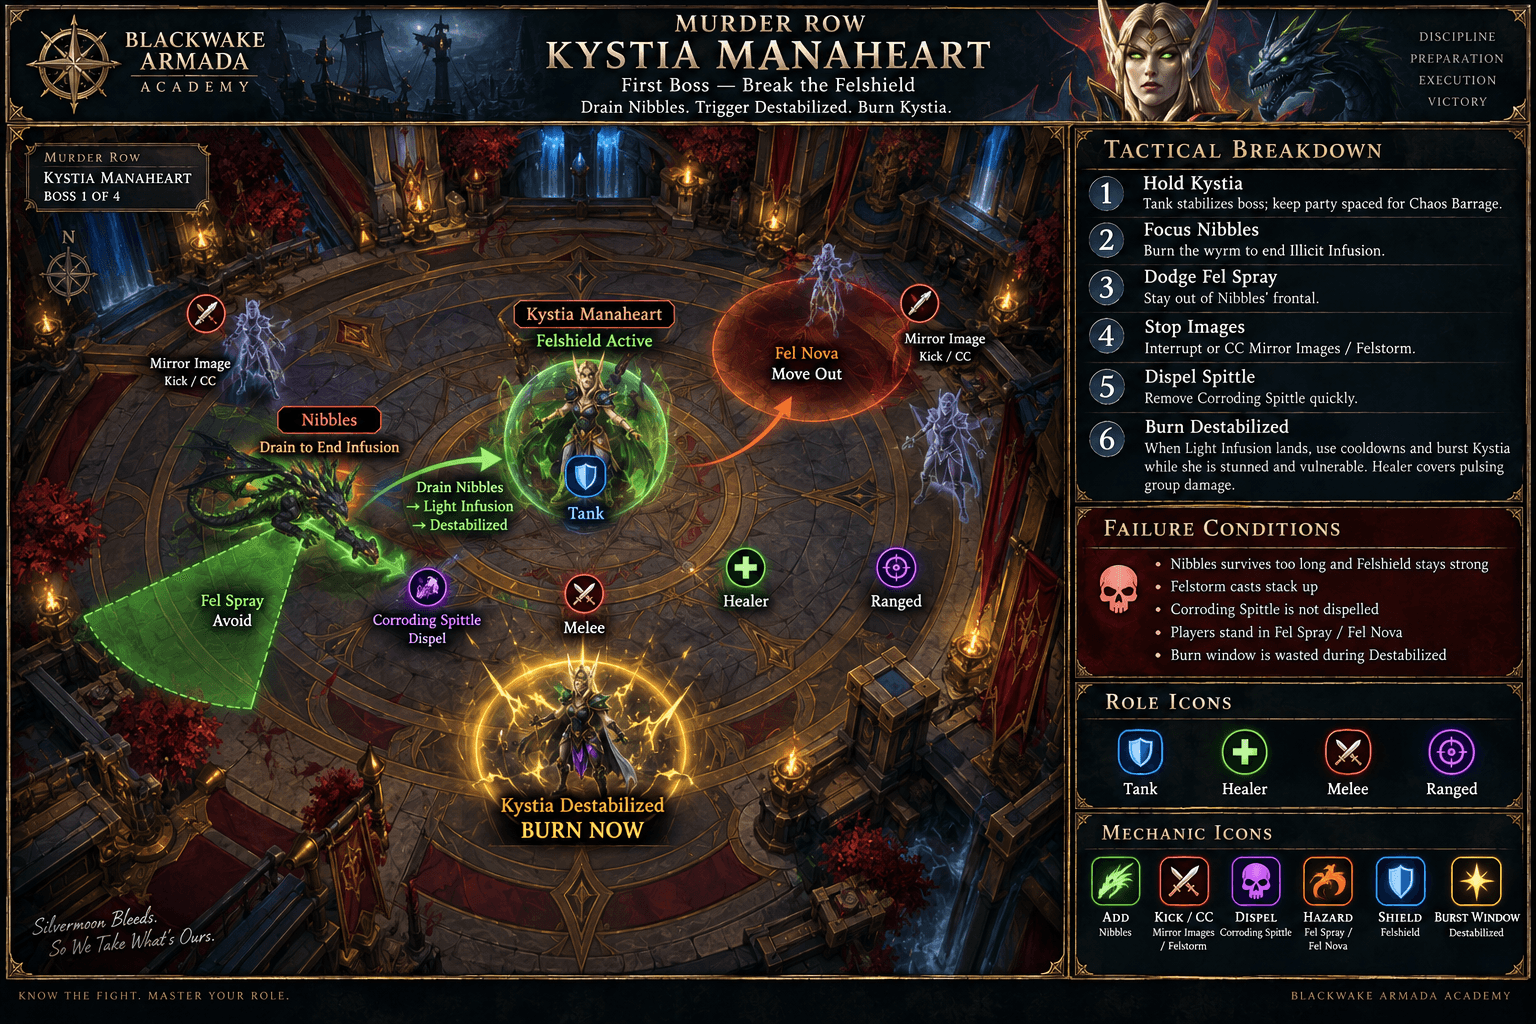
Tank
- Stack Kystia and Nibbles for cleave and face Fel Spray away.
- Mitigate Chaos Barrage while images are active.
Healer
- Dispel Corroding Spittle and cooldown Destabilized/Mirror Images overlap.
- Top the group before the damage-amplified burn.
DPS
- Focus Nibbles first, stop images, then burst Kystia during Destabilized.
- Do not stand in Fel Nova or Fel Spray.
Defensive Timing
- Use personals during Mirror Images with Spittle active.
- Group defensives during Destabilized if incoming damage overlaps.
Bloodlust / Heroism: Good first use when the group wants to shorten repeated image sets; alternatively save for Zaen’s freight phase.
Common Wipe: Players hit Kystia through Felshield while Mirror Images free-cast and Spittle remains undispelled.
- Nibbles and Felshield
Boss 2
Zaen Bladesorrow
Use barrels from Same-Day Delivery as cover for Murder in a Row, cleave Fel-Infused Freight immediately when Fire Bomb marks it, and survive Killing Spree.
The Fight in 20 Seconds
Use barrels from Same-Day Delivery as cover for Murder in a Row, cleave Fel-Infused Freight immediately when Fire Bomb marks it, and survive Killing Spree. Tanks mitigate Envenom and request Poison removal where available.
What Actually Matters
- Same-Day Delivery
Barrels create both obstacles and required cover; keep paths readable.
- Fire Bomb and Freight
The marked freight pulses group damage until destroyed, so swap immediately.
- Murder in a Row
Each player uses separate barrel cover to avoid the heavy bleed.
- Killing Spree
A sustained party-damage channel that becomes lethal with living freight.
- Envenom
Tank hit plus Poison debuff; mitigate and remove if the group has Poison utility.
Dungeon visual · Illustrated positioning
Zaen Barrel Cover and Freight Swap
Illustrated barrel cover, Fel-Infused Freight swaps, Murder in a Row assignments, Killing Spree recovery, and Envenom mitigation.
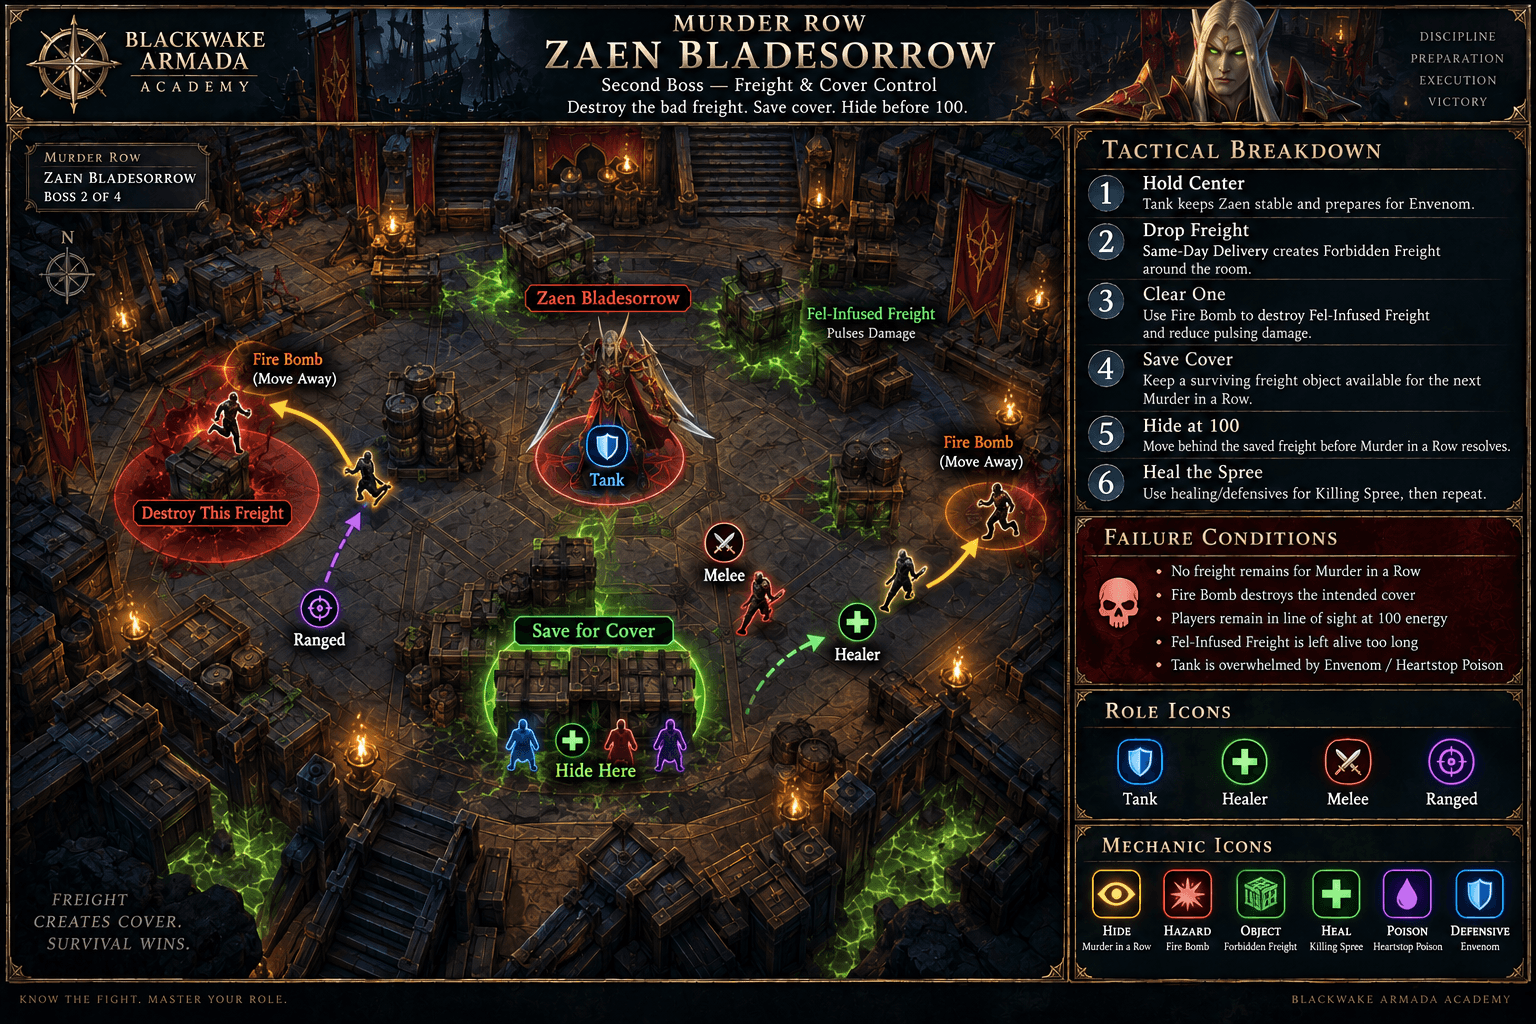
Tank
- Keep Zaen positioned with access to cover and mitigate Envenom.
- Do not trap the group behind badly placed barrels.
Healer
- Cooldown Killing Spree and track Poison coverage for Envenom.
- Demand a freight swap before healing pressure compounds.
DPS
- Kill Fel-Infused Freight immediately and preserve one barrel per player.
- Use defensives during Killing Spree.
Defensive Timing
- Personal during Killing Spree if freight remains.
- Tank defensive for Envenom.
Bloodlust / Heroism: A strong use if freight control is inconsistent; otherwise hold for Xathuux or Lithiel.
Common Wipe: Freight remains alive into Killing Spree or players share/lose barrel cover for Murder in a Row.
- Same-Day Delivery
Boss 3
Xathuux the Annihilator
Tank Xathuux at the edge facing outward, move Axe Toss beside the boss for fast Legion Axe swaps, spread Infernal Crush, and kite Demonic Rage puddles around the perimeter without consuming the whole arena..
The Fight in 20 Seconds
Tank Xathuux at the edge facing outward, move Axe Toss beside the boss for fast Legion Axe swaps, spread Infernal Crush, and kite Demonic Rage puddles around the perimeter without consuming the whole arena.
What Actually Matters
- Legion Strike
Frontal through the Tank; point it outside.
- Axe Toss
Drop the Legion Axe in cleave range and kill it before its increasing party damage escalates.
- Infernal Crush
Loosely spread to avoid cleaving one another.
- Demonic Rage
Large group hit plus damage amplification and puddle creation; kite tightly along the edge.
- Arena space
Poor puddle placement turns later cycles into an unwinnable movement check.
Dungeon visual · Illustrated positioning
Xathuux Arena Space
Illustrated facing, Legion Axe swaps, Infernal Crush spread, Demonic Rage movement, and perimeter puddle control.
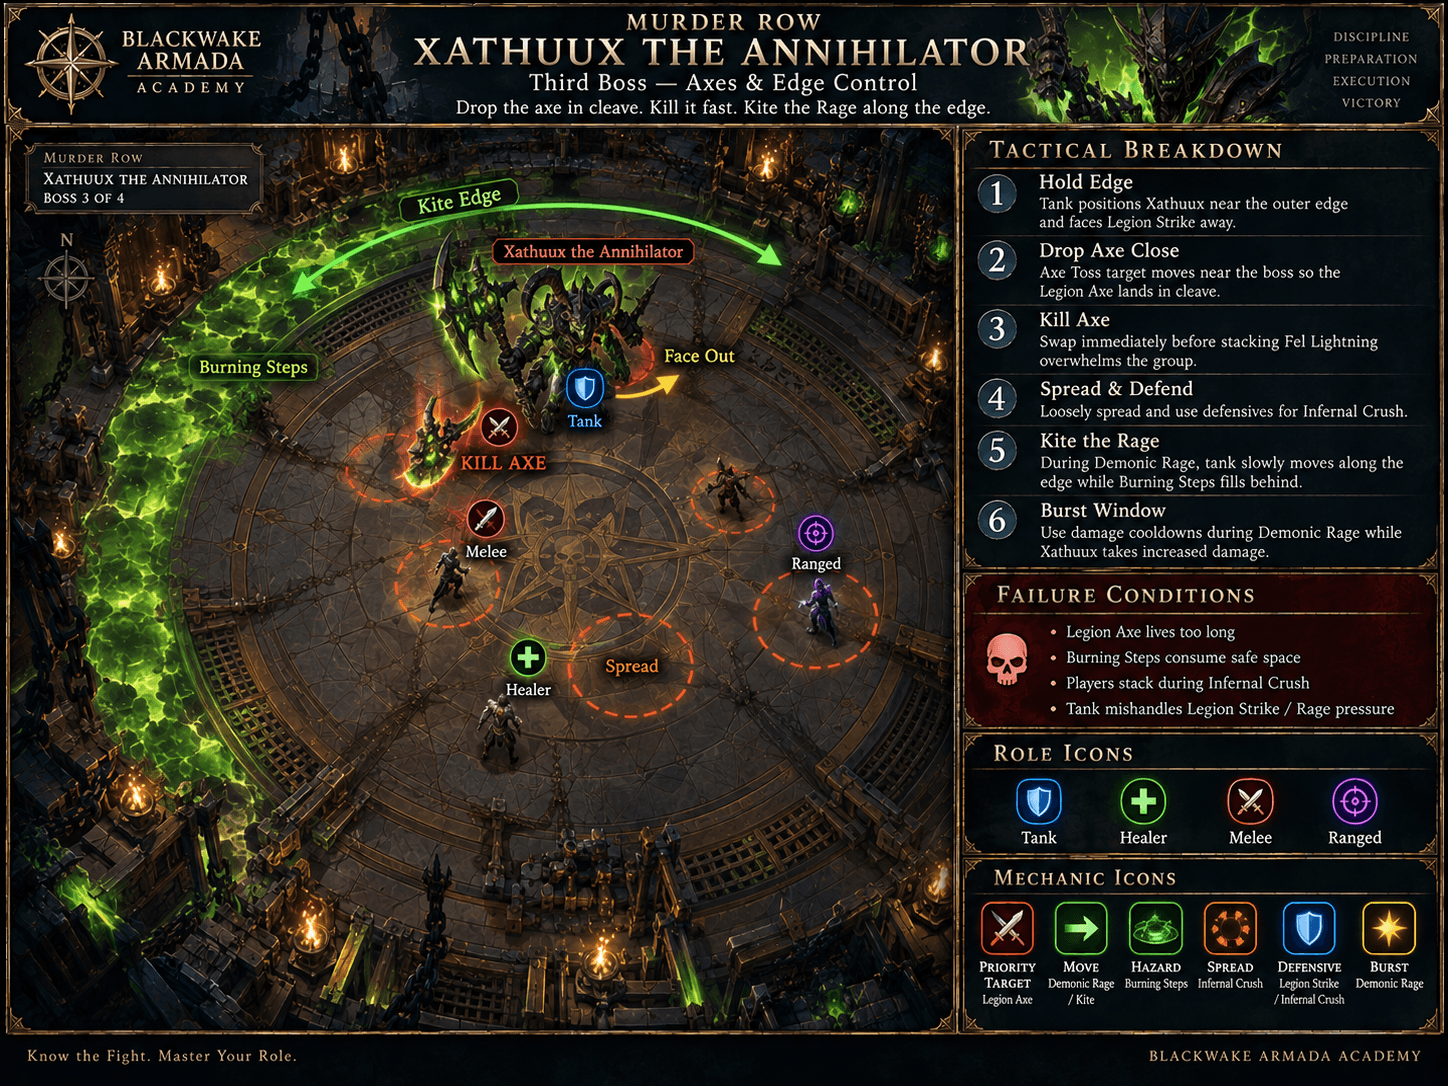
- 1. Point Legion Strike outside the arena.
- 2. Place Axe Toss in cleave range for a fast swap.
- 3. Spread Infernal Crush without blocking the perimeter lane.
- 4. Kite Demonic Rage tightly along the edge.
Tank
- Face outward and kite Demonic Rage along the edge.
- Keep the boss near Axe spawns without crossing the group.
Healer
- Cooldown Infernal Crush into Demonic Rage and track Axe pulse damage.
- Call when space forces extra movement.
DPS
- Swap to Legion Axe and use burst during the boss damage amp.
- Spread Infernal Crush without abandoning safe lanes.
Defensive Timing
- Personal for Infernal Crush/Demonic Rage overlap.
- Tank defensive while relocating through puddles.
Bloodlust / Heroism: Strong default use to exploit the damage-amplification window and reduce arena-space pressure.
Common Wipe: A Legion Axe survives while Demonic Rage fills the room, stacking unavoidable damage with no safe path.
- Legion Strike
Boss 4
Lithiel Cinderfury
Kick Chaos Bolt, cleave Vilefiends and Imps, keep the unkillable Infernal away from the boss, and use Demonic Gateway only after Malefic Wave creates a safe route.
The Fight in 20 Seconds
Kick Chaos Bolt, cleave Vilefiends and Imps, keep the unkillable Infernal away from the boss, and use Demonic Gateway only after Malefic Wave creates a safe route. Kill adds before the wave empowers them.
What Actually Matters
- Chaos Bolt
Maintain a kick rotation on the random-target cast.
- Infernal
It fixates the Tank and cannot be killed; separate it from Lithiel and keep gateways clear.
- Fingers of Gul’dan
Spread circles but overlap them tightly so Wild Imps group for stops and cleave.
- Demonic Gateway
Wait for Malefic Wave, then cross only when the destination is safe.
- Malefic Empowerment
Any add touched by the wave becomes empowered; finish adds before crossing.
Dungeon visual · Illustrated mechanic sequence
Lithiel: Adds Before Gateway
The failure is usually order, not damage: finish controlled adds before using the wave-created route.
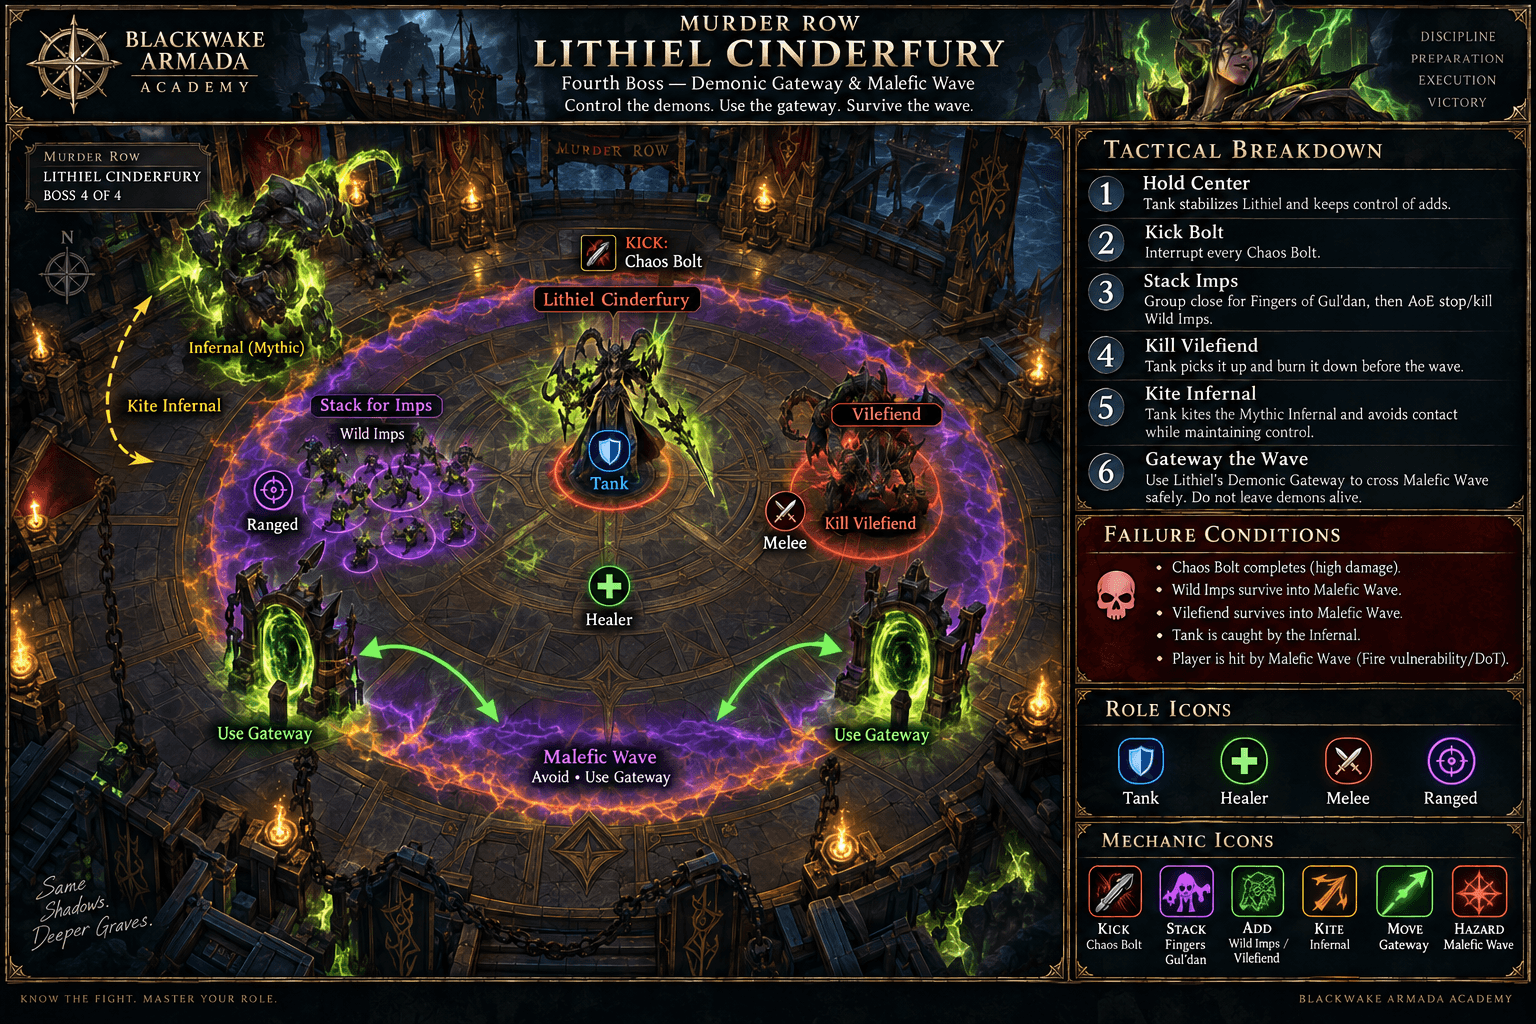
- 1
Maintain kicks
Keep the Chaos Bolt assignment active.
- 2
Group Imps
Overlap Fingers circles tightly enough for control and cleave.
- 3
Finish adds
Kill Vilefiends and Imps before Malefic Wave.
- 4
Wave creates route
Wait for Malefic Wave to establish the safe crossing.
- 5
Use Gateway
Cross only when the destination is clear.
TankKeep the unkillable Infernal away from the boss and gateway path.
HealerCover imp casts and movement through the wave.
DPSKick, stop, and clear adds before the wave empowers them.
Tank
- Kite the Infernal away and keep both gateway ends usable.
- Pick up Vilefiends without dragging the Infernal through the party.
Healer
- Cover constant Searing Fel pressure and imp casts.
- Prepare movement healing around gateway transitions.
DPS
- Kick Chaos Bolt, stop Imps, and finish all adds before Malefic Wave.
- Do not take the gateway early.
Defensive Timing
- Personal during Malefic Wave/add overlap.
- Use group defensives if Imps free-cast.
Bloodlust / Heroism: Strong final use to reduce repeated add-and-wave cycles.
Common Wipe: Adds survive into Malefic Wave, gain empowerment, and free-cast while the Tank loses control of the Infernal.
- Chaos Bolt
Dangerous Trash
Only the enemies that meaningfully change the pull.
Dungeon visual · Priority pack
Priority Pull: Captain and Sayaad
The early control pull has two separate jobs: focus the aura source and cover the control channel.
- 1Critical
Bribed Captain
Deep Corruption
PRIORITY TARGETDEFENSIVEFocus it and use mitigation; it is immune to common CC.
- 2Critical
Seductive Sayaad
Seduction
KICKSTOPAssign the cast and use hard CC as backup.
Dungeon visual · Priority pack
Priority Pull: Felwyrm Objective
The objective threat concentrates Magic dispel, defensive timing, movement, and a death-burst exit on one enemy.
- 1Critical
Massive Felwyrm
Over-Infused
DISPELDEFENSIVEMOVEPRIORITY TARGETDispel Corroding Spittle and leave the death explosion.
Dungeon visual · Priority pack
Priority Pull: Demon Wing
The controlled demon wing combines a timed damage phase with a cast that also has an enrage-removal answer.
- 1High
Shivan Punisher
Demonic Frenzy
DEFENSIVEPRIORITY TARGETSave burst and group defensives for 50%.
- 2High
Wrathguard Flayer
Fel Rage
KICKPURGEKick Fel Rage or remove the enrage; defensive Flay targets.
- Critical
Bribed Captain
Deep Corruption
PRIORITY TARGETDEFENSIVEBuffs nearby creatures while Shield Bash and Glaive Toss pressure the Tank.
- Kick:
- Not kick-interruptible
- Handle:
- Focus it and use mitigation; it is immune to common CC.
- Critical
Seductive Sayaad
Seduction
KICKSTOPA random player is controlled by a kickable or stoppable channel.
- Kick:
- Interruptible
- Handle:
- Assign the cast and use hard CC as backup.
- Critical
Massive Felwyrm
Over-Infused
DISPELDEFENSIVEMOVEPRIORITY TARGETConstant party damage, a dangerous death burst, Magic Spittle, and spawned wyrms.
- Kick:
- Not kick-interruptible
- Handle:
- Dispel Corroding Spittle and leave the death explosion.
- High
Shivan Punisher
Demonic Frenzy
DEFENSIVEPRIORITY TARGETAt 50% it pulses heavy party damage while Punishing Might raises Tank pressure.
- Kick:
- Not kick-interruptible
- Handle:
- Save burst and group defensives for 50%.
- High
Wrathguard Flayer
Fel Rage
KICKPURGEInterrupt or soothe the buff before its damage escalates.
- Kick:
- Interruptible
- Handle:
- Kick Fel Rage or remove the enrage; defensive Flay targets.
- High
Corrupted Warlock
Curse of Doom
DISPELDEFENSIVEPRIORITY TARGETA lethal Curse that summons a Doomguard if it kills its target.
- Kick:
- Not kick-interruptible
- Handle:
- Curse-dispel or stack to split the expiration.
- High
Felmaster Lucsei
Blade Dance
DEFENSIVEMOVEPRIORITY TARGETStacks party damage while Eye Beam threatens a frontal.
- Kick:
- Not kick-interruptible
- Handle:
- Cooldown Blade Dance and face Eye Beam away.
- High
Defiled Golem
Defiled Slam
DEFENSIVEMOVEPRIORITY TARGETHeavy channeled group damage plus player-targeted Fel Beam puddle lines.
- Kick:
- Not kick-interruptible
- Handle:
- Plan healing and spread beam lines.
Interrupt Priority
Kick when a kick works. Use the named stop when it does not.
Stuns, silences, knockbacks, displacement, and incapacitates are stops, not interchangeable labels for an interrupt. Review Interrupts, Stops, and Crowd Control →
Dungeon visual · Interrupt strip
Second-Screen Interrupt Strip
Priority, action type, spell, and source remain visible without opening details or relying on color alone.
Critical
- KICKSeduction
Seductive Sayaad
- KICKChaos Bolt
Lithiel Cinderfury
High priority
- KICKFel Rage
Wrathguard Flayer
- KICKFelfire Burst
Unleashed Imp / Wild Imp
Useful
- KICKFel Missiles
Felonious Mage
- KICKHealth Funnel
Fel Invoker
Critical
- KICKCritical
Seduction
Seductive Sayaad
Removes a player during an already dangerous pull.
Response: Kick every cast.
Alternative stop: Hard CC also ends the channel.
- KICKCritical
Chaos Bolt
Lithiel Cinderfury
Large random-target boss damage.
Response: Maintain a rotation.
High Priority
- KICKHigh
Fel Rage
Wrathguard Flayer
Empowers the Flayer and compounds Tank pressure.
Response: Kick or soothe the resulting enrage.
- KICKHigh
Felfire Burst
Unleashed Imp / Wild Imp
Repeated random-target casts stack quickly.
Response: Rotate spare kicks and stops.
Useful
- KICKUseful
Fel Missiles
Felonious Mage
Avoidable channel damage.
Response: Use spare kicks or stops.
- KICKUseful
Health Funnel
Fel Invoker
Extends dangerous demon pulls.
Response: Kick or hard-stop the channel.
Tank Cheat Sheet
The Tank calls worth reviewing at the ready check.
- Face Harrowers, Nibbles, Xathuux, Felmaster Lucsei, and Defiled Golems away.
- Watch stacked Shield Bash and Heartstop Poison in the opening streets.
- Keep Kystia and Nibbles together while controlling Fel Spray.
- Use mitigation for Zaen Envenom and Poison removal if available.
- Kite Xathuux Rage puddles tightly around the edge.
- Separate Lithiel from the unkillable Infernal and keep gateways clear.
- Do not chain through Massive Felwyrm or Shivan death/health thresholds.
- Pause after the bar event buff rather than wasting it on setup.
Healer Cheat Sheet
The Healer calls worth reviewing at the ready check.
- Magic-dispel Corroding Spittle and coordinate Heartstop Poison/Curse coverage by class.
- Massive Felwyrm and Over-Infused are sustained throughput checks.
- Cooldown Kystia’s Destabilized and image overlap.
- Killing Spree becomes critical while Freight lives.
- Prepare for Demonic Frenzy and Blade Dance before health drops.
- Curse of Doom needs an explicit plan, not a late reaction.
- Defiled Slam and Searing Fel require movement healing.
- Call when dispels are unavailable before the Tank chains.
DPS Cheat Sheet
Mechanics, utility, and priority damage are useful DPS—not only meter output.
- Captain, Massive Felwyrm, Freight, Shivan Punisher, Legion Axe, and Lithiel adds are priority targets.
- Kick Seduction and Chaos Bolt; stop image and imp casts.
- Use soothe/purge/dispels only when your class provides the correct effect.
- Complete your bar role quickly for the Five Star Review buff.
- Preserve separate barrel cover on Zaen.
- Burst Xathuux Legion Axes and Rage windows.
- Kill final-boss adds before Malefic Wave.
- Utility and add control are worth more than street-pack padding.
Blackwake Route
The recommended sequence, why it works, and where the plan can flex.
Blackwake Learning Route — Left-to-Right Objectives
A no-skip teaching route that clears each Snitch area, completes the bar event immediately, isolates the worst demon pressure, and enters Xathuux and Lithiel with predictable cooldowns. Exact count is delegated to the linked live route.
Dungeon visual · Route timeline
Blackwake Route Timeline
A scan-first companion to the detailed pull cards. Pull order, boss transitions, control checks, and planned Bloodlust uses come from the existing route.
- Start · Pull 1
First Snitch street pack
KICK - Pull 2
Captain and Sayaad
STOP - Pull 3
Massive Felwyrm objective
DISPEL - Pull 4Boss
Kystia Manaheart
PRIORITY TARGET - Pull 5
Clock-in event and warehouse
MOVE - Pull 6Boss
Zaen Bladesorrow
DEFENSIVE - Pull 7
Controlled demon wing
KICK - Pull 8Boss
Xathuux
Bloodlust / Heroism - Pull 9
Golem approach
MOVE - Pull 10Boss
Lithiel Cinderfury
Bloodlust / Heroism
- Pull 1
First Snitch street pack
Hooligans, Mage, Guard
Purpose: Advance the route with one clearly assigned priority mechanic before chaining forward.
Danger: Assign Fel Missiles and Tank debuffs.
Cooldowns: Use short stops.
Tank
- Set the pack in safe space and stop moving forward if control is exhausted.
Healer
- Confirm recovery and dispel coverage before the next chain.
DPS
- Priority damage and assigned utility come before broad AoE.
- Pull 2
Captain and Sayaad
Bribed Captain, Seductive Sayaad
Purpose: Advance the route with one clearly assigned priority mechanic before chaining forward.
Danger: Deep Corruption plus Seduction.
Cooldowns: Use priority cooldowns.
Tank
- Set the pack in safe space and stop moving forward if control is exhausted.
Healer
- Confirm recovery and dispel coverage before the next chain.
DPS
- Priority damage and assigned utility come before broad AoE.
- Pull 3
Massive Felwyrm objective
Massive Felwyrm and nearby street mobs
Purpose: Advance the route with one clearly assigned priority mechanic before chaining forward.
Danger: Spittle, pulses, death burst.
Cooldowns: Defensive plan.
Tank
- Set the pack in safe space and stop moving forward if control is exhausted.
Healer
- Confirm recovery and dispel coverage before the next chain.
DPS
- Priority damage and assigned utility come before broad AoE.
- Pull 4
Kystia Manaheart
Kystia and Nibbles
Purpose: Advance the route with one clearly assigned priority mechanic before chaining forward.
Danger: Images and Destabilized.
Cooldowns: Boss cooldowns.
Tank
- Set the pack in safe space and stop moving forward if control is exhausted.
Healer
- Confirm recovery and dispel coverage before the next chain.
DPS
- Priority damage and assigned utility come before broad AoE.
- Pull 5
Clock-in event and warehouse
Bar event, Workers, Taskmaster
Purpose: Advance the route with one clearly assigned priority mechanic before chaining forward.
Danger: Finish jobs, then soothe worker enrage.
Cooldowns: Use Five Star Review efficiently.
Tank
- Set the pack in safe space and stop moving forward if control is exhausted.
Healer
- Confirm recovery and dispel coverage before the next chain.
DPS
- Priority damage and assigned utility come before broad AoE.
- Pull 6
Zaen Bladesorrow
Zaen
Purpose: Advance the route with one clearly assigned priority mechanic before chaining forward.
Danger: Freight and Killing Spree.
Cooldowns: Optional first Bloodlust.
Tank
- Set the pack in safe space and stop moving forward if control is exhausted.
Healer
- Confirm recovery and dispel coverage before the next chain.
DPS
- Priority damage and assigned utility come before broad AoE.
- Pull 7
Controlled demon wing
Punisher, Flayer, Invoker
Purpose: Advance the route with one clearly assigned priority mechanic before chaining forward.
Danger: Frenzy, Fel Rage, channels.
Cooldowns: Split at natural boundaries.
Tank
- Set the pack in safe space and stop moving forward if control is exhausted.
Healer
- Confirm recovery and dispel coverage before the next chain.
DPS
- Priority damage and assigned utility come before broad AoE.
- Pull 8Bloodlust / Heroism
Xathuux
Xathuux
Purpose: Advance the route with one clearly assigned priority mechanic before chaining forward.
Danger: Legion Axe and arena space.
Cooldowns: Blackwake Bloodlust.
Tank
- Set the pack in safe space and stop moving forward if control is exhausted.
Healer
- Confirm recovery and dispel coverage before the next chain.
DPS
- Priority damage and assigned utility come before broad AoE.
- Pull 9
Golem approach
Defiled Golems and remaining demons
Purpose: Advance the route with one clearly assigned priority mechanic before chaining forward.
Danger: Defiled Slam and Fel Beam.
Cooldowns: Group defensives.
Tank
- Set the pack in safe space and stop moving forward if control is exhausted.
Healer
- Confirm recovery and dispel coverage before the next chain.
DPS
- Priority damage and assigned utility come before broad AoE.
- Pull 10Bloodlust / Heroism
Lithiel Cinderfury
Lithiel and adds
Purpose: Advance the route with one clearly assigned priority mechanic before chaining forward.
Danger: Chaos Bolt, Infernal, Malefic Wave.
Cooldowns: Second Bloodlust.
Tank
- Set the pack in safe space and stop moving forward if control is exhausted.
Healer
- Confirm recovery and dispel coverage before the next chain.
DPS
- Priority damage and assigned utility come before broad AoE.
Why This Route Works
- Objectives first
Every Snitch and bar role is completed while nearby.
- Captain isolated
Deep Corruption is not stacked with multiple control failures.
- Demon thresholds separated
Frenzy, Blade Dance, and Defiled Slam receive distinct cooldowns.
- Boss Bloodlust is predictable
Xathuux and Lithiel reduce arena/add cycles.
- No fragile skip
Extra count is repaired from the linked map after deviations.
Bloodlust / Heroism Plan
- Xathuux — Blackwake default
Exploits the boss damage window and preserves arena space.
Alternative: Use on Zaen if Freight/Killing Spree is the group wall.
If timing is lost: If timing is lost, move the use to the next planned boss or dangerous mandatory pull rather than forcing the original script.
- Lithiel — Blackwake default
Shortens repeated add-and-wave cycles.
Alternative: Use when available after a wipe rather than holding for an exact timestamp.
If timing is lost: If timing is lost, move the use to the next planned boss or dangerous mandatory pull rather than forcing the original script.
If It Goes Sideways
Recover the pull, adapt the route, and keep the run moving.
A Snitch was missed
Finish the current pack and backtrack before starting Kystia.
Bar progress stalls
Call each player’s role and stop all five from duplicating one task.
Freight survives
Swap immediately, use personals, and stop damaging Zaen until pulses end.
Curse of Doom cannot be dispelled
Stack healthy players to split it and commit defensives.
Xathuux space collapses
Tighten the next edge rotation; do not cross old puddles for uptime.
Infernal blocks a gateway
Tank moves it first; the group waits for the next safe wave rather than crossing through it.
Common Mistakes
Patterns that repeatedly turn manageable moments into lost time.
Skipping a Snitch
The gate does not care how fast the trash died.
Ignoring the Captain
Deep Corruption amplifies every nearby mob.
One player does every bar task
The event is designed for simultaneous roles.
No freight swap
Zaen’s add pulses through Killing Spree.
Curse expires alone
Stack or dispel it.
Legion Axe is padded around
Its rising AoE is the priority.
Gateway taken early
Wait until Malefic Wave leaves a safe destination.
Adds touch the wave
Finish them before crossing.
Before You Run This Key
Reveal each answer when you are ready. No grades, scores, or completion tracking.
Which opening cast controls a player?
What breaks Kystia’s protection?
What must die during Fire Bomb?
How is Curse of Doom handled?
Where should Xathuux puddles go?
Where does Blackwake Bloodlust?
Blackwake Notes
Crew-specific calls and hard lessons that supplement the tactical Playbook.
Mythic+ Sessions
Dungeon workshops, role sessions, route workshops, and key nights with the crew.
No Mythic+ sessions are scheduled right now. The Learning Board can still rally a key crew.
Related Academy Content
Fundamentals stay in their own lessons so this page can remain tactical.
- DPSGetting Started
Interrupts: The Button Everyone Should Know
DPS
What interrupting a cast actually does, why it matters more than damage meters, and the mistakes that waste it.
Read the lesson →
Sep 15, 2026
- HealerGetting Started
Dispels Explained
Healer
What can be dispelled, what cannot, and why timing beats reflexes.
Read the lesson →
Sep 18, 2026
- Mythic+Getting Started
Mythic+ Explained
Keystones, timers, scaling, and rating — what Mythic+ actually is before your first key goes in.
Read the lesson →
Sep 18, 2026
- Mythic+Getting Started
Understanding Dungeon Routes
Why routes exist, what enemy percentage means, and how to follow a plan without needing to make one.
Read the lesson →
Sep 18, 2026
- TankIntermediate
Tanking Your First Mythic+
Tank
Routes, enemy count, boss positioning, and talking to your group — the tank's guide to a first timed key.
Read the lesson →
Sep 18, 2026
- HealerIntermediate
Healing Your First Mythic+
Healer
Tank damage, group bursts, mana on a timer, and how to recover when a pull goes sideways.
Read the lesson →
Sep 18, 2026
- DPSIntermediate
DPS in Mythic+
DPS
Priority targets, kicks, cooldown planning, and staying alive — what a damage dealer actually owes a key.
Read the lesson →
Sep 18, 2026
- Mythic+Intermediate
Mythic+ Deaths and Recovery
What deaths actually cost, how to recover a collapsing pull, and how to stop the chain.
Read the lesson →
Sep 18, 2026
- Mythic+Getting Started
Mythic+ Etiquette
Communication, commitment, and keeping keys a place people want to learn — the Blackwake way.
Read the lesson →
Sep 18, 2026
Trusted Resources
Curated references beyond the Blackwake Playbook.
Need a hand?
Ask the Crew
Working through Murder Row? Ask for a route review, role help, or a learning run.