Dungeon Playbook
Current poolDragonflight · Season 2Ruby Life Pools
A heavily revised Dragonflight dungeon with deliberate frost placement, dangerous fire thresholds, current Season 2 trash pacing, and a wind-driven final encounter.
Reviewed for Dragonflight Season 2 · Last checked Sep 2026
- Bosses charted
- 3
- Dangerous pulls
- 7
- Priority casts
- 6
Dungeon Overview
The shape of the key before the detailed calls.
A revised frost-and-fire dungeon with sharp boss checks and constrained arena space
Tank channels, unavoidable party hits, shields, dispel timing, fire death effects, and boss ground management create sustained pressure with little room for old-route assumptions.
This is the Patch 12.1 version, not the original Dragonflight route. Opening density and upper-ring packs changed, Frigid Shard is interruptible, lieutenants patrol on the ground, and the final fire-debuff loop was simplified. Blackwake uses current pack boundaries and avoids optional lieutenants.
- Season 2 rework
- Frost placement
- Fire thresholds
- Dispel timing
- Arena space
Dungeon Profile
- Tank Pressure
- Very High
- Draghar Barrage, Destroyers, Flamegullet, Ryvati, Searing Blows, and Stormslam require planned mitigation.
- Group Damage
- Very High
- Excavating Blast, Inferno, Molten Blood, Overload, and all bosses create repeated group checks.
- Interrupt Demand
- High
- Ice Shield, Frigid Shard, Cinderbolt, Fiery Blast, Blaze Volley, and upper-ring casts need assignments.
- Movement
- High
- Charges, Hailbombs, Chillstorm, Boulders, breath, winds, and fire placement demand movement.
- Dispel / Utility Demand
- High
- Magic dispels, purge, freedom, and staggered Rolling Thunder removal matter.
- Route Complexity
- Moderate
- The route is linear but revised pack locations and optional lieutenants invalidate Dragonflight paths.
Dungeon visual · Abstract flow
Dungeon Tactical Overview
A route-flow chart, not dungeon geometry. Read left-to-right on wide screens or top-to-bottom on mobile.
- StartDEFENSIVE
Opening chambers
Juggernaut + Draghar
Pulls 1–2
- Stage 2Bloodlust / Heroism
Melidrussa
Hailbursts + Ice Bulwark
Pulls 3
- Stage 3STOP
Fire ring
Flamelasher + split pulls
Pulls 4–5
- Stage 4KICK
Kokia Blazehoof
Firestorm + Boulder bait
Pulls 6
- Stage 5PURGE
Storm approach
Staggered dispels + shields
Pulls 7
- Stage 6Bloodlust / Heroism
Kyrakka + Erkhart
Napkin control + storm
Pulls 8
Before You Queue
- Discard Dragonflight routes — Use the linked Season 2 route only.
- Assign Frigid Shard and Blaze Volley — Both boss casts are current priority interrupts.
- Plan Magic dispels — Cold Claws, Rolling Thunder, and Stormslam need class-aware handling.
- Review Hailbomb placement — Stack at an edge and rotate.
- Know the wind order — Final-boss puddles move with Winds of Change.
The Things That Wipe the Key
The few failure points most likely to cost the timer.
- RouteTankHealerDPS
Old route assumptions
Use current pack placement and Waystone behavior.
Consequence: Extra or missing packs destroy count and pacing.
- DPSTankHealerDPS
Ice Shield/Bulwark survives
Stop trash shields and burst Melidrussa’s boss shield.
Consequence: Party damage continues and space disappears.
- InterruptTankHealerDPS
Firestorm add ignored
Swap and kick Blaze Volley.
Consequence: Inferno plus boss mechanics overwhelms healing.
- MovementTankHealerDPS
Destroyer death blast
Leave Burnout’s 20-yard explosion.
Consequence: The party is killed after winning the pull.
- DispelTankHealerDPS
Stormslam not dispelled
Remove the Tank debuff before the next hit.
Consequence: The repeated hit becomes lethal.
- PositioningTankHealerDPS
Spit placed against winds
Track the sequence and drop fire safely.
Consequence: Puddles sweep through the party.
Boss Playbook
The fight in 20 seconds, what matters, and the most common wipe.
Boss 1
Melidrussa Chillworn
Stack Hailbursts at an edge, drop Chillstorm away, interrupt Frigid Shard, gather Whelps at 66% and 33%, then break Ice Bulwark quickly to stop Frost Overload..
The Fight in 20 Seconds
Stack Hailbursts at an edge, drop Chillstorm away, interrupt Frigid Shard, gather Whelps at 66% and 33%, then break Ice Bulwark quickly to stop Frost Overload.
What Actually Matters
- Frigid Shard
Now interruptible in Season 2; assign it to reduce Tank pressure.
- Hailburst
Stack impacts to preserve room and never get knocked into old Hailbombs.
- Chillstorm
Move out with the pull and survive the final knockback.
- Awaken Whelps
Tank gathers adds at each health threshold.
- Ice Bulwark
Burst shield to end Frost Overload party damage.
Dungeon visual · Illustrated mechanic sequence
Melidrussa: Edge to Bulwark
The sequence preserves room first, then converts each health threshold into a controlled add and shield check.
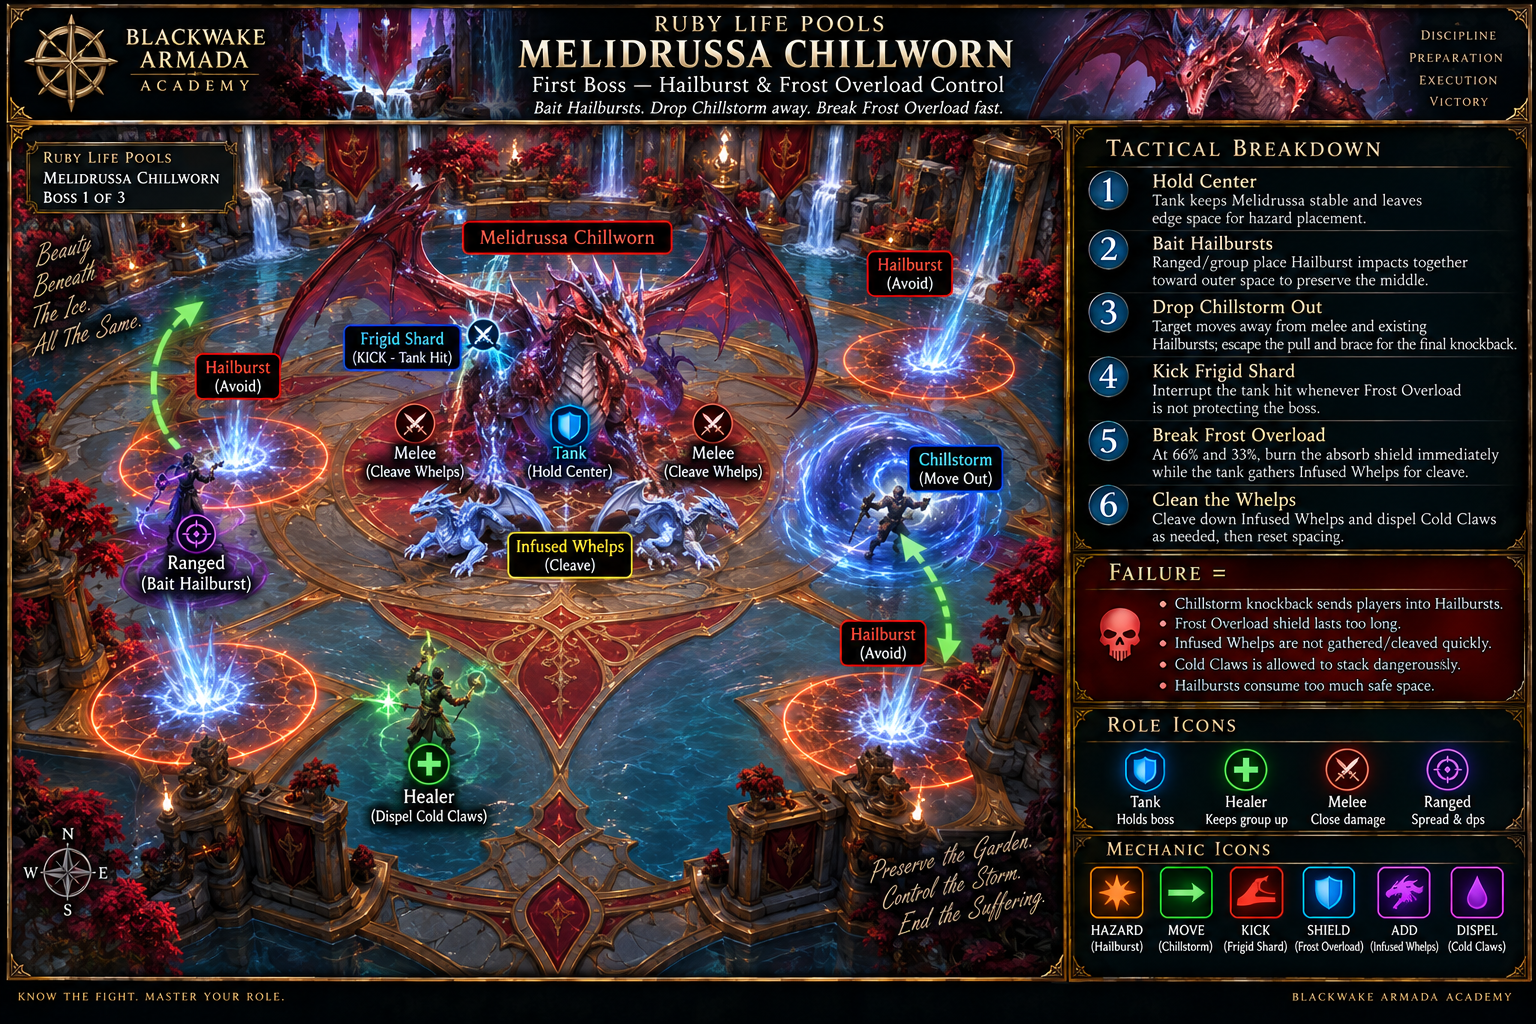
- 1
Stack Hailbursts
Place player circles at an edge without touching old Hailbombs.
- 2
Move Chillstorm
Move out with the pull and survive the final knockback.
- 3
Kick Frigid Shard
Use the assigned interrupt to reduce Tank pressure.
- 4
Gather Whelps
Tank collects adds at the health thresholds.
- 5
Break Bulwark
Burst Ice Bulwark quickly to stop Frost Overload.
TankKeep boss and adds stacked while tracking missed Frigid Shard casts.
HealerCooldown Chillstorm and Frost Overload.
DPSKick Shard and save burst for Ice Bulwark.
Tank
- Keep boss/adds stacked and call Frigid Shard misses.
Healer
- Cooldown Chillstorm and Frost Overload.
DPS
- Kick Shard, stack Hailburst, and save burst for Bulwark.
Defensive Timing
- Personal for Chillstorm explosion.
- Defensive if Bulwark lasts.
Bloodlust / Heroism: Strong first use to shorten both shield cycles.
Common Wipe: Scattered Hailbombs leave no room, then Chillstorm knocks players into them during Frost Overload.
- Frigid Shard
Boss 2
Kokia Blazehoof
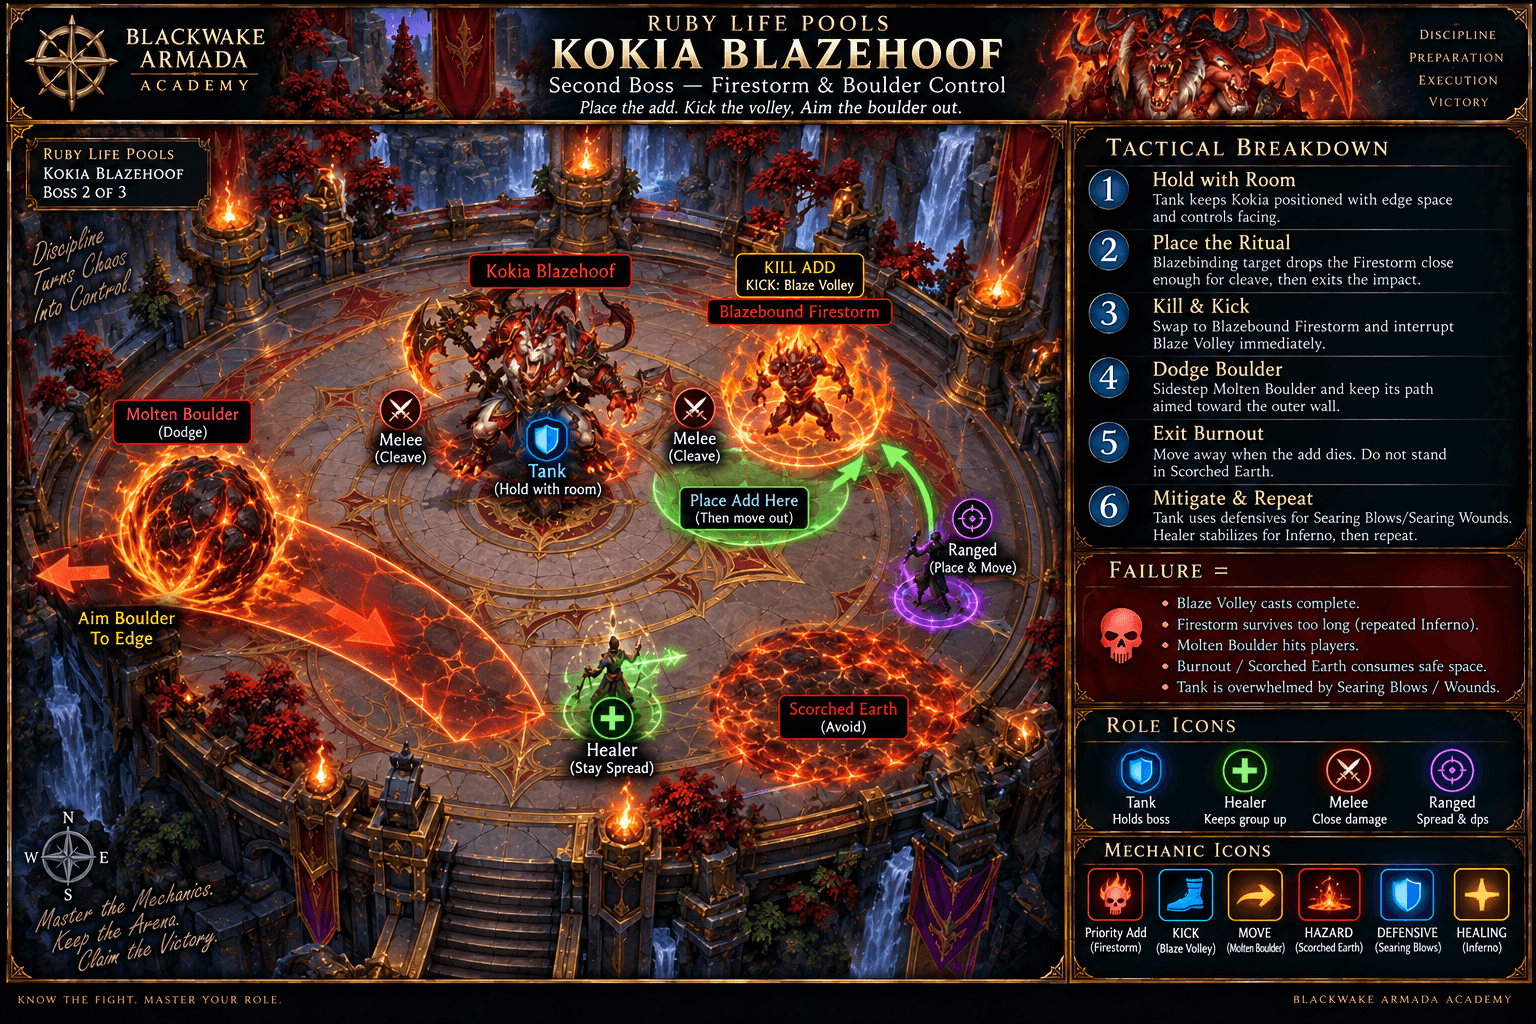
Drop Ritual of Blazebinding in accessible space, kill and interrupt the Firestorm add, bait Molten Boulder away from the route, and mitigate every Searing Blows..
The Fight in 20 Seconds
Drop Ritual of Blazebinding in accessible space, kill and interrupt the Firestorm add, bait Molten Boulder away from the route, and mitigate every Searing Blows.
What Actually Matters
- Ritual of Blazebinding
Marked player places the Firestorm away from allies but within swap range.
- Blaze Volley
Interrupt the add.
- Inferno
Add party hit requires healing.
- Molten Boulder
Bait direction and avoid terrain-triggered explosions.
- Searing Blows
Heavy Tank sequence.
Dungeon visual · Illustrated positioning
Kokia Firestorm and Boulder Bait
Illustrated Ritual of Blazebinding placement, Firestorm swaps, Blaze Volley kicks, Molten Boulder baiting, and Searing Blows mitigation.
Tank
- Kite slowly around clean space and mitigate Searing Blows.
Healer
- Cover Inferno and Living Bomb overlaps.
DPS
- Swap Firestorm and kick Blaze Volley before returning to boss.
Defensive Timing
- Personal for Inferno.
- Tank major for Searing Blows.
Bloodlust / Heroism: Excellent default because add cycles and arena space compound.
Common Wipe: The add is ignored or placed too far away, causing Volley/Inferno overlap with a bad Boulder.
- Ritual of Blazebinding
Boss 3
Kyrakka and Erkhart Stormvein
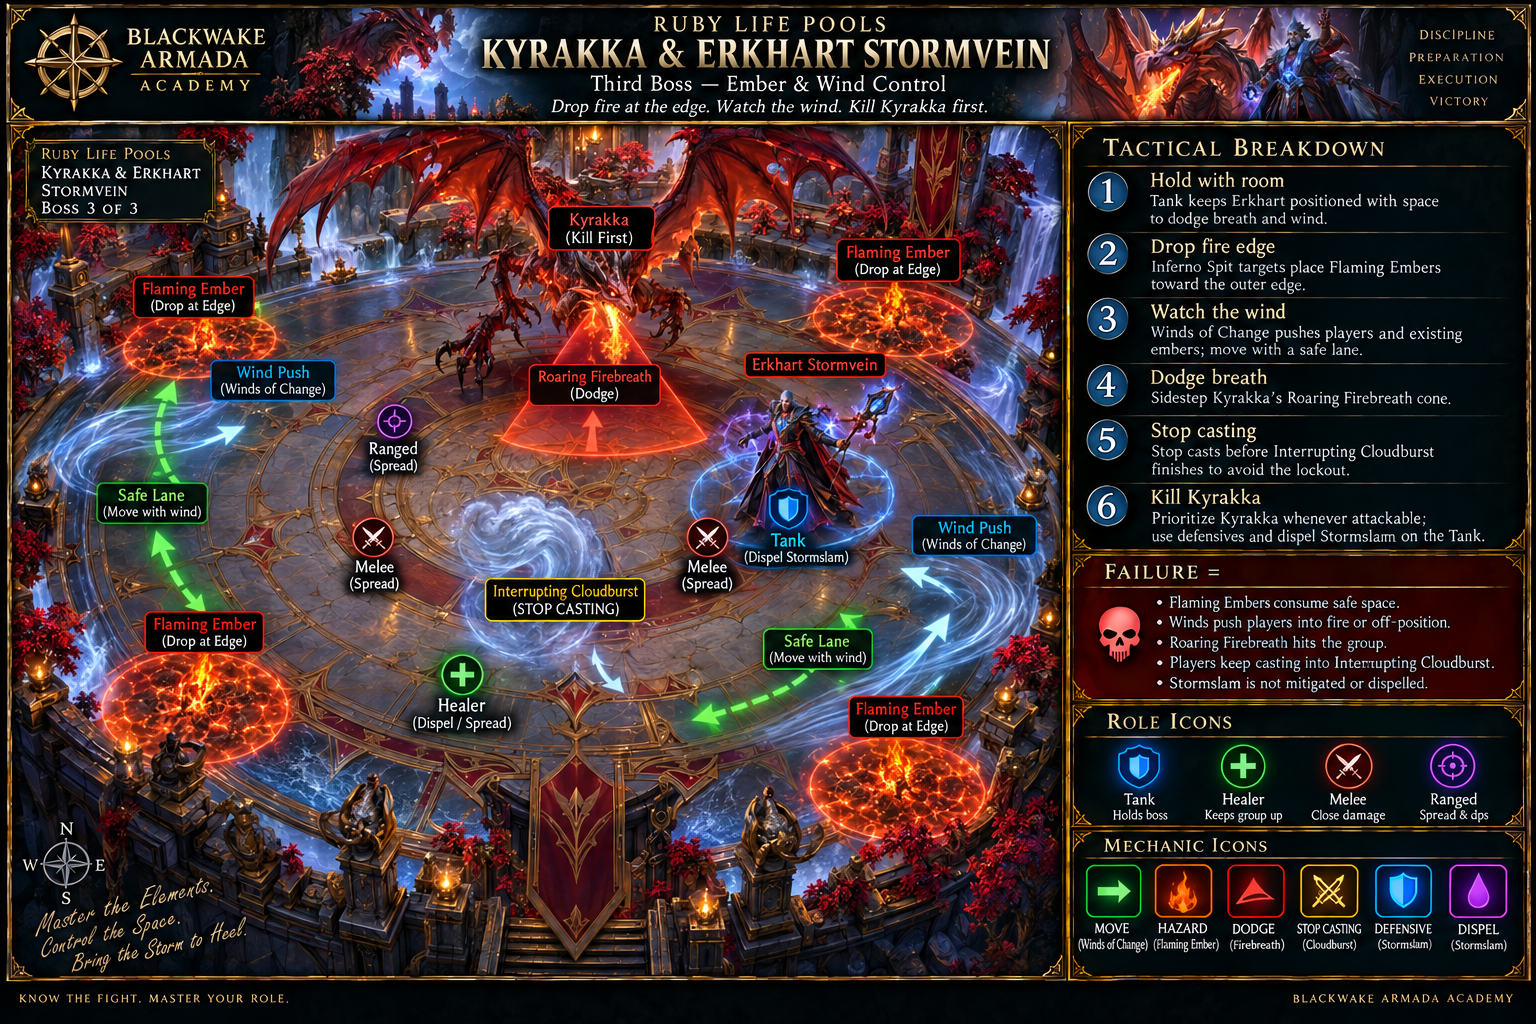
Place Inferno Spit according to the next wind direction, dodge Roaring Firebreath, dispel Stormslam before the next hit, stop casting for Cloudburst, and burn Kyrakka during the mounted phase..
The Fight in 20 Seconds
Place Inferno Spit according to the next wind direction, dodge Roaring Firebreath, dispel Stormslam before the next hit, stop casting for Cloudburst, and burn Kyrakka during the mounted phase.
What Actually Matters
- Inferno Spit
Move marked players out and place puddles for the known wind rotation.
- Roaring Firebreath
Dodge the landing frontal.
- Stormslam
Magic-dispel the Tank debuff before the next cast.
- Interrupting Cloudburst
Stop casting before completion.
- Mounted phase
At 50%, Inferno Spit targets three players; prioritize Kyrakka and use cooldowns.
Dungeon visual · Illustrated positioning
Kyrakka Wind and Fire Placement
Illustrated Inferno Spit placement, wind direction, Firebreath avoidance, Stormslam dispels, Cloudburst casting stops, and mounted-phase damage.
Tank
- Keep Erkhart stable, position for winds, and mitigate Stormslam.
Healer
- Dispel Stormslam and cooldown the mounted phase.
DPS
- Prioritize Kyrakka whenever attackable and spread Spit placements.
Defensive Timing
- Personal in mounted phase.
- Defensive if Spit expiration overlaps winds.
Bloodlust / Heroism: Strong final use at the mounted transition or on pull to reach it quickly.
Common Wipe: Puddles are placed against the wind plan and sweep through the group during the three-target mounted phase.
- Inferno Spit
Dangerous Trash
Only the enemies that meaningfully change the pull.
Dungeon visual · Priority pack
Priority Pulls: Fire-Ring Set
The fire-ring pull boundaries are separate; this compares the priority cast, avoidable death burst, and sub-50% damage ramp.
- 1Critical
Ashseer Flamelasher
Flaming Barrage
STOPPURGEDEFENSIVEHard-stop Barrage and purge/dodge death cast.
- 2High
Blazebound Destroyer
Inferno
DEFENSIVEMOVEPRIORITY TARGETDefensive Inferno and leave Burnout.
- 3High
Flamegullet
Molten Blood
DEFENSIVEPRIORITY TARGETSave burst and healing for 50%.
Dungeon visual · Priority pack
Priority Pull: Storm Approach
The final approach pairs staggered dispels with a shield that must be broken before expiry.
- 1High
High Channeler Ryvati
Tempest Stormshield
PRIORITY TARGETDEFENSIVEBurst shield and cover channels.
- 2High
Thunderhead
Rolling Thunder
DISPELDEFENSIVEStagger removals; do not double-dispel.
- Critical
Primal Juggernaut
Excavating Blast
DEFENSIVEMOVEPRIORITY TARGETCC-immune group hit with circles and Crushing Smash.
- Kick:
- Not kick-interruptible
- Handle:
- Cooldown blast and move circles.
- Critical
Defier Draghar
Steel Barrage
DEFENSIVEMOVEPRIORITY TARGETMandatory CC-immune Tank channel with group fragments and charge.
- Kick:
- Not kick-interruptible
- Handle:
- Mitigate channel and bait charge into wall.
- Critical
Ashseer Flamelasher
Flaming Barrage
STOPPURGEDEFENSIVEStoppable Tank channel; Blaze of Glory on death can be purged.
- Kick:
- Not kick-interruptible
- Handle:
- Hard-stop Barrage and purge/dodge death cast.
- High
Blazebound Destroyer
Inferno
DEFENSIVEMOVEPRIORITY TARGETCC-immune party hit/DoT and 20-yard Burnout death explosion.
- Kick:
- Not kick-interruptible
- Handle:
- Defensive Inferno and leave Burnout.
- High
Flamegullet
Molten Blood
DEFENSIVEPRIORITY TARGETBelow 50% stacks rising party damage; CC-immune.
- Kick:
- Not kick-interruptible
- Handle:
- Save burst and healing for 50%.
- High
Thunderhead
Rolling Thunder
DISPELDEFENSIVETwo dispels each trigger a party DoT.
- Kick:
- Not kick-interruptible
- Handle:
- Stagger removals; do not double-dispel.
- High
High Channeler Ryvati
Tempest Stormshield
PRIORITY TARGETDEFENSIVEShield must break before expiry while torrents target players.
- Kick:
- Not kick-interruptible
- Handle:
- Burst shield and cover channels.
Interrupt Priority
Kick when a kick works. Use the named stop when it does not.
Stuns, silences, knockbacks, displacement, and incapacitates are stops, not interchangeable labels for an interrupt. Review Interrupts, Stops, and Crowd Control →
Dungeon visual · Interrupt strip
Second-Screen Interrupt Strip
Priority, action type, spell, and source remain visible without opening details or relying on color alone.
Critical
- KICKBlaze Volley
Kokia Firestorm
- KICKFrigid Shard
Melidrussa Chillworn
High priority
- KICKIce Shield
Flashfrost Chillweaver
- KICKFiery Blast
Blazebound Destroyer
- KICKCinderbolt
Primalist Cinderweaver
Useful
- KICKThunder Blast
Tempest Channeler
Critical
- KICKCritical
Blaze Volley
Kokia Firestorm
Dangerous group cast during Inferno.
Response: Kick every cast.
- KICKCritical
Frigid Shard
Melidrussa Chillworn
Repeated Tank pressure.
Response: Maintain a rotation.
High Priority
- KICKHigh
Ice Shield
Flashfrost Chillweaver
Large enemy shield.
Response: Kick or hard-stop channel.
- KICKHigh
Fiery Blast
Blazebound Destroyer
Tank hit during Inferno pressure.
Response: Kick when available.
- KICKHigh
Cinderbolt
Primalist Cinderweaver
Random-target fire damage.
Response: Kick consistently.
Useful
- KICKUseful
Thunder Blast
Tempest Channeler
Tank damage.
Response: Use spare kicks.
Tank Cheat Sheet
The Tank calls worth reviewing at the ready check.
- Do not walk mobs over eggs in the opening chamber.
- Mitigate Draghar Steel Barrage and bait Rush into a wall.
- Gather Melidrussa Whelps immediately.
- Hard-stop Flamelasher Barrage.
- Defensive Destroyer/Flamegullet thresholds and leave Burnout.
- Kite Kokia slowly through clean space.
- Hold Ryvati/Channelers so Thundercloud deaths are controllable.
- Mitigate Stormslam while awaiting dispel.
Healer Cheat Sheet
The Healer calls worth reviewing at the ready check.
- Excavating Blast and Steel Barrage are opening checks.
- Cooldown Chillstorm and Frost Overload.
- Inferno and Molten Blood need planned throughput.
- Stagger Rolling Thunder dispels.
- Track Living Bomb targets.
- Cover Firestorm Inferno and final-boss mounted phase.
- Magic-dispel Stormslam before repeat.
- Do not dispel both Rolling Thunders together.
DPS Cheat Sheet
Mechanics, utility, and priority damage are useful DPS—not only meter output.
- Kick Ice Shield, Frigid Shard, Blaze Volley, and Cinderbolt.
- Save burst for Ice Bulwark and Firestorm adds.
- Leave Burnout and Blaze of Glory zones.
- Use purge on Blaze of Glory/Stormcloud Barrier where available.
- Prioritize Flamegullet below 50%.
- Do not pull optional lieutenants accidentally.
- Kill Ryvati shield before expiry.
- Prioritize Kyrakka and place Spit for winds.
Blackwake Route
The recommended sequence, why it works, and where the plan can flex.
Blackwake Learning Route — Current Season 2 Ring
Use current reduced-density packs, avoid optional Thunderhead and Flamegullet lieutenants, complete mandatory Draghar, and route the upper ring with predictable fire pulls. No Dragonflight percentages are reused.
Dungeon visual · Route timeline
Blackwake Route Timeline
A scan-first companion to the detailed pull cards. Pull order, boss transitions, control checks, and planned Bloodlust uses come from the existing route.
- Start · Pull 1
Opening chambers
MOVE - Pull 2
Draghar
DEFENSIVE - Pull 3Boss
Melidrussa
Bloodlust / Heroism - Pull 4
Fire-ring packs
STOP - Pull 5
Destroyer/Flamegullet split
DEFENSIVE - Pull 6Boss
Kokia
KICK - Pull 7
Storm approach
PURGE - Pull 8Boss
Kyrakka and Erkhart
Bloodlust / Heroism
- Pull 1
Opening chambers
Juggernaut and current packs
Purpose: Advance the route with one clearly assigned priority mechanic before chaining forward.
Danger: Blast and eggs.
Cooldowns: Short cooldowns.
Tank
- Set the pack in safe space and stop moving forward if control is exhausted.
Healer
- Confirm recovery and dispel coverage before the next chain.
DPS
- Priority damage and assigned utility come before broad AoE.
- Pull 2
Draghar
Mandatory miniboss
Purpose: Advance the route with one clearly assigned priority mechanic before chaining forward.
Danger: Steel Barrage and Rush.
Cooldowns: Tank defensive.
Tank
- Set the pack in safe space and stop moving forward if control is exhausted.
Healer
- Confirm recovery and dispel coverage before the next chain.
DPS
- Priority damage and assigned utility come before broad AoE.
- Pull 3Bloodlust / Heroism
Melidrussa
Boss
Purpose: Advance the route with one clearly assigned priority mechanic before chaining forward.
Danger: Hailbombs and shields.
Cooldowns: First Bloodlust.
Tank
- Set the pack in safe space and stop moving forward if control is exhausted.
Healer
- Confirm recovery and dispel coverage before the next chain.
DPS
- Priority damage and assigned utility come before broad AoE.
- Pull 4
Fire-ring packs
Cinderweaver and Flamelasher
Purpose: Advance the route with one clearly assigned priority mechanic before chaining forward.
Danger: Bomb and Barrage.
Cooldowns: Stops.
Tank
- Set the pack in safe space and stop moving forward if control is exhausted.
Healer
- Confirm recovery and dispel coverage before the next chain.
DPS
- Priority damage and assigned utility come before broad AoE.
- Pull 5
Destroyer/Flamegullet split
Current mandatory fire packs
Purpose: Advance the route with one clearly assigned priority mechanic before chaining forward.
Danger: Inferno and thresholds.
Cooldowns: Do not combine lieutenants.
Tank
- Set the pack in safe space and stop moving forward if control is exhausted.
Healer
- Confirm recovery and dispel coverage before the next chain.
DPS
- Priority damage and assigned utility come before broad AoE.
- Pull 6
Kokia
Boss
Purpose: Advance the route with one clearly assigned priority mechanic before chaining forward.
Danger: Firestorm and Boulder.
Cooldowns: Boss cooldowns.
Tank
- Set the pack in safe space and stop moving forward if control is exhausted.
Healer
- Confirm recovery and dispel coverage before the next chain.
DPS
- Priority damage and assigned utility come before broad AoE.
- Pull 7
Storm approach
Warriors, Thunderclouds, Channelers
Purpose: Advance the route with one clearly assigned priority mechanic before chaining forward.
Danger: Purge timing and shields.
Cooldowns: Stagger deaths.
Tank
- Set the pack in safe space and stop moving forward if control is exhausted.
Healer
- Confirm recovery and dispel coverage before the next chain.
DPS
- Priority damage and assigned utility come before broad AoE.
- Pull 8Bloodlust / Heroism
Kyrakka and Erkhart
Boss
Purpose: Advance the route with one clearly assigned priority mechanic before chaining forward.
Danger: Spit, winds, mounted phase.
Cooldowns: Second Bloodlust.
Tank
- Set the pack in safe space and stop moving forward if control is exhausted.
Healer
- Confirm recovery and dispel coverage before the next chain.
DPS
- Priority damage and assigned utility come before broad AoE.
Why This Route Works
- Current packs only
Original Dragonflight density/count is obsolete.
- Lieutenants avoided
Their pressure is unnecessary for a learning route.
- Fire thresholds split
Inferno and Molten Blood get separate cooldowns.
- Shields receive burst
Boss and trash shield windows drive cooldown timing.
- Boss uses are stable
Melidrussa and final boss reduce repeated arena cycles.
Bloodlust / Heroism Plan
- Melidrussa Chillworn
Shortens two shield/add cycles.
Alternative: Use on Kokia if Firestorm control is the wall.
If timing is lost: If timing is lost, move the use to the next planned boss or dangerous mandatory pull rather than forcing the original script.
- Kyrakka and Erkhart
Pushes the mounted three-Spit phase quickly.
Alternative: Use at 50% transition if held on pull.
If timing is lost: If timing is lost, move the use to the next planned boss or dangerous mandatory pull rather than forcing the original script.
If It Goes Sideways
Recover the pull, adapt the route, and keep the run moving.
Extra eggs hatch
Group Whelps, stop movement, and clear them before continuing.
Bulwark lasts
Use personals and fully swap damage to shield.
Destroyer dies near group
Run beyond 20 yards; do not finish casts in Burnout.
Rolling Thunder double-dispelled
Group defensive and stop chain pulling.
Fire puddles misplaced
Rotate boss and party to the largest remaining clean quadrant.
Old-route count mismatch
Use linked Season 2 map; never patch with obsolete Dragonflight packs.
Common Mistakes
Patterns that repeatedly turn manageable moments into lost time.
Using an old route
Season 2 changed density and patrols.
Scattering Hailbombs
Stack and rotate.
Holding damage through Bulwark
Break it immediately.
Ignoring Firestorm
Swap and kick.
Standing in Burnout
Leave 20 yards.
Double-dispelling Rolling Thunder
Stagger it.
Pulling lieutenants accidentally
Ground patrols are visible now.
Placing Spit without wind plan
Track the sequence.
Before You Run This Key
Reveal each answer when you are ready. No grades, scores, or completion tracking.
What changed about Frigid Shard?
What ends Frost Overload?
What is Kokia’s priority target?
How is Rolling Thunder dispelled?
What happens at final-boss 50%?
Where does Blackwake Bloodlust?
Blackwake Notes
Crew-specific calls and hard lessons that supplement the tactical Playbook.
Mythic+ Sessions
Dungeon workshops, role sessions, route workshops, and key nights with the crew.
No Mythic+ sessions are scheduled right now. The Learning Board can still rally a key crew.
Related Academy Content
Fundamentals stay in their own lessons so this page can remain tactical.
- DPSGetting Started
Interrupts: The Button Everyone Should Know
DPS
What interrupting a cast actually does, why it matters more than damage meters, and the mistakes that waste it.
Read the lesson →
Sep 15, 2026
- HealerGetting Started
Dispels Explained
Healer
What can be dispelled, what cannot, and why timing beats reflexes.
Read the lesson →
Sep 18, 2026
- Mythic+Getting Started
Mythic+ Explained
Keystones, timers, scaling, and rating — what Mythic+ actually is before your first key goes in.
Read the lesson →
Sep 18, 2026
- Mythic+Getting Started
Understanding Dungeon Routes
Why routes exist, what enemy percentage means, and how to follow a plan without needing to make one.
Read the lesson →
Sep 18, 2026
- TankIntermediate
Tanking Your First Mythic+
Tank
Routes, enemy count, boss positioning, and talking to your group — the tank's guide to a first timed key.
Read the lesson →
Sep 18, 2026
- HealerIntermediate
Healing Your First Mythic+
Healer
Tank damage, group bursts, mana on a timer, and how to recover when a pull goes sideways.
Read the lesson →
Sep 18, 2026
- DPSIntermediate
DPS in Mythic+
DPS
Priority targets, kicks, cooldown planning, and staying alive — what a damage dealer actually owes a key.
Read the lesson →
Sep 18, 2026
- Mythic+Intermediate
Mythic+ Deaths and Recovery
What deaths actually cost, how to recover a collapsing pull, and how to stop the chain.
Read the lesson →
Sep 18, 2026
- Mythic+Getting Started
Mythic+ Etiquette
Communication, commitment, and keeping keys a place people want to learn — the Blackwake way.
Read the lesson →
Sep 18, 2026
Trusted Resources
Curated references beyond the Blackwake Playbook.
Need a hand?
Ask the Crew
Working through Ruby Life Pools? Ask for a route review, role help, or a learning run.