Dungeon Playbook
Current poolBattle for Azeroth · Season 2Temple of Sethraliss
A fully reworked Battle for Azeroth temple with shield swaps, forced movement, add-ended Burrow phases, three-lane lightning soaks, a rebuilt eye gauntlet, and a group-driven healing finale.
Reviewed for Battle for Azeroth Season 2 · Last checked Sep 2026
- Bosses charted
- 4
- Dangerous pulls
- 8
- Priority casts
- 6
Dungeon Overview
The shape of the key before the detailed calls.
A redesigned utility-and-soak dungeon with four assignment-heavy bosses
Bleeds, poison, curse, Magic dispels, knockbacks, lightning soaks, eye-defense channels, and a healer objective demand coordinated group utility.
Patch 12.1 substantially rebuilt this dungeon. Old reflect rules, timed Merektha burrows, timeout eye interactions, and healer-only Avatar strategy are obsolete. The current Playbook follows shield health thresholds, kill-ended add phases, active eye defense, and shared Lifeforce/Tormentor responsibilities.
- Season 2 redesign
- Shield swaps
- Add control
- Three-lane soaks
- Shared healing objective
Dungeon Profile
- Tank Pressure
- High
- Stonefist, riders, Orb Watchers, boss busters, and final Guardian pressure Tanks.
- Group Damage
- Very High
- Ground Pound, Release Charge, Caustic Stomp, Serpentstorm, spires, and final soaks pressure party.
- Interrupt Demand
- High
- Poisoned Cheap Shot, Addle Mind, Lightning Bolt, Poison Spit, Essence Disruption, and Flame Shock need assignments.
- Movement
- Very High
- Gale pushback, soaks, Burrow charges, spark gauntlets, spire lanes, and final kiting require movement.
- Dispel / Utility Demand
- Very High
- Poison, Curse, Magic, purge, hard stops, bleed removal, and freedom effects all matter.
- Route Complexity
- High
- Reworked gauntlets, two eye objectives, forces adjustments, and fixed progression gates require route awareness.
Dungeon visual · Abstract flow
Dungeon Tactical Overview
A route-flow chart, not dungeon geometry. Read left-to-right on wide screens or top-to-bottom on mobile.
- StartSTOP
Entrance wall
Barrage stop + Cheap Shot
Pulls 1
- Stage 2Bloodlust / Heroism
Adderis + Aspix
Gale + cyclone spacing
Pulls 2
- Stage 3KICK
Merektha path
Subjugator + defensive boss
Pulls 3–4
- Stage 4PURGE
Spark gauntlet
Nimbus purge + Stormcaller dispel
Pulls 5
- Stage 5KICK
Eyes checkpoint
Galvazzt lanes + eye casts
Pulls 6–7
- Stage 6Bloodlust / Heroism
Avatar objective
Guardian → Lifeforce → Tormentors
Pulls 8
Before You Queue
- Forget BfA boss rules — Adderis/Aspix, Merektha, Galvazzt, gauntlet, and Avatar changed.
- Assign Addle Mind and eye-disrupt kicks — Curse removal is recovery, not the primary plan.
- Check Poison, Curse, and Magic utility — Cytotoxin, Addle Mind, Conduction, and Hex effects differ.
- Assign three Galvazzt lanes — Non-Tanks own spires.
- Review final Lifeforce soaks — Three players claim orbs after Guardian death.
The Things That Wipe the Key
The few failure points most likely to cost the timer.
- DPSTankHealerDPS
Using old reflect strategy
Attack the unshielded boss; current shield is resistance.
Consequence: Damage is wasted and transitions desync.
- MovementTankHealerDPS
Gale push ruins soak
Place Tempest zones safely and collapse immediately.
Consequence: Thunder and Lightning is under-soaked.
- DPSTankHealerDPS
Merektha adds live
Kill all four to end Burrow.
Consequence: Constant damage and charges continue.
- PositioningTankHealerDPS
Galvazzt lane empty
Assign three non-Tank soakers.
Consequence: Consume Charge becomes lethal.
- InterruptTankHealerDPS
Eye disruption completes
Kick/stop Temple Disruptors.
Consequence: Objective progress is lost while adds stack.
- PositioningTankHealerDPS
Lifeforce expires
Three players soak within six seconds.
Consequence: Corruption Burst wipes the group.
Boss Playbook
The fight in 20 seconds, what matters, and the most common wipe.
Boss 1
Adderis and Aspix
Attack the unshielded target, spread Gale Force lines, use walls for the push, immediately collapse for Thunder and Lightning, and place Tempest Winds away before Adderis Overload/Frenzy pressure..
The Fight in 20 Seconds
Attack the unshielded target, spread Gale Force lines, use walls for the push, immediately collapse for Thunder and Lightning, and place Tempest Winds away before Adderis Overload/Frenzy pressure.
What Actually Matters
- Storm Blessed
Swap to unshielded boss; Season 2 shield is damage resistance, not old reflect.
- Gale Force
Spread lines and manage pushback.
- Thunder and Lightning
Collapse immediately after Gale Force for group soak.
- Tempest Winds
Drop silence zones away.
- Overload/Frenzy
Tank pressure and faster final mechanics.
Dungeon visual · Illustrated positioning
Adderis and Aspix Target Swap
Illustrated unshielded-target swaps, Gale Force spread, wall use, Thunder and Lightning collapse, Tempest Winds placement, and Overload control.
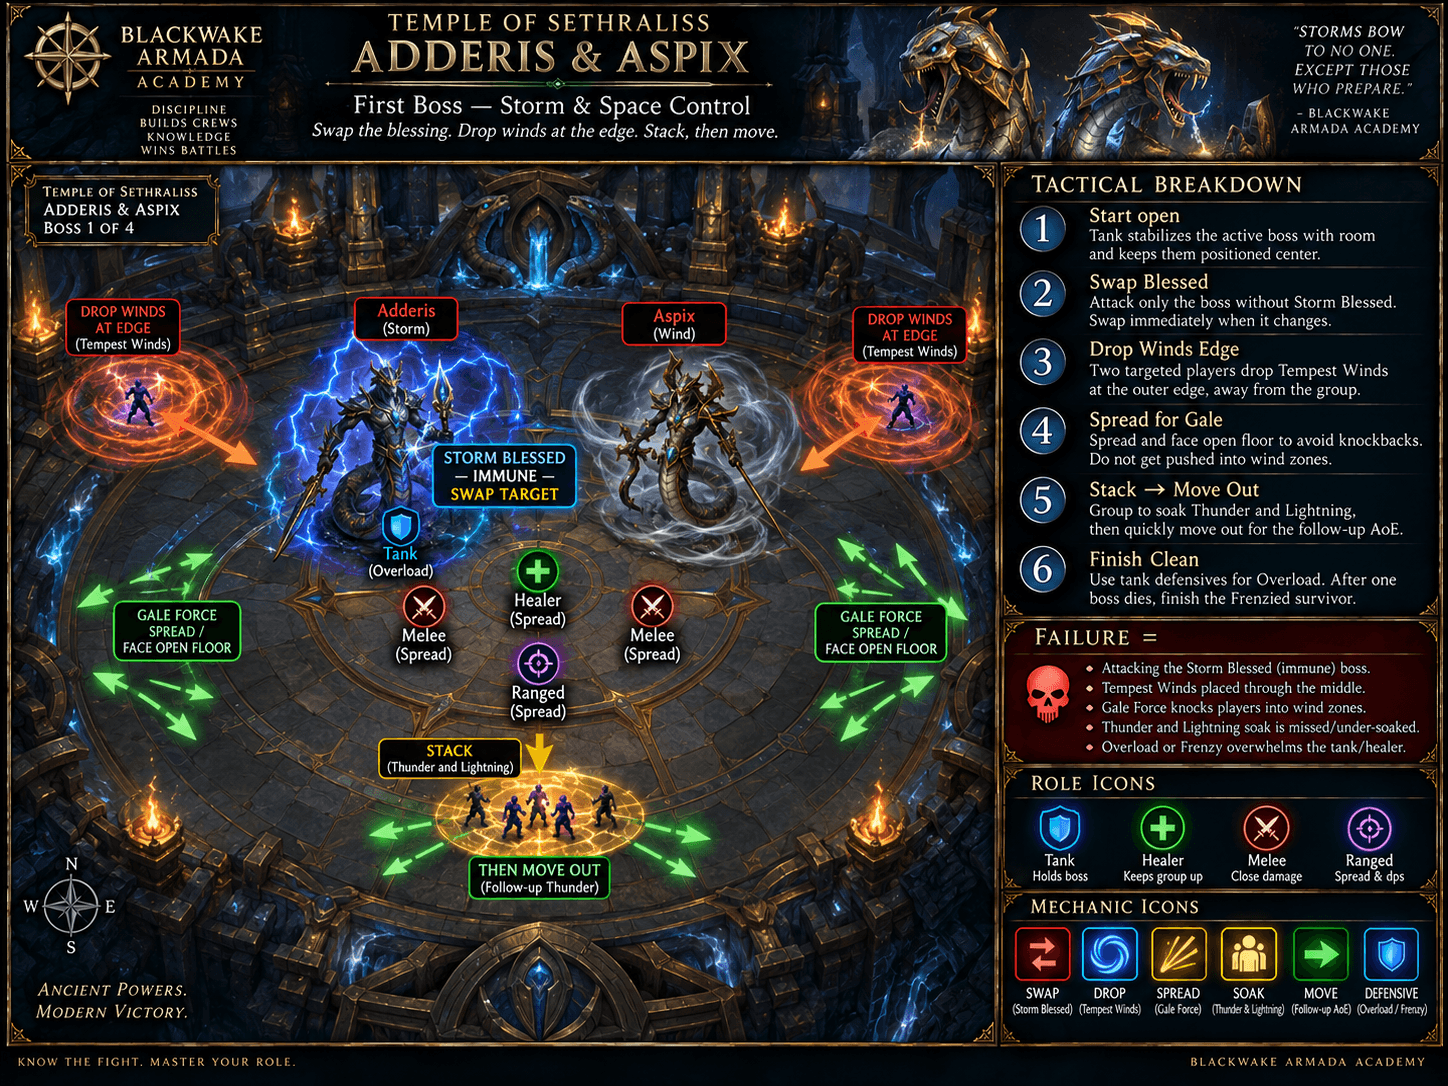
Tank
- Mitigate Overload and hold bosses where pushback/soak remains safe.
Healer
- Spot-heal Gust and cooldown final Frenzy.
DPS
- Swap shield target and return quickly for soak.
Defensive Timing
- Personal for Gale/soak overlap.
- Tank defensive for Overload.
Bloodlust / Heroism: Good first use to shorten Frenzy.
Common Wipe: Players are pushed into Tempest Winds and cannot reach the immediate group soak.
- Storm Blessed
Boss 2
Merektha
Stack Knot of Snakes for AoE control, place Thunder Spit outside, heal Serpentstorm, then kill three Toxic Vipers and the Storm Serpent to end the redesigned Burrow phase..
The Fight in 20 Seconds
Stack Knot of Snakes for AoE control, place Thunder Spit outside, heal Serpentstorm, then kill three Toxic Vipers and the Storm Serpent to end the redesigned Burrow phase.
What Actually Matters
- Lightning Bite
Tank buster.
- Knot of Snakes
Stack targets so one AoE stop frees both.
- Thunder Spit
Drop puddles at edge.
- Serpentstorm
Party hit and knockback.
- Burrow/Hatch
Kill all spawned serpents; kick Poison Spit and dodge charges.
Dungeon visual · Illustrated positioning
Merektha Snakes and Burrow
Illustrated Knot of Snakes grouping, Thunder Spit placement, Serpentstorm healing, Toxic Viper kills, and Storm Serpent control.
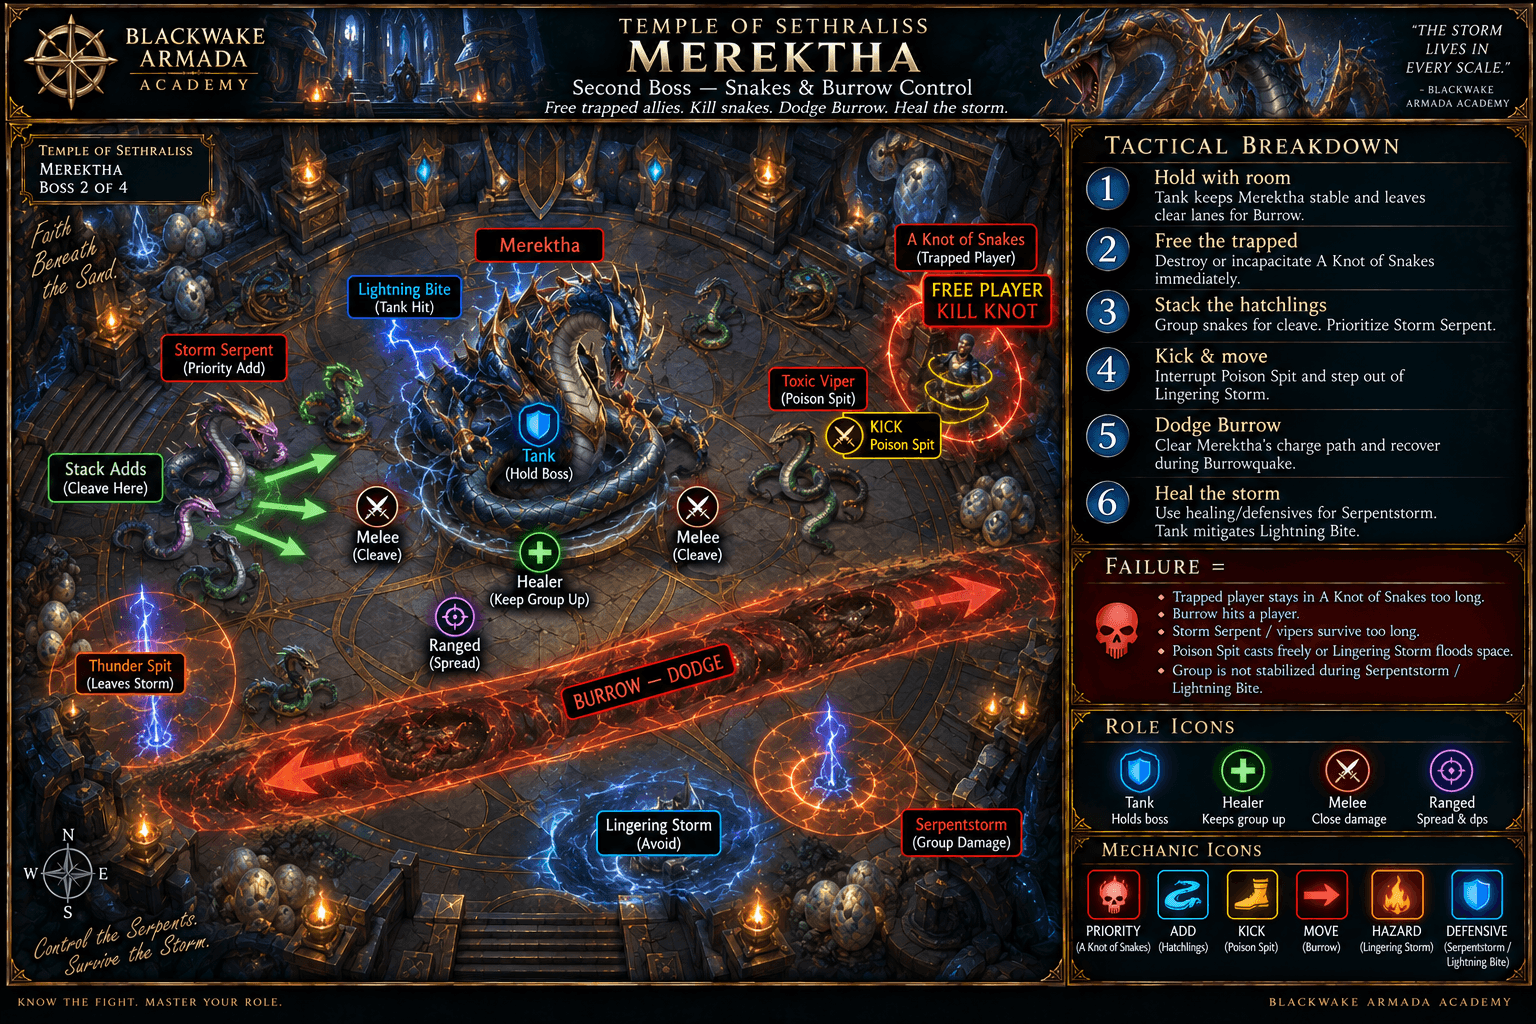
Tank
- Mitigate Bite and group adds near edge puddles.
Healer
- Cooldown Serpentstorm and Poison DoTs.
DPS
- AoE-stop Knot and priority Storm Serpent/add casts.
Defensive Timing
- Personal for Serpentstorm.
- Defensive if targeted during Burrow.
Bloodlust / Heroism: Strong alternative use to shorten add-ended Burrow.
Common Wipe: Adds scatter and Poison Spit free-casts while Burrow damage continues.
- Lightning Bite
Boss 3
Galvazzt
Three non-Tanks soak Lightning Spires before Galvazzt gains energy, rotate defensives between lanes, and move boss away from Induction puddles.
The Fight in 20 Seconds
Three non-Tanks soak Lightning Spires before Galvazzt gains energy, rotate defensives between lanes, and move boss away from Induction puddles. Full energy triggers Consume Charge.
What Actually Matters
- Lightning Spires
Assign three lanes; Tank does not soak.
- Galvanized
Unsoaked spires feed boss energy.
- Consume Charge
Full energy is likely lethal.
- Induction
Creates ground denial and forces repositioning.
Dungeon visual · Illustrated positioning
Galvazzt Spire Lanes
Illustrated three-lane Lightning Spire coverage, defensive rotation, Induction avoidance, and Consume Charge prevention.
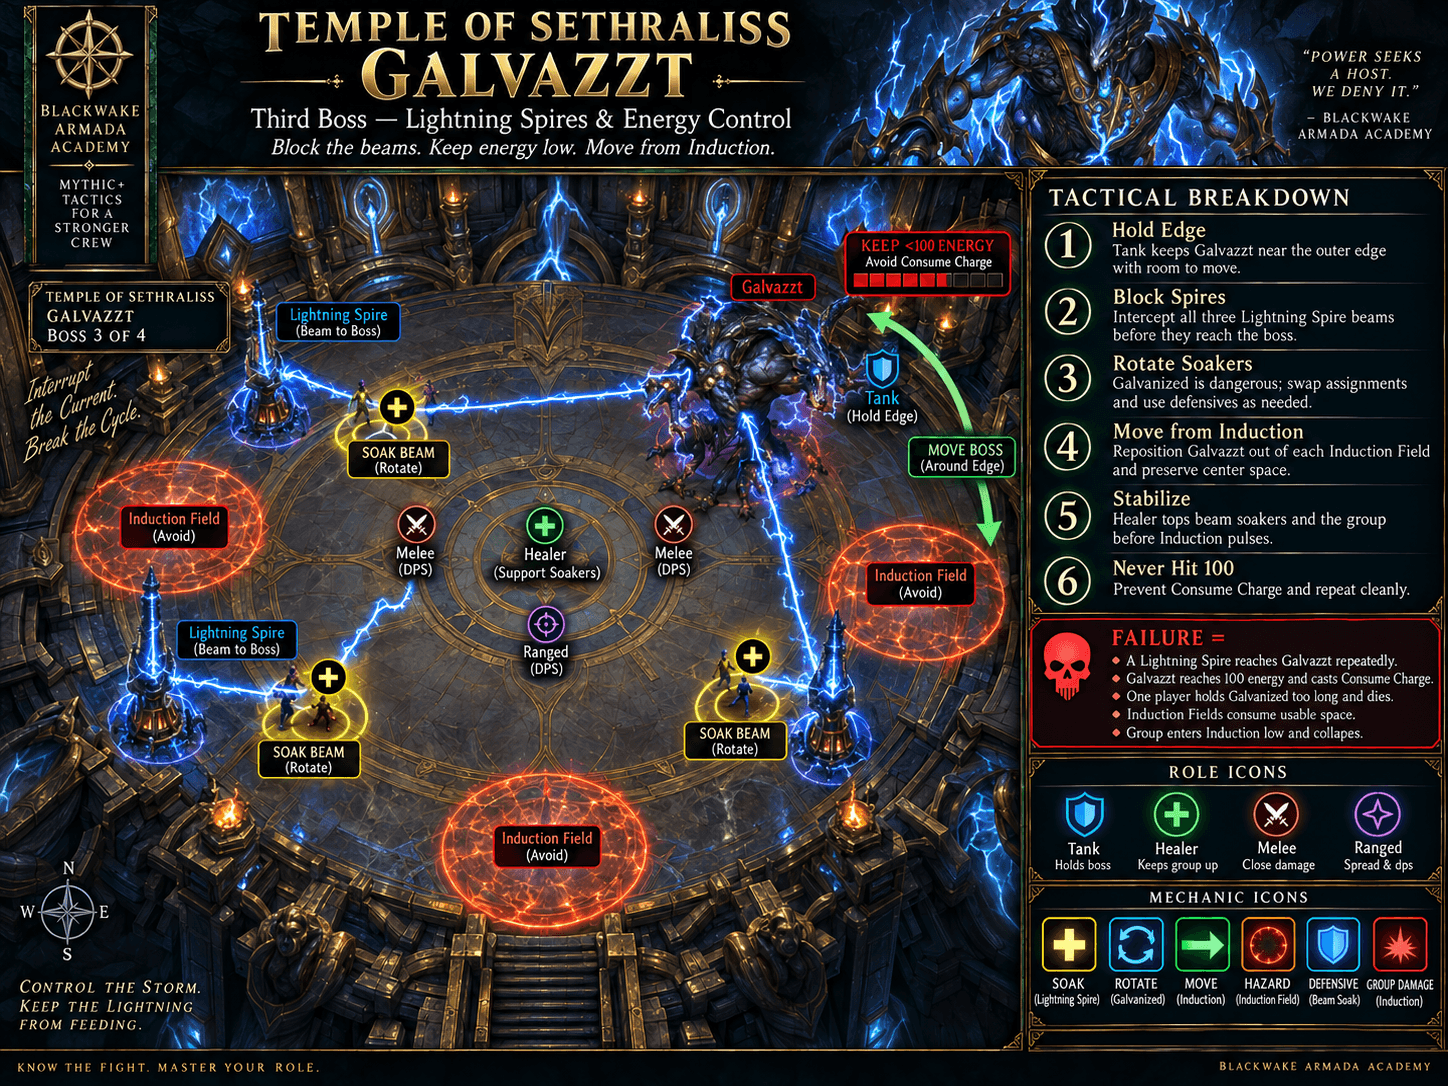
- 1. Assign three lanes before the channel.
- 2. The Tank does not soak a Spire.
- 3. Move the boss away from Induction puddles.
- 4. Full energy can trigger Consume Charge.
Tank
- Move boss to support spire lanes and away from puddles.
Healer
- Rotate cooldowns across three soakers.
DPS
- Own a spire lane and stay until channel completes.
Defensive Timing
- Personal while soaking.
- Group defensive if energy rises.
Bloodlust / Heroism: Strong default because it reduces repeated spire sets.
Common Wipe: A lane is unsoaked, boss caps energy, and Consume Charge wipes the group.
- Lightning Spires
Boss 4
Avatar of Sethraliss
Kill Corrupted Guardian, soak three Corrupted Lifeforces before they burst, kick Hexxer Flame Shock, then heal the Avatar while kiting and controlling Tormentors whose deaths restore her health..
The Fight in 20 Seconds
Kill Corrupted Guardian, soak three Corrupted Lifeforces before they burst, kick Hexxer Flame Shock, then heal the Avatar while kiting and controlling Tormentors whose deaths restore her health.
What Actually Matters
- Corrupted Guardian
Priority target; Tank mitigates Tainted Strike and players dodge Vile Charge.
- Corrupted Lifeforce
Three players soak within six seconds, using defensives for Corruption.
- Flame Shock / Latent Hex
Kick and place puddles outside.
- Essence Defiler transition
Healer begins restoring Avatar.
- Faithless Tormentors
Control and kill while each death heals Avatar; avoid Shadowlash stacks.
Dungeon visual · Illustrated mechanic sequence
Avatar: Guardian to Restoration
The final encounter is a phase handoff: kill the guardian, collect Lifeforce, then keep the Avatar healing plan alive through Tormentor control.
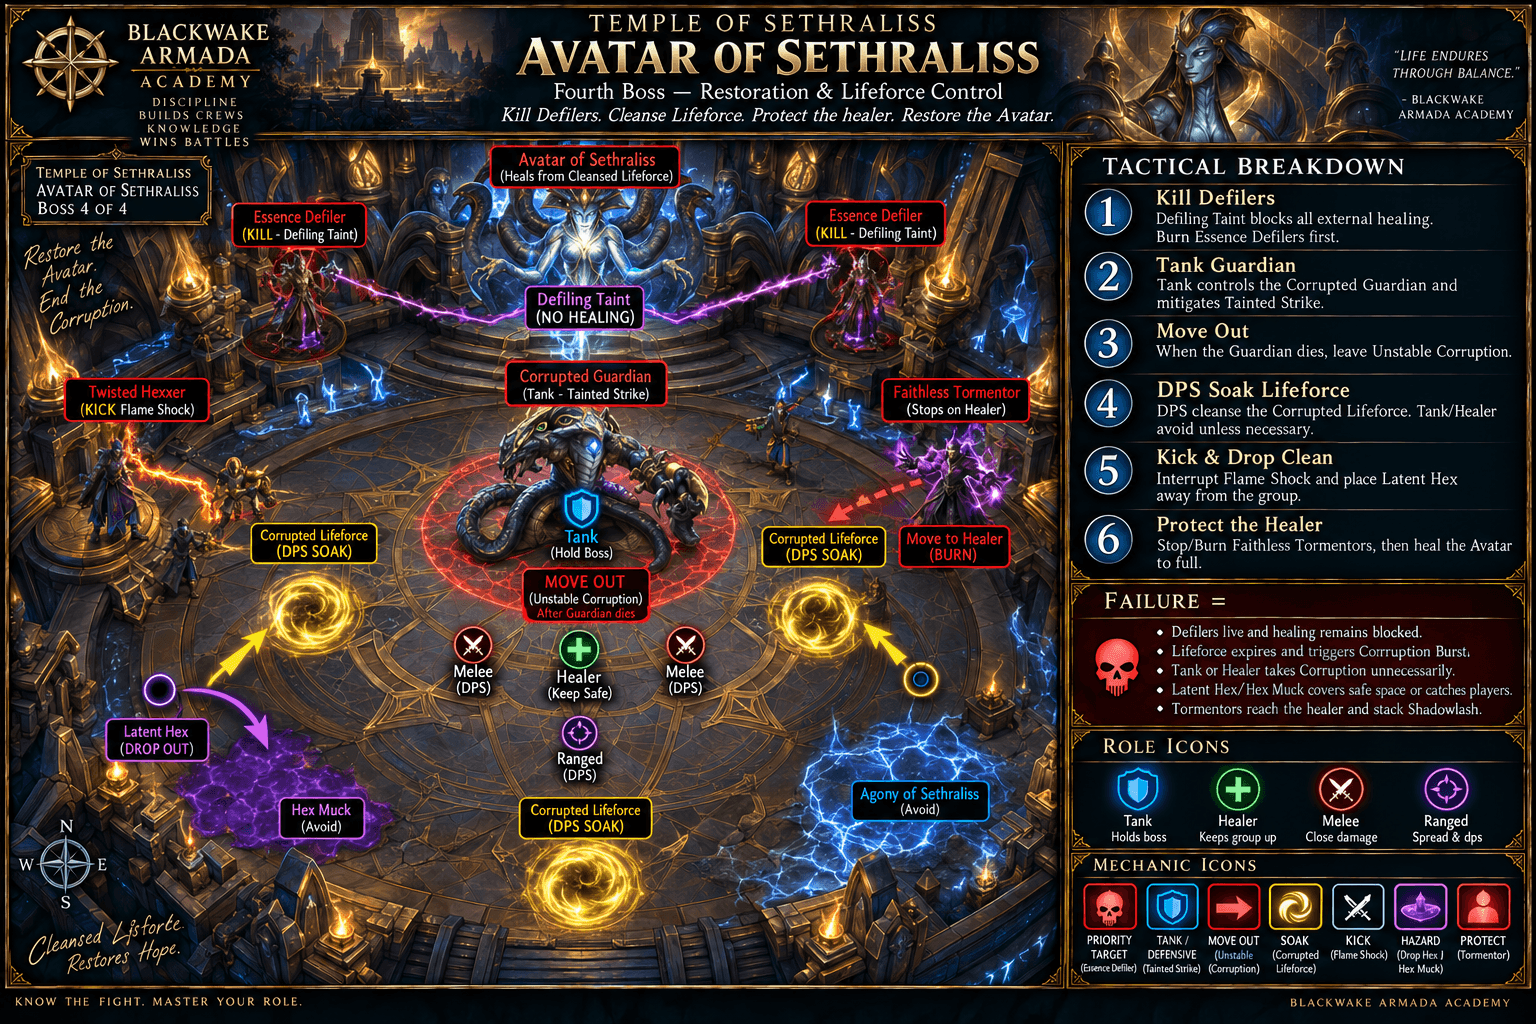
- 1
Kill Guardian
Focus the Corrupted Guardian and dodge Vile Charge.
- 2
Soak Lifeforce
Three players collect Corrupted Lifeforce within six seconds.
- 3
Kick Hexxer
Interrupt Flame Shock and place Latent Hex safely.
- 4
Defiler transition
Healer begins restoring the Avatar.
- 5
Control Tormentors
Kite, control, and kill Tormentors; each death heals Avatar.
TankMitigate the Guardian and keep Tormentors away from the healer.
HealerHeal the Avatar after Defiler while maintaining party coverage.
DPSSoak Lifeforce, kick Hexxer, and control Tormentors.
Tank
- Mitigate Guardian and control Tormentors away from healer.
Healer
- Heal Avatar after Defiler while maintaining party coverage.
DPS
- Soak Lifeforce, kick Hexxer, and control Tormentors.
Defensive Timing
- Personal for Lifeforce soak.
- Group control during healer channel.
Bloodlust / Heroism: Strong final use to accelerate Guardian/Defiler and reduce Tormentor time.
Common Wipe: Lifeforce expires or uncontrolled Tormentors stack Shadowlash on the healer and prevent Avatar recovery.
- Corrupted Guardian
Dangerous Trash
Only the enemies that meaningfully change the pull.
Dungeon visual · Priority pack
Priority Pull: Entrance Wall
The opening pack combines a hard stop, stealth control, and a cooldown check.
- 1Critical
Sandswept Hunter
Arrow Barrage
STOPPRIORITY TARGETHard-stop every Barrage.
- 2Critical
Shrouded Fang
Poisoned Cheap Shot
KICKDISPELPRIORITY TARGETBreak stealth or kick Cheap Shot.
- 3Critical
Sandfury Stonefist
Ground Pound
DEFENSIVEMOVEPRIORITY TARGETCooldown Pound and mitigate Slam.
Dungeon visual · Priority pack
Priority Pull: Spark Gauntlet
The lightning section requires both purge discipline and Magic-dispel coverage.
- 1High
Agitated Nimbus
Accumulate Charge
PURGEDEFENSIVEPRIORITY TARGETPurge and defensive AoE.
- 2High
Imbued Stormcaller
Imbued Conduction
DISPELKICKDispel Conduction and kick bolts.
Dungeon visual · Priority pack
Priority Pull: Eye Checkpoint
The eye pack has a mandatory channel stop while the Watcher applies unavoidable group pressure.
- 1High
Temple Disruptor
Essence Disruption
KICKSTOPPRIORITY TARGETKick or hard-stop immediately.
- 2High
Orb Watcher
Caustic Stomp
DEFENSIVEPRIORITY TARGETPlan cooldown and defensive Slash.
- Critical
Sandswept Hunter
Arrow Barrage
STOPPRIORITY TARGETStoppable player channel.
- Kick:
- Not kick-interruptible
- Handle:
- Hard-stop every Barrage.
- Critical
Shrouded Fang
Poisoned Cheap Shot
KICKDISPELPRIORITY TARGETInterruptible stealth stun; Poison removal recovers miss.
- Kick:
- Interruptible
- Handle:
- Break stealth or kick Cheap Shot.
- Critical
Sandfury Stonefist
Ground Pound
DEFENSIVEMOVEPRIORITY TARGETCC-immune group hit/knockback plus Sunder Slam amp.
- Kick:
- Not kick-interruptible
- Handle:
- Cooldown Pound and mitigate Slam.
- High
Faithless Subjugator
Addle Mind
KICKDISPELKickable disorient, Curse-dispellable after miss.
- Kick:
- Interruptible
- Handle:
- Kick every cast.
- High
Agitated Nimbus
Accumulate Charge
PURGEDEFENSIVEPRIORITY TARGETPurge stacks before Release Charge.
- Kick:
- Not kick-interruptible
- Handle:
- Purge and defensive AoE.
- High
Imbued Stormcaller
Imbued Conduction
DISPELKICKMagic debuff stuns on expiry while Lightning Bolt is kickable.
- Kick:
- Interruptible
- Handle:
- Dispel Conduction and kick bolts.
- High
Orb Watcher
Caustic Stomp
DEFENSIVEPRIORITY TARGETGroup hit/DoT while Tank handles Venomous Slash; CC-immune.
- Kick:
- Not kick-interruptible
- Handle:
- Plan cooldown and defensive Slash.
- High
Temple Disruptor
Essence Disruption
KICKSTOPPRIORITY TARGETChannels into eye objective.
- Kick:
- Interruptible
- Handle:
- Kick or hard-stop immediately.
Interrupt Priority
Kick when a kick works. Use the named stop when it does not.
Stuns, silences, knockbacks, displacement, and incapacitates are stops, not interchangeable labels for an interrupt. Review Interrupts, Stops, and Crowd Control →
Dungeon visual · Interrupt strip
Second-Screen Interrupt Strip
Priority, action type, spell, and source remain visible without opening details or relying on color alone.
Critical
- KICKEssence Disruption
Temple Disruptor
- KICKAddle Mind
Faithless Subjugator
- KICKPoison Spit
Merektha adds
High priority
- KICKFlame Shock
Twisted Hexxer
- KICKLightning Bolt
Imbued Stormcaller
Useful
- KICKLightning Bolt / Venom Bolt
Storm Adept / Brood Tender
Critical
- KICKCritical
Essence Disruption
Temple Disruptor
Stops eye objective.
Response: Kick or stop every channel.
- KICKCritical
Addle Mind
Faithless Subjugator
Disorients player.
Response: Kick; Curse-dispel miss.
- KICKCritical
Poison Spit
Merektha adds
Poison DoT during Burrow.
Response: Assign add kicks.
High Priority
- KICKHigh
Flame Shock
Twisted Hexxer
Final-room DoT during healing objective.
Response: Kick every cast.
- KICKHigh
Lightning Bolt
Imbued Stormcaller
Random-target damage.
Response: Maintain rotation.
Useful
- KICKUseful
Lightning Bolt / Venom Bolt
Storm Adept / Brood Tender
Avoidable target damage.
Response: Use spare kicks.
Tank Cheat Sheet
The Tank calls worth reviewing at the ready check.
- Defensive Sunder Slam and face Stonefists away from route.
- Mitigate Overload on Adderis.
- Hold Merektha adds near edge puddles.
- Use current gauntlet paths; do not rely on old skips.
- Move Galvazzt to support three soak lanes.
- Defensive Orb Watcher Slash/Stomp pulls.
- Protect eye channelers and keep adds grouped.
- Mitigate final Guardian and control Tormentors away from healer.
Healer Cheat Sheet
The Healer calls worth reviewing at the ready check.
- Spot-heal Gust and recover Gale/soak overlap.
- Poison-cleanse Cytotoxin and Burrow add DoTs where possible.
- Cooldown Serpentstorm.
- Magic-dispel Imbued Conduction before stun.
- Rotate cooldowns across Galvazzt soakers.
- Caustic Stomp is the eye-gauntlet spike.
- Track Lifeforce soakers.
- Balance party healing with Avatar healing after Defiler.
DPS Cheat Sheet
Mechanics, utility, and priority damage are useful DPS—not only meter output.
- Stop Arrow Barrage and Cheap Shot; kick Addle Mind.
- Swap active shield target on first boss.
- Kill Merektha adds to end Burrow.
- Purge Nimbus charge.
- Own a Galvazzt lane.
- Kick Essence Disruption during eyes.
- Priority Guardian and soak Lifeforce.
- Control Tormentors while healer restores Avatar.
Blackwake Route
The recommended sequence, why it works, and where the plan can flex.
Blackwake Learning Route — Current Temple Rebuild
Use the current reduced-forces route, split dangerous bleed/Stonefist packs, complete both Loose Spark gauntlets deliberately, defend each eye objective with assigned kicks, and enter Avatar with control available.
Dungeon visual · Route timeline
Blackwake Route Timeline
A scan-first companion to the detailed pull cards. Pull order, boss transitions, control checks, and planned Bloodlust uses come from the existing route.
- Start · Pull 1
Temple entrance
STOP - Pull 2Boss
Adderis and Aspix
Bloodlust / Heroism - Pull 3
Rider/Tamer wing
KICK - Pull 4Boss
Merektha
PRIORITY TARGET - Pull 5
Spark gauntlet
PURGE - Pull 6Boss
Galvazzt
DEFENSIVE - Pull 7
Eye one and two
KICK - Pull 8Boss
Avatar
Bloodlust / Heroism
- Pull 1
Temple entrance
Hunters, Krolusks, Fang, Stonefist
Purpose: Advance the route with one clearly assigned priority mechanic before chaining forward.
Danger: Stops, bleeds, Pound.
Cooldowns: Conservative opener.
Tank
- Set the pack in safe space and stop moving forward if control is exhausted.
Healer
- Confirm recovery and dispel coverage before the next chain.
DPS
- Priority damage and assigned utility come before broad AoE.
- Pull 2Bloodlust / Heroism
Adderis and Aspix
Boss pair
Purpose: Advance the route with one clearly assigned priority mechanic before chaining forward.
Danger: Gale into soak.
Cooldowns: First Bloodlust.
Tank
- Set the pack in safe space and stop moving forward if control is exhausted.
Healer
- Confirm recovery and dispel coverage before the next chain.
DPS
- Priority damage and assigned utility come before broad AoE.
- Pull 3
Rider/Tamer wing
Riders, Vipers, Subjugator
Purpose: Advance the route with one clearly assigned priority mechanic before chaining forward.
Danger: Adds, bleeds, Addle Mind.
Cooldowns: Priority control.
Tank
- Set the pack in safe space and stop moving forward if control is exhausted.
Healer
- Confirm recovery and dispel coverage before the next chain.
DPS
- Priority damage and assigned utility come before broad AoE.
- Pull 4
Merektha
Boss and hatch adds
Purpose: Advance the route with one clearly assigned priority mechanic before chaining forward.
Danger: Kill-ended Burrow.
Cooldowns: Add burst.
Tank
- Set the pack in safe space and stop moving forward if control is exhausted.
Healer
- Confirm recovery and dispel coverage before the next chain.
DPS
- Priority damage and assigned utility come before broad AoE.
- Pull 5
Spark gauntlet
Nimbus, Stormcaller, Anomalies
Purpose: Advance the route with one clearly assigned priority mechanic before chaining forward.
Danger: Purge, dispel, dodge.
Cooldowns: Do not rush.
Tank
- Set the pack in safe space and stop moving forward if control is exhausted.
Healer
- Confirm recovery and dispel coverage before the next chain.
DPS
- Priority damage and assigned utility come before broad AoE.
- Pull 6
Galvazzt
Boss
Purpose: Advance the route with one clearly assigned priority mechanic before chaining forward.
Danger: Three spire lanes.
Cooldowns: Soaker cooldowns.
Tank
- Set the pack in safe space and stop moving forward if control is exhausted.
Healer
- Confirm recovery and dispel coverage before the next chain.
DPS
- Priority damage and assigned utility come before broad AoE.
- Pull 7
Eye one and two
Orb Watcher, Disruptor, Hexxer
Purpose: Advance the route with one clearly assigned priority mechanic before chaining forward.
Danger: Protect objectives.
Cooldowns: Separate activations.
Tank
- Set the pack in safe space and stop moving forward if control is exhausted.
Healer
- Confirm recovery and dispel coverage before the next chain.
DPS
- Priority damage and assigned utility come before broad AoE.
- Pull 8Bloodlust / Heroism
Avatar
Guardian, Defiler, Tormentors
Purpose: Advance the route with one clearly assigned priority mechanic before chaining forward.
Danger: Soaks and healing objective.
Cooldowns: Second Bloodlust.
Tank
- Set the pack in safe space and stop moving forward if control is exhausted.
Healer
- Confirm recovery and dispel coverage before the next chain.
DPS
- Priority damage and assigned utility come before broad AoE.
Why This Route Works
- Rebuild rules only
Old BfA mechanics and route are excluded.
- Bleed packs split
Charges and Pound do not overlap excessively.
- Gauntlets are deliberate
Spark movement is solved before chain pulling.
- Eyes are separate checkpoints
Each objective receives kicks and cooldowns.
- Avatar starts with control ready
Tormentors are a group responsibility.
Bloodlust / Heroism Plan
- Adderis and Aspix
Reduces Frenzy and repeated Gale/soak overlap.
Alternative: Use on Merektha if Burrow adds are the wall.
If timing is lost: If timing is lost, move the use to the next planned boss or dangerous mandatory pull rather than forcing the original script.
- Avatar of Sethraliss
Accelerates Guardian/Defiler and shortens Tormentor phase.
Alternative: Use on Galvazzt if lane healing is the group wall.
If timing is lost: If timing is lost, move the use to the next planned boss or dangerous mandatory pull rather than forcing the original script.
If It Goes Sideways
Recover the pull, adapt the route, and keep the run moving.
Pushed into Tempest zone
Use freedom/movement, regroup for soak, and spend personals.
Merektha add escapes
Mark it, kick Poison Spit, and fully swap until Burrow ends.
Spire lane missed
Nearest healthy non-Tank fills it and uses defensive.
Eye channel interrupted
Re-engage only after Disruptor is controlled.
Lifeforce soaker dies
Nearest defensive-ready player takes the orb before six seconds.
Healer loses Avatar channel
Tank/DPS chain control on Tormentors and stabilize before resuming.
Common Mistakes
Patterns that repeatedly turn manageable moments into lost time.
Using old reflect rule
Current shield is resistance.
Dropping Tempest in soak path
Place at edge.
Waiting out Burrow
Kill adds to end it.
Tank soaking Galvazzt lane
Non-Tanks own spires.
Not purging Nimbus
Release Charge scales with stacks.
Ignoring Eye Disruptor
Kick it immediately.
Leaving Lifeforce unsoaked
Three orbs, six seconds.
Making final boss healer-only
Everyone controls Tormentors.
Before You Run This Key
Reveal each answer when you are ready. No grades, scores, or completion tracking.
What does Storm Blessed mean now?
How does Merektha exit Burrow?
Who soaks Galvazzt spires?
Which eye cast is critical?
How many Lifeforces spawn?
Where does Blackwake Bloodlust?
Blackwake Notes
Crew-specific calls and hard lessons that supplement the tactical Playbook.
Mythic+ Sessions
Dungeon workshops, role sessions, route workshops, and key nights with the crew.
No Mythic+ sessions are scheduled right now. The Learning Board can still rally a key crew.
Related Academy Content
Fundamentals stay in their own lessons so this page can remain tactical.
- DPSGetting Started
Interrupts: The Button Everyone Should Know
DPS
What interrupting a cast actually does, why it matters more than damage meters, and the mistakes that waste it.
Read the lesson →
Sep 15, 2026
- HealerGetting Started
Dispels Explained
Healer
What can be dispelled, what cannot, and why timing beats reflexes.
Read the lesson →
Sep 18, 2026
- Mythic+Getting Started
Mythic+ Explained
Keystones, timers, scaling, and rating — what Mythic+ actually is before your first key goes in.
Read the lesson →
Sep 18, 2026
- Mythic+Getting Started
Understanding Dungeon Routes
Why routes exist, what enemy percentage means, and how to follow a plan without needing to make one.
Read the lesson →
Sep 18, 2026
- TankIntermediate
Tanking Your First Mythic+
Tank
Routes, enemy count, boss positioning, and talking to your group — the tank's guide to a first timed key.
Read the lesson →
Sep 18, 2026
- HealerIntermediate
Healing Your First Mythic+
Healer
Tank damage, group bursts, mana on a timer, and how to recover when a pull goes sideways.
Read the lesson →
Sep 18, 2026
- DPSIntermediate
DPS in Mythic+
DPS
Priority targets, kicks, cooldown planning, and staying alive — what a damage dealer actually owes a key.
Read the lesson →
Sep 18, 2026
- Mythic+Intermediate
Mythic+ Deaths and Recovery
What deaths actually cost, how to recover a collapsing pull, and how to stop the chain.
Read the lesson →
Sep 18, 2026
- Mythic+Getting Started
Mythic+ Etiquette
Communication, commitment, and keeping keys a place people want to learn — the Blackwake way.
Read the lesson →
Sep 18, 2026
Trusted Resources
Curated references beyond the Blackwake Playbook.
Need a hand?
Ask the Crew
Working through Temple of Sethraliss? Ask for a route review, role help, or a learning run.