Dungeon Playbook
Current poolMidnight · Season 2The Blinding Vale
A lush but punishing four-boss dungeon built around interruptible casters, mandatory soaks, root and beam management, shifting boss forms, and sustained healing.
Reviewed for Midnight Season 2 · Last checked Sep 2026
- Bosses charted
- 4
- Dangerous pulls
- 7
- Priority casts
- 6
Dungeon Overview
The shape of the key before the detailed calls.
A movement-and-soak dungeon with dangerous casters and sustained nature damage
Frequent party pulses, bleed and poison effects, caster volleys, boss soaks, roots, and form changes demand disciplined movement and priority damage.
The Blinding Vale branches at the start, then converges into increasingly dense light-and-nature mechanics. Blackwake takes the left path for the Light-Starved Blossom opportunity and cleaner teaching pulls, completes both opening bosses, and preserves cooldowns for Ruia’s final form and Ziekket’s add cycles.
- Mandatory soaks
- Roots
- Caster kicks
- Bleeds and Poison
- Form changes
Dungeon Profile
- Tank Pressure
- High
- Lasher stacks, Grovekeeper strikes, Thornmaw Gash, Tongue Toss, and boss busters create repeated spikes.
- Group Damage
- Very High
- Spouting Floret, Hydra beams, Roar, Lightfire, Toxic Spew, and Oozing Xylem pressure all players.
- Interrupt Demand
- High
- Light Bolt Volley, Screech, Warden’s Wrath, Lightspore Shot, and filler casts need rotations.
- Movement
- Very High
- Roots, knockbacks, beam lines, tornadoes, form frontals, and orb soaks keep the party moving.
- Dispel / Utility Demand
- High
- Magic, Poison, Bleed removal, freedom effects, and offensive shield removal are valuable.
- Route Complexity
- Moderate
- The opening branch and optional class buffs matter, but the route converges after two bosses.
Dungeon visual · Abstract flow
Dungeon Tactical Overview
A route-flow chart, not dungeon geometry. Read left-to-right on wide screens or top-to-bottom on mobile.
- StartKICK
Left branch
Volley + Belcher pulses
Pulls 1–2
- Stage 2Bloodlust / Heroism
Lightblossom Trinity
3 Loam soaks
Pulls 3
- Stage 3MOVE
Ikuzz wing
Roots + Gaze kiting
Pulls 4–5
- Stage 4DEFENSIVE
Blighted landing
Bleeds + infected packs
Pulls 6
- Stage 5DISPEL
Ruia + ambush
Three forms + Poison eggs
Pulls 7–8
- Stage 6Bloodlust / Heroism
Ziekket
Corpse beams + Essence
Pulls 9
Before You Queue
- Assign Volley and Screech kicks — Radiant Spellsowers and Petalwings are the trash priorities.
- Check freedom, Poison, Magic, and bleed utility — Roots, Toxic Spew, Spore Spines, and Gashes use different answers.
- Know the three Trinity soaks — Tank plus two players claim Fertile Loam.
- Review Ruia’s health phases — Moonkin to Bear to all-mechanics final form.
- Plan corpse beams on Ziekket — Dead Lightblooms must be hit by Concentrated Lightbeam.
The Things That Wipe the Key
The few failure points most likely to cost the timer.
- InterruptTankHealerDPS
Light Bolt Volley completes
Assign every Spellsower volley.
Consequence: Party damage destabilizes already dangerous packs.
- PositioningTankHealerDPS
Trinity soak left empty
Claim all three Fertile Loam circles.
Consequence: Overgrowth punishes the whole group.
- MovementTankHealerDPS
Roots fill Ikuzz’s arena
Stack new roots and kite Gaze through old ones.
Consequence: Stomp and Frenzy leave no safe path.
- HealerTankHealerDPS
Ruia final form unmanaged
Save cooldowns and maintain kicks below 40%.
Consequence: All prior mechanics cycle every eight seconds.
- DPSTankHealerDPS
Ziekket adds revive
Beam corpses before leaving the area.
Consequence: Repeated adds and shots overwhelm Xylem healing.
- PositioningTankHealerDPS
Essence reaches Ziekket
Assign orb soaks and distribute DoTs.
Consequence: Boss empowerment extends the hardest phase.
Boss Playbook
The fight in 20 seconds, what matters, and the most common wipe.
Boss 1
Lightblossom Trinity
Keep Light Bolt interrupted, spread Thornblade, position the trio beside Fertile Loam, soak all three circles during Lightblossom Beam, then move away from the scorched ground..
The Fight in 20 Seconds
Keep Light Bolt interrupted, spread Thornblade, position the trio beside Fertile Loam, soak all three circles during Lightblossom Beam, then move away from the scorched ground.
What Actually Matters
- Light Bolt
Assign Kezkitt’s random-target cast.
- Thornblade
Move from allies and leave the leap impact.
- Bedrock Slam
Tank buster that creates three Fertile Loam circles.
- Lightblossom Beam
Three players soak the circles to prevent Overgrowth.
- Scorched Earth
Reposition immediately after the channel.
Dungeon visual · Illustrated mechanic sequence
Trinity: Loam to Beam
The three-circle soak is the repeatable failure point; the diagram keeps the setup and movement order explicit.
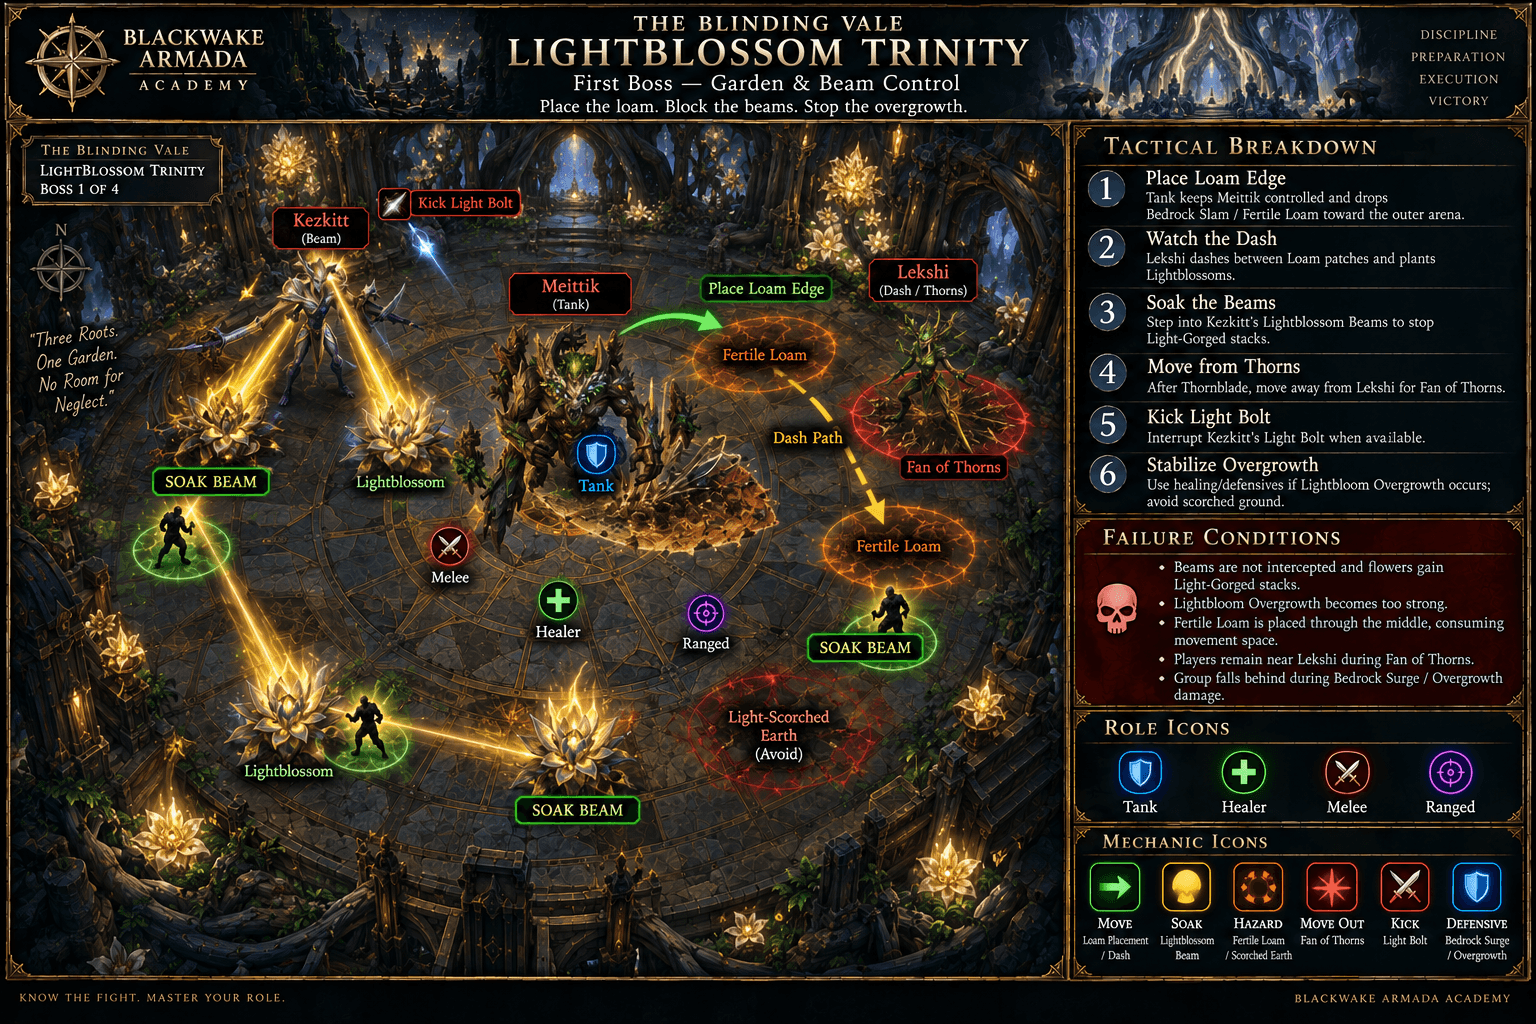
- 1
Control Light Bolt
Maintain the assigned kick and spread Thornblade.
- 2
Create Loam
Bedrock Slam creates three Fertile Loam circles.
- 3
Assign soakers
Three players stand in the circles during Lightblossom Beam.
- 4
Prevent Overgrowth
Every filled circle avoids the group-wide failure.
- 5
Leave Scorched Earth
Move immediately and reset on clean space.
TankMitigate Slam and move the trio between clean Loam sets.
HealerCover the three assigned soakers.
DPSKick Light Bolt and take a designated circle.
Tank
- Mitigate Slam and move all bosses between clean Loam sets.
Healer
- Heal three soakers and Thornblade targets.
DPS
- Kick Light Bolt, spread Thornblade, and take an assigned soak.
Defensive Timing
- Personal while soaking Beam.
- Tank defensive for Slam.
Bloodlust / Heroism: Good first use to reduce repeated three-soak cycles.
Common Wipe: A Fertile Loam circle is left empty and Lightbloom Overgrowth hits the party.
- Light Bolt
Boss 2
Ikuzz the Light Hunter
Avoid Bloodthorn Roots, group new roots for cleave, survive Thorncaller Roar, and kite Bloodthirsty Gaze through existing roots after Lightcrazed Frenzy begins at 50%..
The Fight in 20 Seconds
Avoid Bloodthorn Roots, group new roots for cleave, survive Thorncaller Roar, and kite Bloodthirsty Gaze through existing roots after Lightcrazed Frenzy begins at 50%.
What Actually Matters
- Bloodthorn Roots
Avoid existing roots and group new spawns for cleave or freedom removal.
- Thorncaller Roar
Unavoidable pulsing party damage.
- Verdant Stomp
Knockback can send players into roots.
- Bloodthirsty Gaze
Fixated player kites Ikuzz over roots to destroy them.
- Lightcrazed Frenzy
At 50%, pressure and pacing increase.
Dungeon visual · Illustrated positioning
Ikuzz Root Clear
Illustrated root grouping, Thorncaller Roar coverage, Verdant Stomp space, and Bloodthirsty Gaze kiting through existing roots.
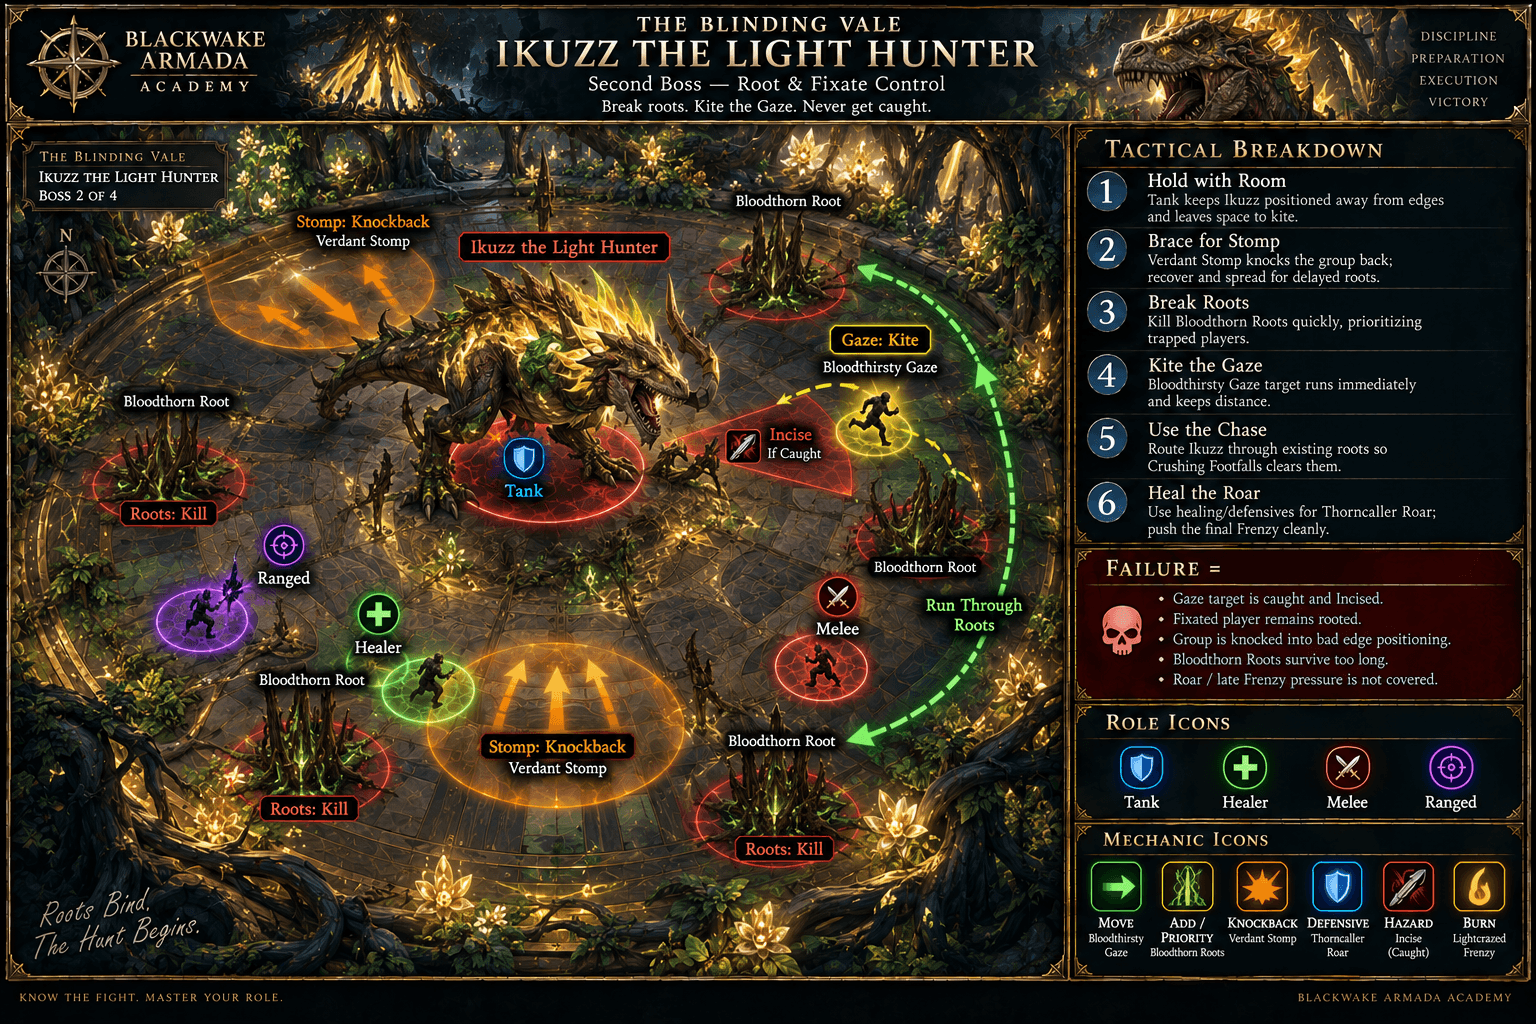
- 1. Keep new Bloodthorn Roots grouped for cleave.
- 2. Leave room for Verdant Stomp knockback.
- 3. The Gaze target guides Ikuzz through existing roots after Frenzy begins.
Tank
- Keep the boss central enough for controlled root clears and Stomp space.
Healer
- Cooldown Roar and the 50% transition.
DPS
- Cleave grouped roots and kite Gaze through them.
Defensive Timing
- Personal for Roar after 50%.
- Freedom effects recover root mistakes.
Bloodlust / Heroism: Valid alternative first use to shorten Frenzy.
Common Wipe: Players are knocked into roots, then the fixate has no safe kite path.
- Bloodthorn Roots
Boss 3
Lightwarden Ruia
Handle three phases: kick Warden’s Wrath and dodge Lightfall, mitigate bear bleeds and spread Pulverizing Strikes, then survive a final form that cycles all prior mechanics every eight seconds..
The Fight in 20 Seconds
Handle three phases: kick Warden’s Wrath and dodge Lightfall, mitigate bear bleeds and spread Pulverizing Strikes, then survive a final form that cycles all prior mechanics every eight seconds.
What Actually Matters
- Warden’s Wrath
Interrupt to reduce Tank damage.
- Lightfire
Three players stack loosely and dodge expiration tornadoes.
- Grievous Thrash
Bear-form bleed requires mitigation or removal.
- Pulverizing Strikes
Spread the targeted frontals.
- Spirits of the Vale
Below 40%, prior mechanics cycle rapidly.
Dungeon visual · Illustrated positioning
Lightwarden Ruia Form Cycle
Illustrated Warden’s Wrath kicks, Lightfall movement, bear bleeds, Pulverizing Strikes spread, and the final form’s repeating mechanics.
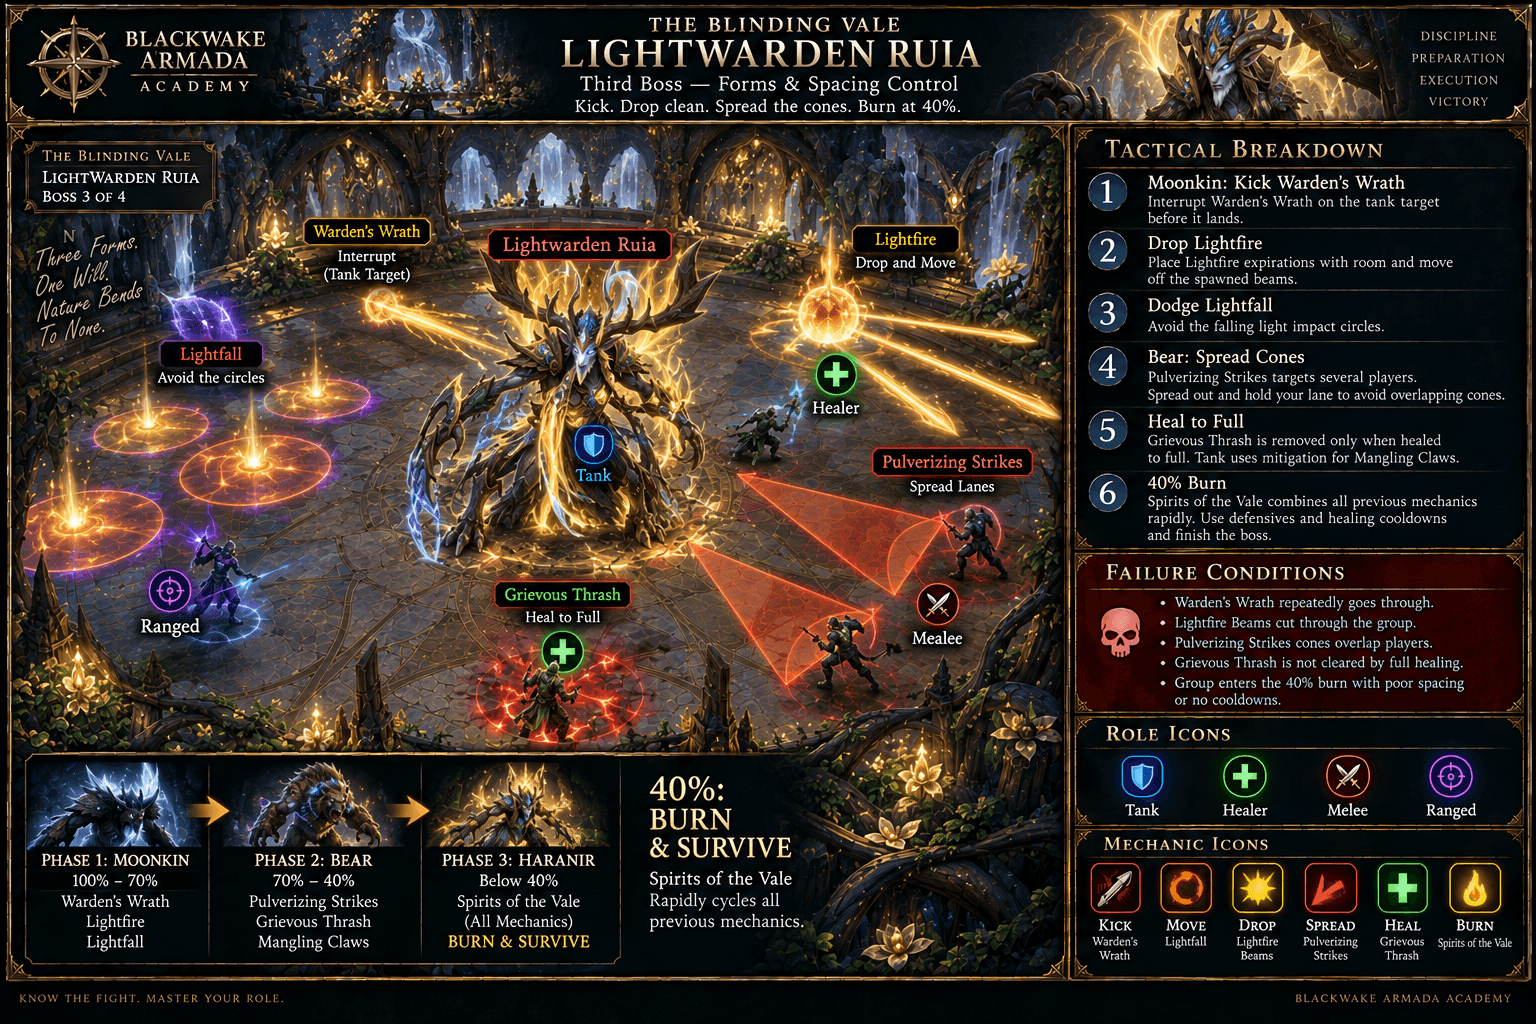
Tank
- Mitigate Thrash and keep frontals away during final cycles.
Healer
- Track Lightfire and Tank bleed; save cooldowns below 40%.
DPS
- Kick Wrath and spread Pulverizing Strikes.
Defensive Timing
- Personal for Lightfire expiration or final-form overlap.
- Tank defensive for Thrash.
Bloodlust / Heroism: Strong use at 40% if cooldowns are available.
Common Wipe: The group enters the final form with Lightfire poorly stacked and the Tank bleed unmanaged.
- Warden’s Wrath
Boss 4
Ziekket
Endure constant Oozing Xylem, cleave Lightbloom adds, interrupt Lightspore Shot, destroy corpses with Concentrated Lightbeam, soak Essence orbs, and keep Thornspike knockback away from the edge..
The Fight in 20 Seconds
Endure constant Oozing Xylem, cleave Lightbloom adds, interrupt Lightspore Shot, destroy corpses with Concentrated Lightbeam, soak Essence orbs, and keep Thornspike knockback away from the edge.
What Actually Matters
- Oozing Xylem
Constant party damage for the encounter.
- Awaken the Lightbloom
Adds must be grouped, stopped, and killed.
- Concentrated Lightbeam
Aim through add corpses to destroy them permanently; it leaves a large puddle.
- Lightbloom’s Essence
Soak orbs before they reach Ziekket and distribute the DoT.
- Thornspike
Tank hit and knockback.
Dungeon visual · Illustrated positioning
Ziekket Corpse and Essence Control
Illustrated Lightbloom add control, corpse destruction, Essence orb soaks, Lightspore kicks, and safe Thornspike knockback positioning.
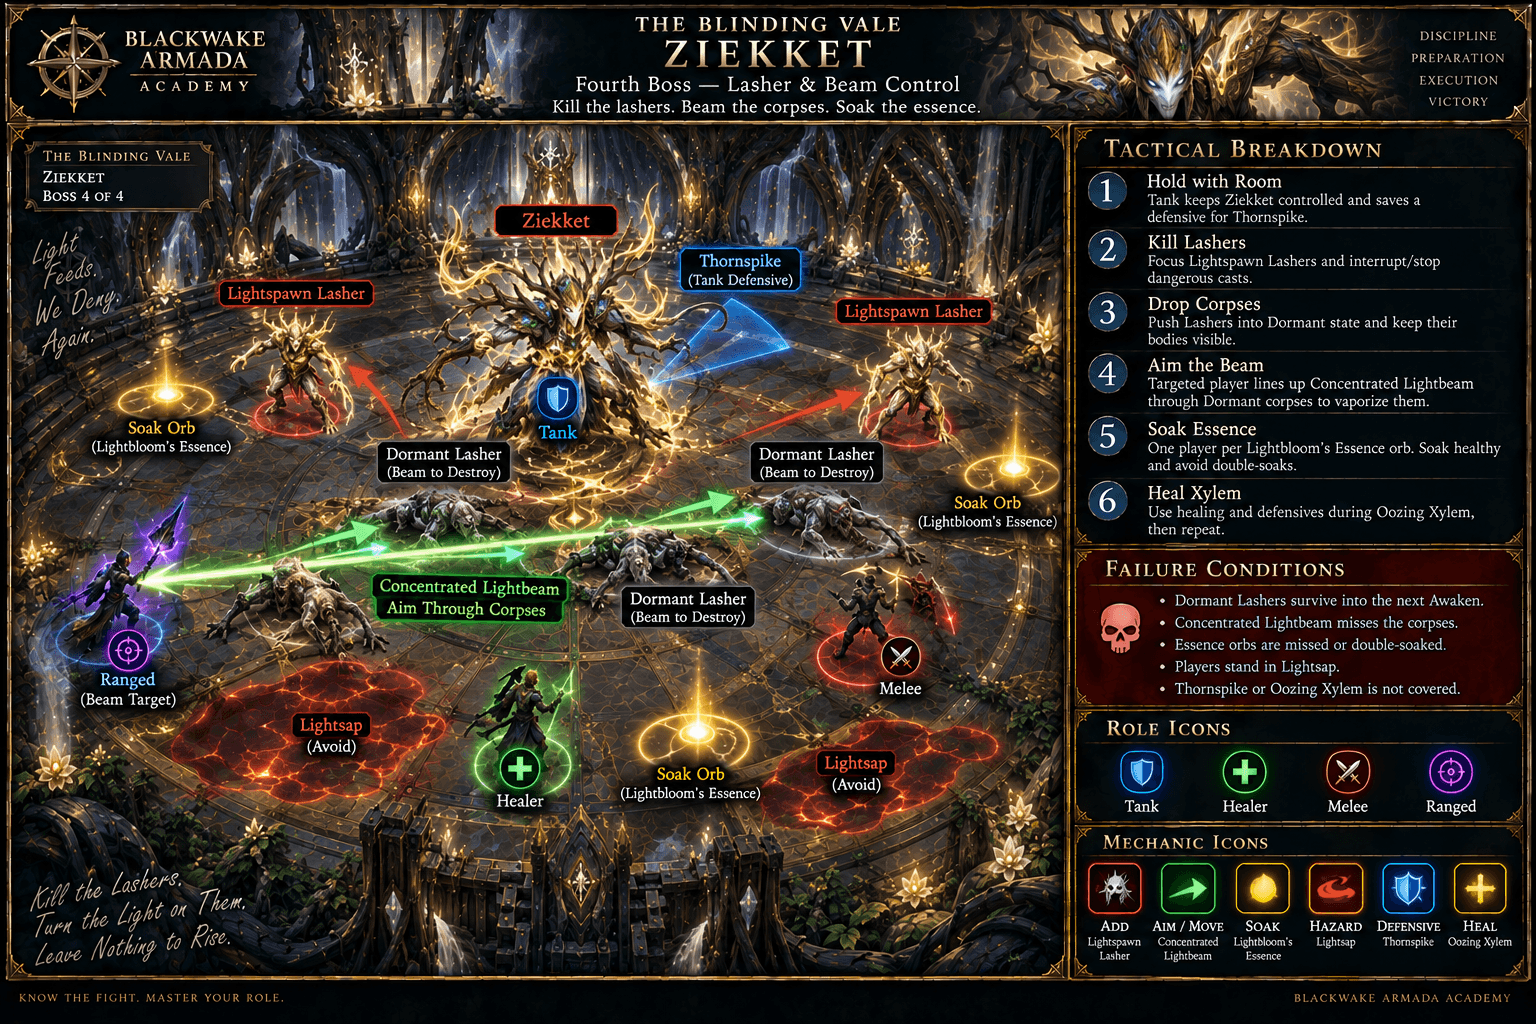
Tank
- Position boss/adds near the edge for corpse beams and brace Thornspike.
Healer
- Sustain Xylem healing and spread orb-soak DoTs.
DPS
- Stop Lightspore Shot, cleave adds, and line corpses for the beam.
Defensive Timing
- Personal for orb soak plus Xylem.
- Group cooldown during heavy add sets.
Bloodlust / Heroism: Strong final default to reduce add and orb cycles.
Common Wipe: Add corpses are not destroyed, they revive, and Essence orbs reach the boss.
- Oozing Xylem
Dangerous Trash
Only the enemies that meaningfully change the pull.
Dungeon visual · Priority pack
Priority Pull: Belcher Control
The second pull pairs an unavoidable pulse check with an interruptible group disorient.
- 1Critical
Lightfeather Petalwing
Disorienting Screech
KICKPRIORITY TARGETKick every cast.
- 2Critical
Sporeblight Belcher
Spouting Floret
DEFENSIVEMOVEPRIORITY TARGETCooldown pulses and dodge spores.
Dungeon visual · Priority pack
Priority Pull: Potatoad Ambush
The final approach requires Poison coverage while controlling hatchable eggs.
- 1High
Potatoad Matriarch
Toxic Spew
DISPELDEFENSIVEPRIORITY TARGETPoison-cleanse where available and kill eggs.
- Critical
Radiant Spellsower
Light Bolt Volley
KICKSTOPPRIORITY TARGETKickable party damage; Call the Grove awakens dormant Lashers at low health.
- Kick:
- Interruptible
- Handle:
- Kick Volley and stop/focus Call the Grove.
- Critical
Sporeblight Belcher
Spouting Floret
DEFENSIVEMOVEPRIORITY TARGETCC-immune pulses plus avoidable spores.
- Kick:
- Not kick-interruptible
- Handle:
- Cooldown pulses and dodge spores.
- Critical
Lightfeather Petalwing
Disorienting Screech
KICKPRIORITY TARGETInterruptible group disorient.
- Kick:
- Interruptible
- Handle:
- Kick every cast.
- High
Overgrown Hydra
Lightmaw Beams
MOVEDEFENSIVEPRIORITY TARGETThree player-targeted channels plus Bullet Seed lines; CC-immune.
- Kick:
- Not kick-interruptible
- Handle:
- Spread beams and use personals.
- High
Virid Grovekeeper
Uproot
DEFENSIVEMOVEParty hit and knockback with Earthrupture Tank strike; CC-immune.
- Kick:
- Not kick-interruptible
- Handle:
- Place Tank puddle away and brace knockback.
- High
Luminous Thornmaw
Grievous Gash
DEFENSIVEMOVEPRIORITY TARGETTank bleed plus random Solar Breath frontal; CC-immune.
- Kick:
- Not kick-interruptible
- Handle:
- Mitigate/cleanse bleed and dodge breath.
- High
Potatoad Matriarch
Toxic Spew
DISPELDEFENSIVEPRIORITY TARGETGroup Poison DoT, Tank launch, and hatchable eggs.
- Kick:
- Not kick-interruptible
- Handle:
- Poison-cleanse where available and kill eggs.
Interrupt Priority
Kick when a kick works. Use the named stop when it does not.
Stuns, silences, knockbacks, displacement, and incapacitates are stops, not interchangeable labels for an interrupt. Review Interrupts, Stops, and Crowd Control →
Dungeon visual · Interrupt strip
Second-Screen Interrupt Strip
Priority, action type, spell, and source remain visible without opening details or relying on color alone.
Critical
- KICKLight Bolt Volley
Radiant Spellsower
- KICKDisorienting Screech
Lightfeather Petalwing
- KICKWarden’s Wrath
Lightwarden Ruia
High priority
- KICKLightspore Shot
Lightbloom add
Useful
- KICKLight Bolt
Radiant Spellsower
- KICKSeed Shot
Leafy Grovecrawler
Critical
- KICKCritical
Light Bolt Volley
Radiant Spellsower
Party-wide damage.
Response: Kick every cast.
- KICKCritical
Disorienting Screech
Lightfeather Petalwing
Group disorient breaks pull control.
Response: Kick every cast.
- KICKCritical
Warden’s Wrath
Lightwarden Ruia
Repeated Tank damage in phase one.
Response: Maintain a rotation.
High Priority
- KICKHigh
Lightspore Shot
Lightbloom add
Random-target damage during constant Xylem.
Response: Kick or hard-stop adds.
Useful
- KICKUseful
Light Bolt
Radiant Spellsower
Random-target damage.
Response: Use spare kicks.
- KICKUseful
Seed Shot
Leafy Grovecrawler
Avoidable random-target damage.
Response: Use spare kicks.
Tank Cheat Sheet
The Tank calls worth reviewing at the ready check.
- Manage Lasher Spore Spines and freedom/Magic removal by actual class.
- Place Grovekeeper Earthrupture away and brace Uproot.
- Mitigate Trinity Bedrock Slam and move off scorched ground.
- Keep Ikuzz root lanes usable for Gaze.
- Mitigate Thornmaw Gash and Ruia Thrash.
- Spread Ruia final-form frontals away.
- Place Potatoad Tongue Toss safely.
- Position Ziekket adds/corpses near an edge and brace Thornspike.
Healer Cheat Sheet
The Healer calls worth reviewing at the ready check.
- Plan cooldowns for Spouting Floret and Hydra beams.
- Track Thornblade/Spore Spines bleeds and class-specific removal.
- Heal Trinity soakers and Ikuzz Roar.
- Use freedom effects on root mistakes where available.
- Save a major cooldown for Ruia below 40%.
- Poison-cleanse Toxic Spew by priority.
- Sustain Oozing Xylem while covering orb soakers.
- Call when add shots or Essence stacks exceed coverage.
DPS Cheat Sheet
Mechanics, utility, and priority damage are useful DPS—not only meter output.
- Spellsower, Petalwing, Belcher, Hydra, Thornmaw, Matriarch, and Ziekket adds are priority.
- Kick Volley, Screech, Wrath, and Lightspore Shot.
- Break Pollination shields and stop Call the Grove.
- Take assigned Trinity soak.
- Cleave grouped Ikuzz roots and kite Gaze through them.
- Respect Ruia form swaps.
- Destroy Matriarch eggs.
- Beam Ziekket corpses before returning to boss.
Blackwake Route
The recommended sequence, why it works, and where the plan can flex.
Blackwake Learning Route — Left Branch and Clean Soaks
Take the left opening for the more teachable caster route and Light-Starved Blossom opportunity, complete Trinity then Ikuzz, isolate post-flight lieutenants, and enter Ziekket with add-control cooldowns.
Dungeon visual · Route timeline
Blackwake Route Timeline
A scan-first companion to the detailed pull cards. Pull order, boss transitions, control checks, and planned Bloodlust uses come from the existing route.
- Start · Pull 1
Left-branch caster opener
KICK - Pull 2
Belcher control pack
DEFENSIVE - Pull 3Boss
Lightblossom Trinity
Bloodlust / Heroism - Pull 4
Ikuzz wing
MOVE - Pull 5Boss
Ikuzz
MOVE - Pull 6
Blighted flight landing
DEFENSIVE - Pull 7Boss
Lightwarden Ruia
PRIORITY TARGET - Pull 8
Potatoad ambush
DISPEL - Pull 9Boss
Ziekket
Bloodlust / Heroism
- Pull 1
Left-branch caster opener
Lashers and Radiant Spellsower
Purpose: Advance the route with one clearly assigned priority mechanic before chaining forward.
Danger: Volley and Call the Grove.
Cooldowns: Short stops.
Tank
- Set the pack in safe space and stop moving forward if control is exhausted.
Healer
- Confirm recovery and dispel coverage before the next chain.
DPS
- Priority damage and assigned utility come before broad AoE.
- Pull 2
Belcher control pack
Belcher, Petalwing, nearby mobs
Purpose: Advance the route with one clearly assigned priority mechanic before chaining forward.
Danger: Pulses and Screech.
Cooldowns: Healing cooldown.
Tank
- Set the pack in safe space and stop moving forward if control is exhausted.
Healer
- Confirm recovery and dispel coverage before the next chain.
DPS
- Priority damage and assigned utility come before broad AoE.
- Pull 3Bloodlust / Heroism
Lightblossom Trinity
Boss trio
Purpose: Advance the route with one clearly assigned priority mechanic before chaining forward.
Danger: Three soaks and scorched ground.
Cooldowns: First Bloodlust.
Tank
- Set the pack in safe space and stop moving forward if control is exhausted.
Healer
- Confirm recovery and dispel coverage before the next chain.
DPS
- Priority damage and assigned utility come before broad AoE.
- Pull 4
Ikuzz wing
Hydra and root-area trash
Purpose: Advance the route with one clearly assigned priority mechanic before chaining forward.
Danger: Beams and movement.
Cooldowns: Keep space.
Tank
- Set the pack in safe space and stop moving forward if control is exhausted.
Healer
- Confirm recovery and dispel coverage before the next chain.
DPS
- Priority damage and assigned utility come before broad AoE.
- Pull 5
Ikuzz
Boss
Purpose: Advance the route with one clearly assigned priority mechanic before chaining forward.
Danger: Roots, Roar, Frenzy.
Cooldowns: Defensive plan.
Tank
- Set the pack in safe space and stop moving forward if control is exhausted.
Healer
- Confirm recovery and dispel coverage before the next chain.
DPS
- Priority damage and assigned utility come before broad AoE.
- Pull 6
Blighted flight landing
Thornmaw and infected packs
Purpose: Advance the route with one clearly assigned priority mechanic before chaining forward.
Danger: Death puddles and Tank bleed.
Cooldowns: Split lieutenants.
Tank
- Set the pack in safe space and stop moving forward if control is exhausted.
Healer
- Confirm recovery and dispel coverage before the next chain.
DPS
- Priority damage and assigned utility come before broad AoE.
- Pull 7
Lightwarden Ruia
Boss
Purpose: Advance the route with one clearly assigned priority mechanic before chaining forward.
Danger: Three forms.
Cooldowns: Hold cooldowns for 40%.
Tank
- Set the pack in safe space and stop moving forward if control is exhausted.
Healer
- Confirm recovery and dispel coverage before the next chain.
DPS
- Priority damage and assigned utility come before broad AoE.
- Pull 8
Potatoad ambush
Matriarch and eggs
Purpose: Advance the route with one clearly assigned priority mechanic before chaining forward.
Danger: Toxic Spew and hatches.
Cooldowns: Priority damage.
Tank
- Set the pack in safe space and stop moving forward if control is exhausted.
Healer
- Confirm recovery and dispel coverage before the next chain.
DPS
- Priority damage and assigned utility come before broad AoE.
- Pull 9Bloodlust / Heroism
Ziekket
Boss and Lightbloom adds
Purpose: Advance the route with one clearly assigned priority mechanic before chaining forward.
Danger: Corpse beams and Essence.
Cooldowns: Second Bloodlust.
Tank
- Set the pack in safe space and stop moving forward if control is exhausted.
Healer
- Confirm recovery and dispel coverage before the next chain.
DPS
- Priority damage and assigned utility come before broad AoE.
Why This Route Works
- Left is teachable
Caster assignments are clearer and the Blossom buff is useful when available.
- Pulse mobs stay bounded
Belcher and Hydra pressure get separate healing plans.
- Opening bosses are not rushed
Soaks and roots receive full space.
- Blighted mobs are split
Death puddles do not flood the landing.
- Ziekket begins with control ready
Stops and burst are saved for recurring adds.
Bloodlust / Heroism Plan
- Lightblossom Trinity
Reduces repeated three-soak and scorched-ground cycles.
Alternative: Use on Ikuzz if Frenzy is the group wall.
If timing is lost: If timing is lost, move the use to the next planned boss or dangerous mandatory pull rather than forcing the original script.
- Ziekket
Shortens constant Xylem and repeated add sets.
Alternative: Use at first large add set if unavailable on pull.
If timing is lost: If timing is lost, move the use to the next planned boss or dangerous mandatory pull rather than forcing the original script.
If It Goes Sideways
Recover the pull, adapt the route, and keep the run moving.
Wrong opening branch
Continue it safely; both paths converge and the route link repairs count.
Volley or Screech lands
Use personals, stabilize, and assign the next cast by name.
Trinity soak missed
Group defensive immediately and reposition off scorched ground.
Player rooted on Ikuzz
Cleave root or use valid freedom; do not drag Gaze through allies.
Ruia final phase begins low
Delay personal damage cooldowns only long enough to stabilize; maintain Wrath kicks.
Ziekket corpse survives
Aim the next Concentrated Lightbeam through it before another add set.
Common Mistakes
Patterns that repeatedly turn manageable moments into lost time.
Kicking Light Bolt before Volley
Volley is the assignment.
Leaving a Trinity circle empty
Three players must soak.
Standing in scorched Loam
Move bosses immediately.
Scattering Ikuzz roots
Group new roots for cleave.
Ignoring Ruia’s form
The active mechanic package changes by health.
Letting Potatoad eggs hatch
Priority-target eggs.
Killing adds away from beam lanes
Corpse placement matters.
Overstacking Essence DoTs
Distribute soaks.
Before You Run This Key
Reveal each answer when you are ready. No grades, scores, or completion tracking.
Which trash cast is the primary kick?
How many Trinity circles must be soaked?
How are Ikuzz roots removed?
What happens below 40% on Ruia?
How are Ziekket adds permanently removed?
Where does Blackwake Bloodlust?
Blackwake Notes
Crew-specific calls and hard lessons that supplement the tactical Playbook.
Mythic+ Sessions
Dungeon workshops, role sessions, route workshops, and key nights with the crew.
No Mythic+ sessions are scheduled right now. The Learning Board can still rally a key crew.
Related Academy Content
Fundamentals stay in their own lessons so this page can remain tactical.
- DPSGetting Started
Interrupts: The Button Everyone Should Know
DPS
What interrupting a cast actually does, why it matters more than damage meters, and the mistakes that waste it.
Read the lesson →
Sep 15, 2026
- HealerGetting Started
Dispels Explained
Healer
What can be dispelled, what cannot, and why timing beats reflexes.
Read the lesson →
Sep 18, 2026
- Mythic+Getting Started
Mythic+ Explained
Keystones, timers, scaling, and rating — what Mythic+ actually is before your first key goes in.
Read the lesson →
Sep 18, 2026
- Mythic+Getting Started
Understanding Dungeon Routes
Why routes exist, what enemy percentage means, and how to follow a plan without needing to make one.
Read the lesson →
Sep 18, 2026
- TankIntermediate
Tanking Your First Mythic+
Tank
Routes, enemy count, boss positioning, and talking to your group — the tank's guide to a first timed key.
Read the lesson →
Sep 18, 2026
- HealerIntermediate
Healing Your First Mythic+
Healer
Tank damage, group bursts, mana on a timer, and how to recover when a pull goes sideways.
Read the lesson →
Sep 18, 2026
- DPSIntermediate
DPS in Mythic+
DPS
Priority targets, kicks, cooldown planning, and staying alive — what a damage dealer actually owes a key.
Read the lesson →
Sep 18, 2026
- Mythic+Intermediate
Mythic+ Deaths and Recovery
What deaths actually cost, how to recover a collapsing pull, and how to stop the chain.
Read the lesson →
Sep 18, 2026
- Mythic+Getting Started
Mythic+ Etiquette
Communication, commitment, and keeping keys a place people want to learn — the Blackwake way.
Read the lesson →
Sep 18, 2026
Trusted Resources
Curated references beyond the Blackwake Playbook.
Need a hand?
Ask the Crew
Working through The Blinding Vale? Ask for a route review, role help, or a learning run.