Dungeon Playbook
Current poolMidnight · Season 2Voidscar Arena
A three-boss arena gauntlet with branching miniboss buffs, wave-based trash, severe Tank debuffs, mandatory priority spawns, and constant forced movement.
Reviewed for Midnight Season 2 · Last checked Sep 2026
- Bosses charted
- 3
- Dangerous pulls
- 8
- Priority casts
- 6
Dungeon Overview
The shape of the key before the detailed calls.
A branching arena dungeon built around wave control, priority spawns, and forced movement
Tank armor loss, unavoidable channels, poison, fears, shields, fixates, and arena hazards punish groups that chain waves before cooldowns and control recover.
Voidscar Arena rewards a deliberate path choice and strict wave pacing. Blackwake takes the left Endurance route for fewer interrupt demands, controls each arena wave before triggering the next, kills all three required Brutalizers, and saves space for every boss.
- Arena waves
- Branching buffs
- Tank debuffs
- Priority spawns
- Forced movement
Dungeon Profile
- Tank Pressure
- Very High
- Bloodsurge, Melt Armor, Shred Defense, Creeper bites, Brutalize, and boss busters stack rapidly.
- Group Damage
- Very High
- Brutal Slams, Insidious Aura, Dreadbellow, Poison Splash, and Singularity pulses pressure all players.
- Interrupt Demand
- High
- Demoralizing Shout, Volley, Mass Shriek, Violent Sand, and healing channels require assignments.
- Movement
- Very High
- Charges, puddles, orb kiting, fixates, pushbacks, and boss arena patterns dominate.
- Dispel / Utility Demand
- High
- Poison, Magic, bleed removal, soothe, purge, freedom, and shields all matter.
- Route Complexity
- High
- Two opening paths, arena wave pacing, lieutenant choices, and three required Brutalizers create route decisions.
Dungeon visual · Abstract flow
Dungeon Tactical Overview
A route-flow chart, not dungeon geometry. Read left-to-right on wide screens or top-to-bottom on mobile.
- StartKICK
Opening fights
Brawler → Overseer → Aegyra
Pulls 1–3
- Stage 2PRIORITY TARGET
Arena waves
Player-controlled wave release
Pulls 4
- Stage 3Bloodlust / Heroism
Taz’Rah
Edge puddles + Dark Bloom
Pulls 5
- Stage 4KICK
Atroxus path
Chosen lieutenants + boss
Pulls 6–7
- Stage 5DEFENSIVE
Brutalizer gate
3 Brutalizers + Devour
Pulls 8
- Stage 6Bloodlust / Heroism
Charonus
Orbs through Singularities
Pulls 9
Before You Queue
- Choose the opening path — Blackwake defaults left for fewer kick demands and Proof of Endurance.
- Assign Demoralizing Shout and Mass Shriek — Both are must-kick casts.
- Check Poison and Magic coverage — Corrosive Essence and Melt Armor can exceed one healer’s toolkit.
- Review Atroxus Creeper swap — Every DPS changes target immediately.
- Review Charonus orb disposal — Kite Gravitic Orbs through Singularities.
The Things That Wipe the Key
The few failure points most likely to cost the timer.
- RouteTankHealerDPS
Arena waves chained early
Finish and recover before activating the next pack.
Consequence: Multiple tough mobs and auras overlap.
- DPSTankHealerDPS
Brutal Slams shield survives
Break the Overseer shield.
Consequence: AoE damage continues until the shield breaks.
- InterruptTankHealerDPS
Mass Shriek completes
Assign every Screamer.
Consequence: The group fear destroys wave control.
- DPSTankHealerDPS
Atroxus Creeper ignored
Swap and kite immediately.
Consequence: Bite stacks make Hulking Claw lethal.
- Priority TargetTankHealerDPS
Brutalizer Devour completes
Kill its low-health target first.
Consequence: The Brutalizer empowers itself and extends the gate.
- MovementTankHealerDPS
Charonus orbs remain
Kite each orb into a Singularity.
Consequence: Mass stacks and overlapping pulls overwhelm the group.
Boss Playbook
The fight in 20 seconds, what matters, and the most common wipe.
Boss 1
Taz’Rah
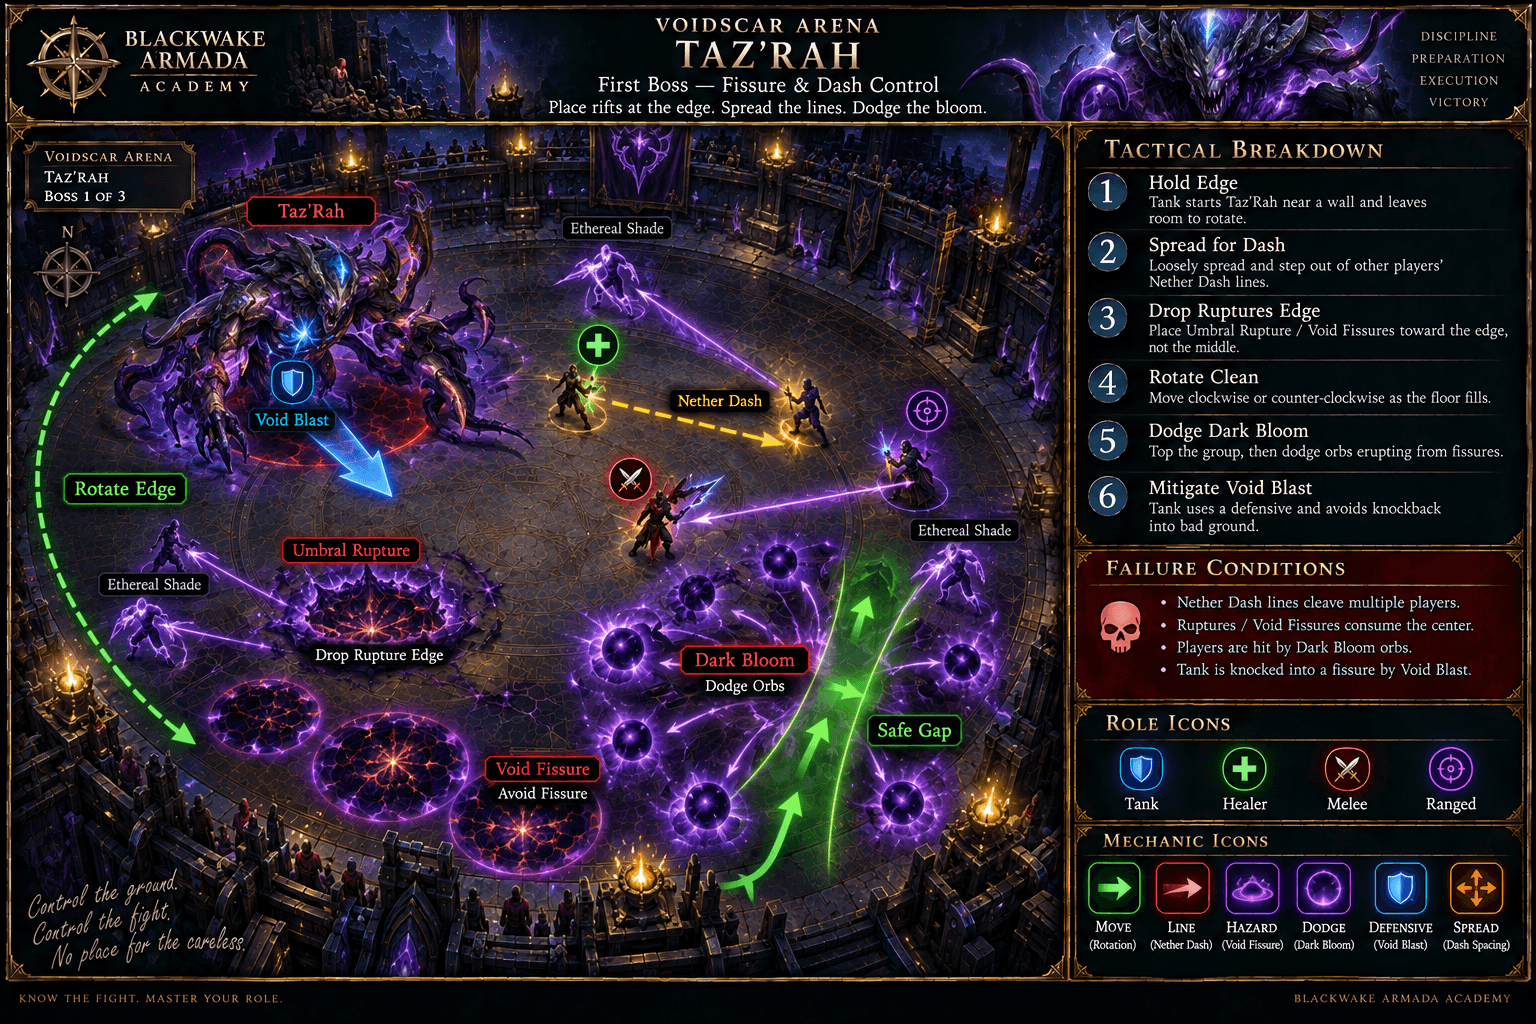
Loosely spread Nether Dash near the edge so Umbral Ruptures cluster, rotate around those puddles during Dark Bloom, and keep Void Blast knockback from sending the Tank into old ground..
The Fight in 20 Seconds
Loosely spread Nether Dash near the edge so Umbral Ruptures cluster, rotate around those puddles during Dark Bloom, and keep Void Blast knockback from sending the Tank into old ground.
What Actually Matters
- Nether Dash
Lines through every player; spread without scattering shades.
- Umbral Rupture
Cluster puddles near the edge to preserve room.
- Dark Bloom
Old puddles fire lethal orbs; rotate through clean space.
- Void Blast
Tank buster plus knockback.
Dungeon visual · Illustrated positioning
Taz’Rah Rupture Rotation
Illustrated edge rupture placement, Nether Dash spread, Dark Bloom rotation, safe gaps, and Void Blast mitigation.
Tank
- Tank at a wall and rotate the boss around the arena.
Healer
- Top before Rupture and cover Dark Bloom movement.
DPS
- Spread Dash lines and rotate around orb patterns.
Defensive Timing
- Personal during Dark Bloom.
- Tank defensive for Void Blast.
Bloodlust / Heroism: Good first use to preserve arena space.
Common Wipe: Scattered Ruptures turn Dark Bloom into an undodgeable orb field.
- Nether Dash
Boss 2
Atroxus
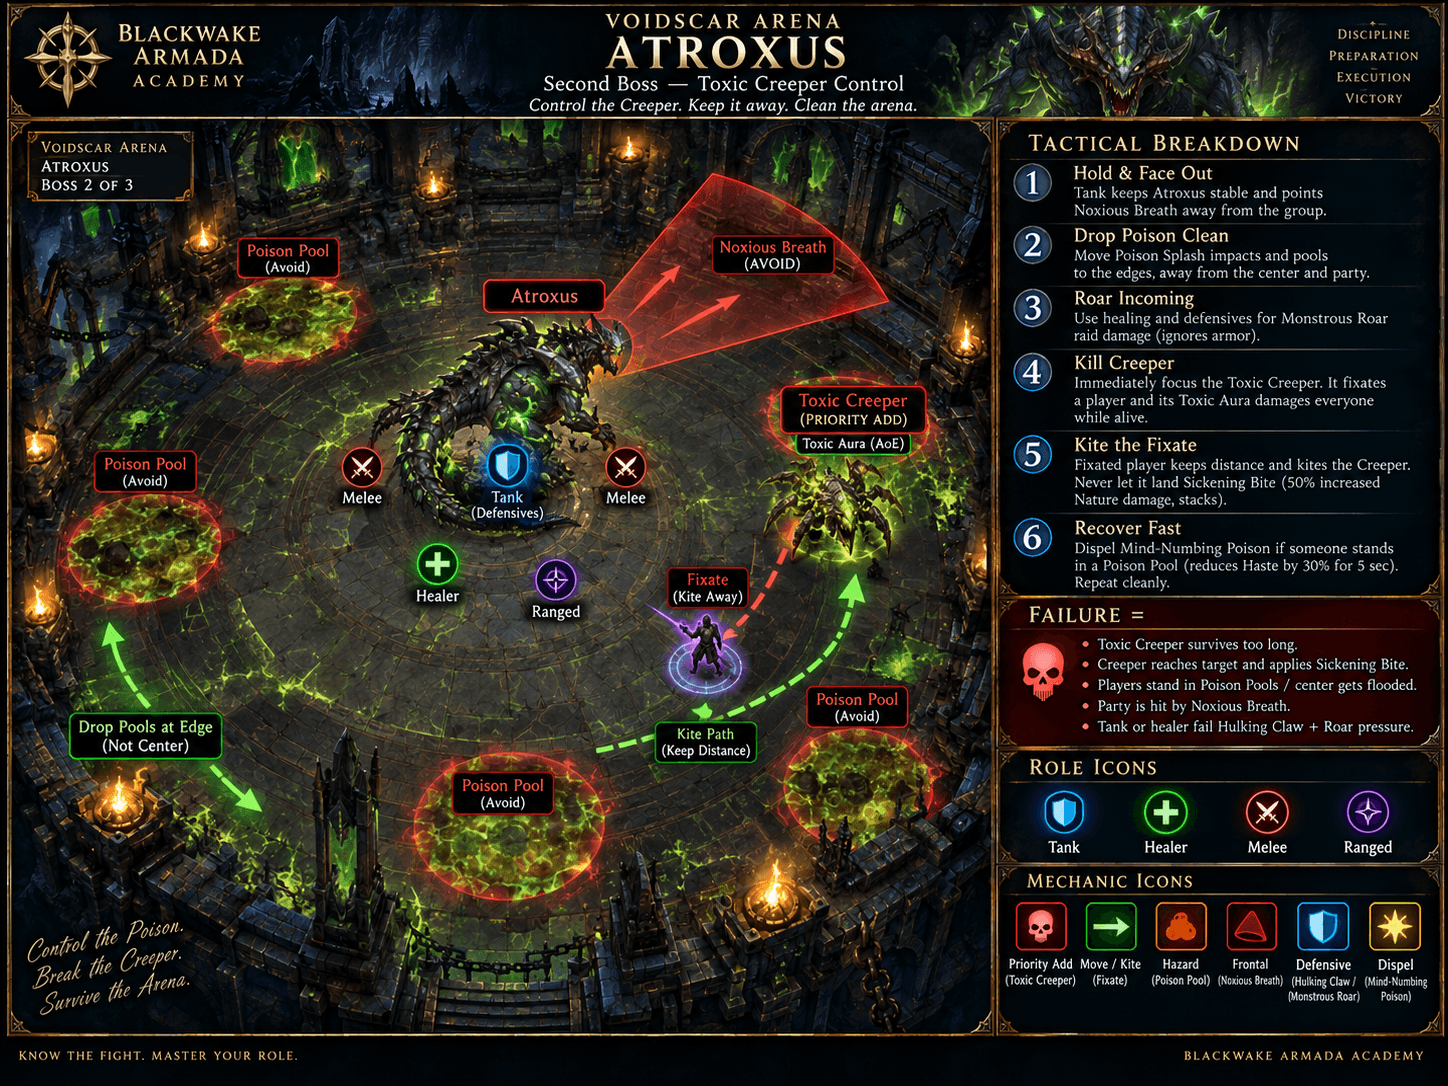
Dodge Poison Splash puddles and Noxious Breath, kill the Toxic Creeper immediately, and kite it off the Tank so Sickening Bite stacks do not combine with Hulking Claw..
The Fight in 20 Seconds
Dodge Poison Splash puddles and Noxious Breath, kill the Toxic Creeper immediately, and kite it off the Tank so Sickening Bite stacks do not combine with Hulking Claw.
What Actually Matters
- Poison Splash
Party hit plus Mind-Numbing Poison puddles.
- Noxious Breath
Random-target frontal; stay close to sidestep.
- Monstrous Roar
Spawns the Toxic Creeper and adds party pressure.
- Toxic Creeper
Pulses group damage and fixates the Tank.
- Sickening Bite and Hulking Claw
Kite the add before stacks make the buster lethal.
Dungeon visual · Illustrated positioning
Atroxus Creeper Swap
Illustrated Poison Splash avoidance, Noxious Breath spacing, Toxic Creeper priority, Sickening Bite kiting, and Hulking Claw mitigation.
Tank
- Kite the Creeper and mitigate Hulking Claw.
Healer
- Cooldown Roar/Creeper overlap and Poison Splash.
DPS
- Swap to Creeper immediately and dodge Breath.
Defensive Timing
- Personal during Roar.
- Tank major for Claw with Bite stacks.
Bloodlust / Heroism: Strong default to remove Creeper cycles.
Common Wipe: DPS stay on Atroxus while the Creeper stacks Sickening Bite and the Tank dies to Hulking Claw.
- Poison Splash
Boss 3
Charonus
Avoid Singularity pull zones, spread Cosmic Crash, kite Gravitic Orbs through Singularities to destroy both, point Dark Waves away, and run out to create dodge time for Void Cascade..
The Fight in 20 Seconds
Avoid Singularity pull zones, spread Cosmic Crash, kite Gravitic Orbs through Singularities to destroy both, point Dark Waves away, and run out to create dodge time for Void Cascade.
What Actually Matters
- Unstable Singularity
Persistent pull and party pulse; touching applies Atomized.
- Cosmic Crash
Spread player circles.
- Gravitic Orbs
DPS kite fixates through Singularities.
- Dark Waves
Tank frontal.
- Void Cascade
Run out from the boss to gain projectile-dodge time.
Dungeon visual · Illustrated positioning
Charonus Orb Destruction
Illustrated Singularity spacing, Cosmic Crash spread, Gravitic Orb kiting paths, Dark Waves, Void Cascade movement, and clean resets.
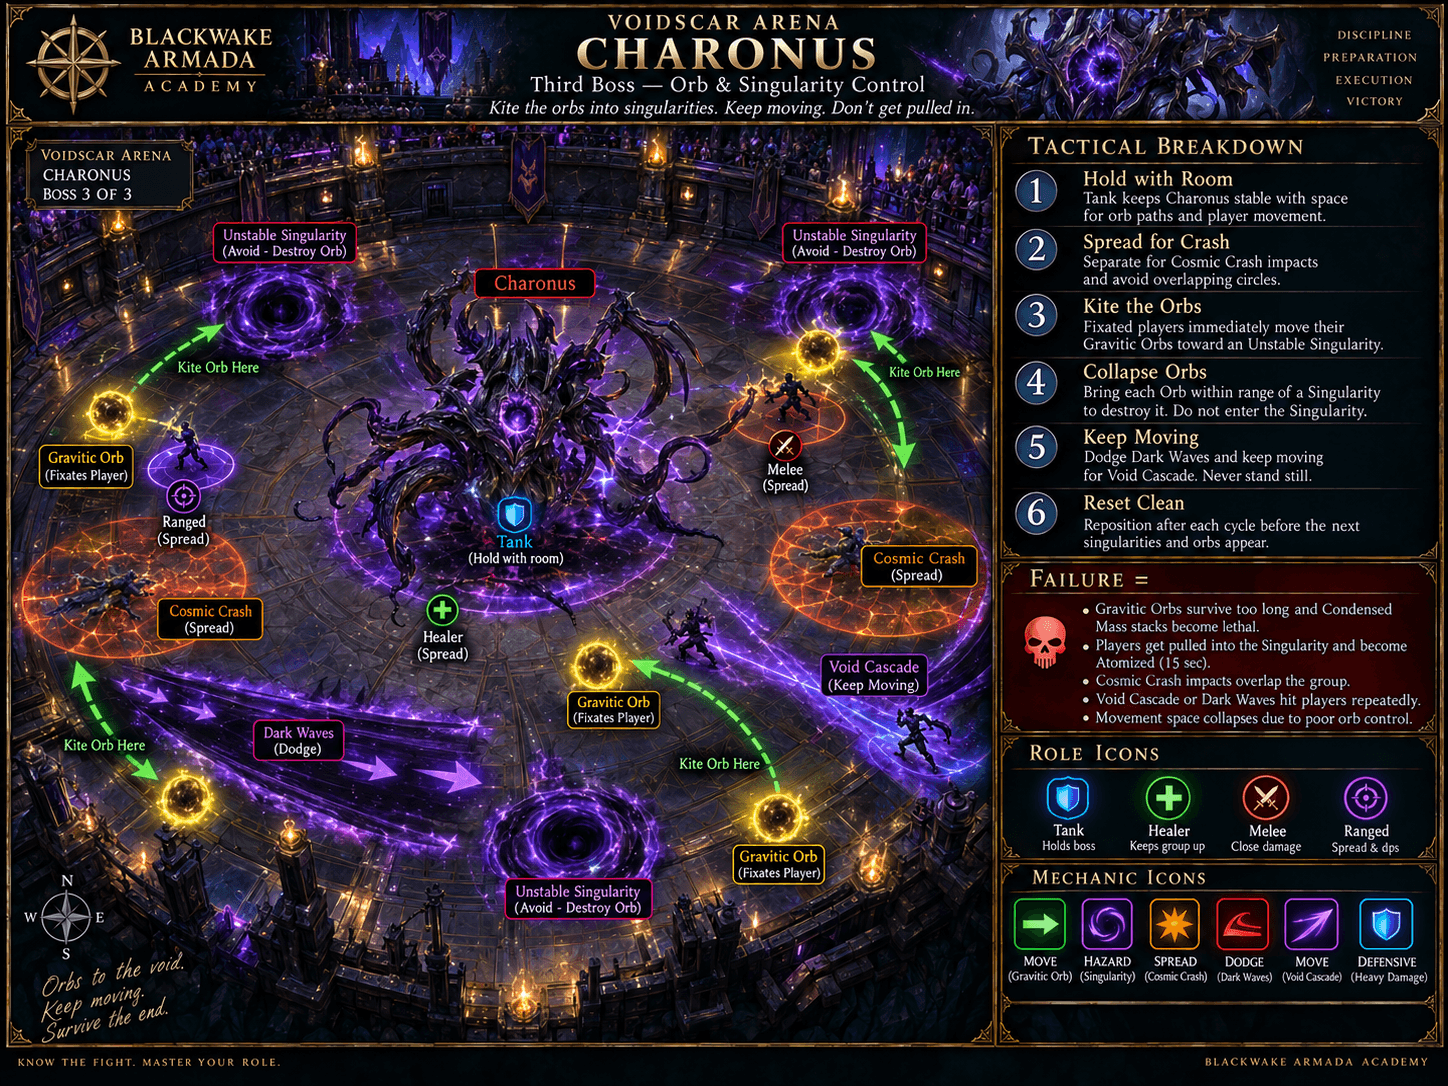
- 1. Spread for Cosmic Crash.
- 2. Point Dark Waves away from the party.
- 3. Kite each Gravitic Orb through a Singularity to destroy both.
- 4. Run away from the boss during Void Cascade.
Tank
- Point Dark Waves away and keep boss paths clear of Singularities.
Healer
- Cover Singularity pulses and orb fixates.
DPS
- Kite Gravitic Orbs into Singularities and spread Crash.
Defensive Timing
- Personal while clearing an orb.
- Movement defensive during Cascade.
Bloodlust / Heroism: Strong final default to reduce orb/singularity cycles.
Common Wipe: Orbs are not cleared, Condensed Mass stacks rise, and players are pulled into overlapping Singularities.
- Unstable Singularity
Dangerous Trash
Only the enemies that meaningfully change the pull.
Dungeon visual · Priority pack
Priority Pulls: Opening Control Set
The first three pulls are separate encounters; this compares their dominant jobs without implying that every enemy is present at once.
- 1Critical
Dominated Brawler
Demoralizing Shout
KICKDEFENSIVEPRIORITY TARGETKick Shout; soothe/control/kite Bloodsurge.
- 2Critical
Brutal Overseer
Brutal Slams
PRIORITY TARGETDEFENSIVEMOVEBreak shield and leave Macestorm.
- 3Critical
Aegyra the Unyielding
Champion’s Spear
PRIORITY TARGETDEFENSIVEMOVEBreak spear and spread quickly.
- Critical
Dominated Brawler
Demoralizing Shout
KICKDEFENSIVEPRIORITY TARGETKickable group damage-reduction debuff plus rising Bloodsurge Tank pressure.
- Kick:
- Interruptible
- Handle:
- Kick Shout; soothe/control/kite Bloodsurge.
- Critical
Brutal Overseer
Brutal Slams
PRIORITY TARGETDEFENSIVEMOVECC-immune shield channel pulses party damage until broken.
- Kick:
- Not kick-interruptible
- Handle:
- Break shield and leave Macestorm.
- Critical
Aegyra the Unyielding
Champion’s Spear
PRIORITY TARGETDEFENSIVEMOVERoots all players before Savage Smash; CC-immune.
- Kick:
- Not kick-interruptible
- Handle:
- Break spear and spread quickly.
- High
Voidtouched Magi
Shadowbolt Volley
KICKPRIORITY TARGETCC-immune caster with must-kick party volley.
- Kick:
- Interruptible
- Handle:
- Kick every Volley and spread Null Eruption.
- High
Killvore Screamer
Mass Shriek
KICKPRIORITY TARGETAoE fear.
- Kick:
- Interruptible
- Handle:
- Assign every cast.
- High
Agitated Voidscythe
Corrosive Essence
DISPELDEFENSIVEPRIORITY TARGETThree Poison debuffs plus Tank bleed; CC-immune.
- Kick:
- Not kick-interruptible
- Handle:
- Assign Poison removal and Tank mitigation.
- High
Devouring Brutalizer
Dreadbellow / Devour
DEFENSIVEPRIORITY TARGETMOVECC-immune AoE/pushback; Devour targets a low-health mob.
- Kick:
- Not kick-interruptible
- Handle:
- Kill Devour target before channel completes.
- High
Voidminder
Mending Void
KICKSTOPHeals a nearby mob.
- Kick:
- Interruptible
- Handle:
- Kick or hard-stop the channel.
Interrupt Priority
Kick when a kick works. Use the named stop when it does not.
Stuns, silences, knockbacks, displacement, and incapacitates are stops, not interchangeable labels for an interrupt. Review Interrupts, Stops, and Crowd Control →
Dungeon visual · Interrupt strip
Second-Screen Interrupt Strip
Priority, action type, spell, and source remain visible without opening details or relying on color alone.
Critical
- KICKMass Shriek
Killvore Screamer
- KICKShadowbolt Volley
Voidtouched Magi
High priority
- KICKDemoralizing Shout
Dominated Brawler
- KICKViolent Sand
Angry Krolusk
- KICKMending Void
Voidminder
Useful
- KICKLava Bolt
Enthralled Shaman
Critical
- KICKCritical
Mass Shriek
Killvore Screamer
AoE fear breaks wave control.
Response: Kick every cast.
- KICKCritical
Shadowbolt Volley
Voidtouched Magi
Heavy party damage.
Response: Assign every cast.
High Priority
- KICKHigh
Demoralizing Shout
Dominated Brawler
Reduces group damage and extends danger.
Response: Kick every cast.
- KICKHigh
Violent Sand
Angry Krolusk
Party damage and movement pressure.
Response: Kick every cast.
- KICKHigh
Mending Void
Voidminder
Heals tough enemies.
Response: Kick or stop.
Useful
- KICKUseful
Lava Bolt
Enthralled Shaman
Random-target damage.
Response: Use spare kicks.
Tank Cheat Sheet
The Tank calls worth reviewing at the ready check.
- Left path reduces caster load but still requires Brawler Bloodsurge control.
- Aim Brutok charge at a wall and step out.
- Magic-dispel Melt Armor only if the healer can; otherwise plan mitigation.
- Do not trigger next arena wave before cooldowns recover.
- Mitigate Shred Defense and Voidscythe bleed.
- Kite Atroxus Creeper before Bite stacks rise.
- Hold Brutalizers away from extra packs during Dreadbellow.
- Point Charonus Dark Waves away.
Healer Cheat Sheet
The Healer calls worth reviewing at the ready check.
- Brutal Slams shield duration determines healing load.
- Champion’s Spear and Smash require rapid recovery.
- Insidious Aura and Thundering Storm need planned cooldowns by route side.
- Poison coverage is critical for Corrosive Essence.
- Atroxus Roar/Creeper is the boss spike.
- Dreadbellow can push players into new waves.
- Singularities pulse for their full duration.
- Call when Tank debuffs exceed dispel coverage.
DPS Cheat Sheet
Mechanics, utility, and priority damage are useful DPS—not only meter output.
- Overseer shields, Magma Totems, Orbs, Creeper, and Devour targets are immediate swaps.
- Kick Shout, Volley, Shriek, Violent Sand, and Mending Void.
- Soothe Bloodsurge/Feral Rage/Bolster where available.
- Wait for the Tank before triggering waves.
- Kite orbs and fixates without scattering packs.
- Use poison/bleed utility by class.
- Burst Creeper over boss damage.
- Kill all three Brutalizers to open Charonus.
Blackwake Route
The recommended sequence, why it works, and where the plan can flex.
Blackwake Learning Route — Endurance Path
Take the left opening for lower interrupt complexity, earn Proof of Endurance, pace arena waves one at a time, use the poison-dispel route toward Atroxus only when coverage exists, and defeat all required Brutalizers before Charonus.
Dungeon visual · Route timeline
Blackwake Route Timeline
A scan-first companion to the detailed pull cards. Pull order, boss transitions, control checks, and planned Bloodlust uses come from the existing route.
- Start · Pull 1
Left-path opener
KICK - Pull 2
Overseer pack
DEFENSIVE - Pull 3
Aegyra
MOVE - Pull 4
Arena waves
PRIORITY TARGET - Pull 5Boss
Taz’Rah
Bloodlust / Heroism - Pull 6
Atroxus approach
KICK - Pull 7Boss
Atroxus
PRIORITY TARGET - Pull 8
Three Brutalizers
DEFENSIVE - Pull 9Boss
Charonus
Bloodlust / Heroism
- Pull 1
Left-path opener
Sethrak, Saberon, Brawler
Purpose: Advance the route with one clearly assigned priority mechanic before chaining forward.
Danger: Shout and Bloodsurge.
Cooldowns: Short stops.
Tank
- Set the pack in safe space and stop moving forward if control is exhausted.
Healer
- Confirm recovery and dispel coverage before the next chain.
DPS
- Priority damage and assigned utility come before broad AoE.
- Pull 2
Overseer pack
Brutal Overseer and allies
Purpose: Advance the route with one clearly assigned priority mechanic before chaining forward.
Danger: Shield and Macestorm.
Cooldowns: Break shield.
Tank
- Set the pack in safe space and stop moving forward if control is exhausted.
Healer
- Confirm recovery and dispel coverage before the next chain.
DPS
- Priority damage and assigned utility come before broad AoE.
- Pull 3
Aegyra
Opening lieutenant
Purpose: Advance the route with one clearly assigned priority mechanic before chaining forward.
Danger: Spear and Smash.
Cooldowns: Defensive plan.
Tank
- Set the pack in safe space and stop moving forward if control is exhausted.
Healer
- Confirm recovery and dispel coverage before the next chain.
DPS
- Priority damage and assigned utility come before broad AoE.
- Pull 4
Arena waves
Tarasek, Chitigoth, Turtle, Brutok
Purpose: Advance the route with one clearly assigned priority mechanic before chaining forward.
Danger: Pace each wave.
Cooldowns: One wave at a time.
Tank
- Set the pack in safe space and stop moving forward if control is exhausted.
Healer
- Confirm recovery and dispel coverage before the next chain.
DPS
- Priority damage and assigned utility come before broad AoE.
- Pull 5Bloodlust / Heroism
Taz’Rah
Boss
Purpose: Advance the route with one clearly assigned priority mechanic before chaining forward.
Danger: Rupture placement and Bloom.
Cooldowns: First Bloodlust.
Tank
- Set the pack in safe space and stop moving forward if control is exhausted.
Healer
- Confirm recovery and dispel coverage before the next chain.
DPS
- Priority damage and assigned utility come before broad AoE.
- Pull 6
Atroxus approach
Screamer and chosen lieutenant
Purpose: Advance the route with one clearly assigned priority mechanic before chaining forward.
Danger: Shriek and Poison/soak path.
Cooldowns: Match utility.
Tank
- Set the pack in safe space and stop moving forward if control is exhausted.
Healer
- Confirm recovery and dispel coverage before the next chain.
DPS
- Priority damage and assigned utility come before broad AoE.
- Pull 7
Atroxus
Boss and Creeper
Purpose: Advance the route with one clearly assigned priority mechanic before chaining forward.
Danger: Immediate add swap.
Cooldowns: Boss defensives.
Tank
- Set the pack in safe space and stop moving forward if control is exhausted.
Healer
- Confirm recovery and dispel coverage before the next chain.
DPS
- Priority damage and assigned utility come before broad AoE.
- Pull 8
Three Brutalizers
Required gate mobs
Purpose: Advance the route with one clearly assigned priority mechanic before chaining forward.
Danger: Dreadbellow and Devour.
Cooldowns: Separate pulls.
Tank
- Set the pack in safe space and stop moving forward if control is exhausted.
Healer
- Confirm recovery and dispel coverage before the next chain.
DPS
- Priority damage and assigned utility come before broad AoE.
- Pull 9Bloodlust / Heroism
Charonus
Boss
Purpose: Advance the route with one clearly assigned priority mechanic before chaining forward.
Danger: Orbs into Singularities.
Cooldowns: Second Bloodlust.
Tank
- Set the pack in safe space and stop moving forward if control is exhausted.
Healer
- Confirm recovery and dispel coverage before the next chain.
DPS
- Priority damage and assigned utility come before broad AoE.
Why This Route Works
- Endurance path lowers kick load
The left branch is easier to teach.
- Waves never overlap by default
Each tough mob receives a complete control plan.
- Atroxus path follows utility
Poison route is chosen only with actual coverage.
- Brutalizers are mandatory
They are treated as three planned checks.
- Boss Bloodlust preserves space
Taz’Rah and Charonus lose dangerous arena cycles.
Bloodlust / Heroism Plan
- Taz’Rah
Shortens accumulating Rupture/Bloom arena pressure.
Alternative: Use on a large but controlled arena wave if the group deliberately plans it.
If timing is lost: If timing is lost, move the use to the next planned boss or dangerous mandatory pull rather than forcing the original script.
- Charonus
Reduces repeated orb and Singularity cycles.
Alternative: Use on Atroxus if Creeper phases are the wall.
If timing is lost: If timing is lost, move the use to the next planned boss or dangerous mandatory pull rather than forcing the original script.
If It Goes Sideways
Recover the pull, adapt the route, and keep the run moving.
Wrong path taken
Continue safely and use the route map to repair count; both paths reach the arena.
Wave activates early
Stop movement, mark the priority caster/shield, and spend control immediately.
Mass Shriek lands
Use fear breaks, regroup, and assign the next cast.
Creeper stacks rise
Tank kites; DPS fully abandon boss until it dies.
Devour begins
Identify and kill the low-health target before returning to Brutalizer.
Charonus orb misses
Kite it to the next Singularity and use freedom/defensive for Mass stacks.
Common Mistakes
Patterns that repeatedly turn manageable moments into lost time.
Arguing path mid-key
Choose before the timer.
Pulling next wave early
Arena pacing is player-controlled.
Padding through Overseer shield
Break it.
Missing Mass Shriek
Assign it.
No Creeper swap
It kills the Tank.
Fighting Brutalizers together
Separate their unavoidable pressure.
Kiting orbs away from Singularities
They destroy each other.
Standing in Dark Waves
Tank points it away.
Before You Run This Key
Reveal each answer when you are ready. No grades, scores, or completion tracking.
Which opening path is Blackwake default?
Which Screamer cast must be kicked?
What ends Brutal Slams?
What is the Atroxus priority?
How are Gravitic Orbs removed?
Where does Blackwake Bloodlust?
Blackwake Notes
Crew-specific calls and hard lessons that supplement the tactical Playbook.
Mythic+ Sessions
Dungeon workshops, role sessions, route workshops, and key nights with the crew.
No Mythic+ sessions are scheduled right now. The Learning Board can still rally a key crew.
Related Academy Content
Fundamentals stay in their own lessons so this page can remain tactical.
- DPSGetting Started
Interrupts: The Button Everyone Should Know
DPS
What interrupting a cast actually does, why it matters more than damage meters, and the mistakes that waste it.
Read the lesson →
Sep 15, 2026
- HealerGetting Started
Dispels Explained
Healer
What can be dispelled, what cannot, and why timing beats reflexes.
Read the lesson →
Sep 18, 2026
- Mythic+Getting Started
Mythic+ Explained
Keystones, timers, scaling, and rating — what Mythic+ actually is before your first key goes in.
Read the lesson →
Sep 18, 2026
- Mythic+Getting Started
Understanding Dungeon Routes
Why routes exist, what enemy percentage means, and how to follow a plan without needing to make one.
Read the lesson →
Sep 18, 2026
- TankIntermediate
Tanking Your First Mythic+
Tank
Routes, enemy count, boss positioning, and talking to your group — the tank's guide to a first timed key.
Read the lesson →
Sep 18, 2026
- HealerIntermediate
Healing Your First Mythic+
Healer
Tank damage, group bursts, mana on a timer, and how to recover when a pull goes sideways.
Read the lesson →
Sep 18, 2026
- DPSIntermediate
DPS in Mythic+
DPS
Priority targets, kicks, cooldown planning, and staying alive — what a damage dealer actually owes a key.
Read the lesson →
Sep 18, 2026
- Mythic+Intermediate
Mythic+ Deaths and Recovery
What deaths actually cost, how to recover a collapsing pull, and how to stop the chain.
Read the lesson →
Sep 18, 2026
- Mythic+Getting Started
Mythic+ Etiquette
Communication, commitment, and keeping keys a place people want to learn — the Blackwake way.
Read the lesson →
Sep 18, 2026
Trusted Resources
Curated references beyond the Blackwake Playbook.
Need a hand?
Ask the Crew
Working through Voidscar Arena? Ask for a route review, role help, or a learning run.